daver2
10k Member
It'll possibly be an earth loop.
I won't suggest removing the safety earth from the oscilloscope though") !
!
Dave
I won't suggest removing the safety earth from the oscilloscope though
!Dave
! ) and hasn't crashed once.
Where did you read this? I have always found the A1 to be very stable.What's interesting after all I have read about the A1 being a very marginal design and is prone to crashing, it seems to work really well (well within its big and obvious limitations
Applefritter and stories of Lisa Loop's experiences with them.Where did you read this? I have always found the A1 to be very stable.

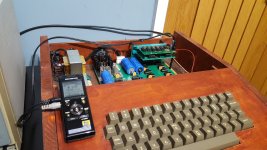
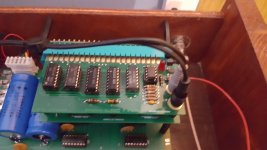
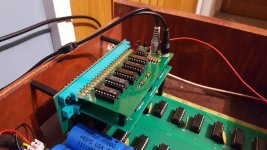
A late reply perhaps, but I also think building a Briel Replica 1 is a very reasonable way to go nowadays. I am very fond of mine. I have it working with USB to Serial input (the slowest way to input programs aside from typing them), a P-LAB Apple 1 micro-SD storage card (which has a very functional command line), and now Uncle Bernie's improved Gen 2 cassette interface. (I don't use a bus extender, only one card at a time).That's the route taken by most not-trying-to-be-original Apple I clones, including the Briel Computers Replica-1 circa 2003-ish, which makes it maybe the first "modern" Apple I clone?
Honestly, considering the way the Apple-1 treats its video circuitry I'd consider it a reasonable route to take because, as you note, unwinding the original design to use SRAM instead of those shift registers results in a pretty silly mess. An Apple I with memory mapped video is pretty close to a Commodore PET, so you might as well just make a PET replica.
(Actually this has me thinking, are the schematics for the Sphere-1 out there in the wild? It was a 6800-based machine that predated the Apple-1 that had memory-mapped video, it might be an interesting replication target.)
It can be very dependent on what you're running. With my Obtronix clone, I ported an updated figForth to use the CFFA1 and it would randomly run off into the weeds. Not until I added extra decoupling caps to the DRAM chips (underneath the PCB so as not to detract from the aesthetics) did it finally run stably.Applefritter and stories of Lisa Loop's experiences with them.
Mine certainly appears to be stable.
One thing that *could* have been done with the Briel version was to improve the terminal section to actually do useful things like X,Y cursor addressing, screen clears, backspace, etc. IIRC, Vince actually implemented some extra terminal functionality in the Propeller code in his second generation design but was removed for production because it was incompatible with some of the test programs that wrote all 256 values to the terminal. The extra control codes messed with the display making it not 100% compatible with the Apple 1. Too bad.A late reply perhaps, but I also think building a Briel Replica 1 is a very reasonable way to go nowadays. I am very fond of mine. I have it working with USB to Serial input (the slowest way to input programs aside from typing them), a P-LAB Apple 1 micro-SD storage card (which has a very functional command line), and now Uncle Bernie's improved Gen 2 cassette interface. (I don't use a bus extender, only one card at a time).
If you actually want to use the thing, the Briel replica 1 plus is a fun functional build that can be done in a couple of hours for an experienced builder. The expansion slot is proving to be quite compatible (lacking -12v but there is an input pad by the slot, and the new ACI doesn't need -12v anyway).
I admire those who have the desire to stick to 100 percent original circuitry, but I am having plenty of fun with the Briel. Some of the builds here are absolutely beautiful though.
I hope you ordered extras to resell.First of the big blues turned up today.
View attachment 1243693
Brand new, made to order. Daftly expensive. (£18 !) and mouser expect you to pay for delivery !

Hey, I think it's great.Its still a crap machine, but its my crap machine and its fun.
Same, M2 and M3. When I started building a bunch of Apple II stuff and some Briel Replicas earlier this year I stocked up on assortment kits like that.Got a kit of nice standoff's on Amazon of all places.
| Mouser No: | Mfr. No: | Desc.: | Customer No | Order Qty. |
| 553-F-31X | F-31X | Power Transformers Power Transformers POWER XFMR 10.0Vct@3.0A 115V CHASSIS MOUNT w/LEADS | 1 | |
| 553-F40X | F-40X | Power Transformers Power Transformers POWER XFMR 26.8Vct@1.0A 115V CHASSIS MOUNT w/LEADS | 1 | |
| 75-39D538G015JP6 | 39D538G015JP6 | Aluminium Electrolytic Capacitors - Axial Leaded Aluminium Electrolytic Capacitors - Axial Leaded 5300UF 15V | 0 | |
| 75-39D248G025JL6 | 39D248G025JL6 | Aluminium Electrolytic Capacitors - Axial Leaded Aluminium Electrolytic Capacitors - Axial Leaded 2400uF 25volts | 0 | |
| 567-680-125A | 680-125A | Heat Sinks Heat Sinks Maximum Efficiency, Omnidirectional Heat Sink for TO-3, 31.8mm Height | 1 | |
| 649-DILB8P223TLF | DILB8P-223TLF | IC & Component Sockets IC & Component Sockets 8P IC SOCKET | 1 | |
| 649-DILB16P-223TLF | DILB16P-223TLF | IC & Component Sockets IC & Component Sockets 16P SOCKET | 42 | |
| 649-DILB14P-223TLF | DILB14P-223TLF | IC & Component Sockets IC & Component Sockets 14P DIP SOCKET | 12 | |
| 649-DILB24P-224TLF | DILB24P-224TLF | IC & Component Sockets IC & Component Sockets 24 POS DIP SOCKET | 2 | |
| 649-DILB40P223TLF | DILB40P-223TLF | IC & Component Sockets IC & Component Sockets 40P DIP SOCKET STAMPED AND FORMED | 2 | |
| 562-703W-00/53 | 703W-00/53 | AC Power Entry Modules AC Power Entry Modules PCB Mount 7mm | 1 | |
| 712-CONBNC004 | CONBNC004 | RF Connectors / Coaxial Connectors RF Connectors / Coaxial Connectors BNC Connector Jack, Female Socket 50 Ohm Bulkhead Mount, Solder Pot | 1 | |
| 611-CN202J3RS215Q7 | CN202J3RS215Q7 | Rocker Switches Rocker Switches DPST 16A ON-OFF RED | 1 | |
| 661-ELBK250E532AM20S | ELBK250ELL532AM20S | Aluminium Electrolytic Capacitors - Radial Leaded Aluminium Electrolytic Capacitors - Radial Leaded 25V 5300uF +30% Tol. AEC-Q200 | 1 | |
| 661-ELBK350E252AL20S | ELBK350ELL252AL20S | Aluminium Electrolytic Capacitors - Radial Leaded Aluminium Electrolytic Capacitors - Radial Leaded 35V 2500uF +30% Tol. AEC-Q200 | 2 |