• Please review our updated Terms and Rules here

Gotek adapter for Full Height Drives (5.25")

cj7hawk

Veteran Member
Joined
Jan 25, 2022
Messages
1,117
Location
Perth, Western Australia.
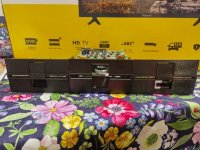
Hi all, Thought I'd share this one - I made it for my Osborne 1 but as it's a full faceplate, it would fit any Full Height restoration.
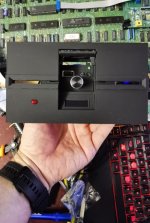

IMG_20230311_195302 (Small).jpg

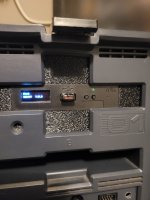
The front closes just like it should and hides the USB slot and the knob, just leaving the display down the bottom visible. I think this may be a first... The latch is biased and will spring up and snap shut with an elastic band driving it, although could also be fitted with a spring. It's pretty close to the correct dimensions of the Siemens frame ( within a few tenths of a millimeter ) so should match existing drives.


If anyone knows how to get the mottled drive finish with 3D printed drives, please let me know :) Otherwise I think it looks pretty good :)
 
Looks good. You might try some "hammered" paint to get a texture.
 
Looks good. You might try some "hammered" paint to get a texture.
That's quite the interesting idea. Unfortunately hammered paint doesn't seem to come in black and they don't stock it online locally online in any event, but I'll check at the hardware store next I'm there and will see if there's a base color I can use then repaint in black once the texture is there.

Matt black works really well on printed drive adapters, but is only flat, while the full height drives I have seen seem to have a mottled texture that is good for hiding marks.
 
Rustoleum 300607 is matte black hammered paint. You could also try Rustoleum 7220830 (textured), Krylon K02776007 (textured), or VHT SP201 (wrinkle finish).
 
Use a generous amount of straight (not thinned) black acrylic (waterbased) paint. Dab it on with a cloth around your finger.
 
Rustoleum don't seem to sell them around here... They don't ship here at all :( Best I can do is visit the hardware shop and hope they have something similar. It's really annoying when everything I find on Amazon shows good pricing and free delivery, then Amazon get to the invoice and say they don't ship to my area... Amazon have some of the worst customer interfaces around :(

The dabbing method sounds interesting... And I'm also wondering if I could just stick it in a small tin filled with ballbearing and shake it around too...

I might just hang back on trying to make it look identical for the time being and wait until I can find a paint shop that might have a good range... And I'm waiting on another Osborne to ship from the States, so I'll install it in that since it seems like it might be in nice condition, and it probably won't be so easy to notice it's 3D printed behind the Osborne Bezel.

David
 
The problem that no one will ship is the contents are extremely flammable. I had the same problem trying to get Hammertone for my Super-80. Found Septone Hammer Finish Black from Supercheap Auto worked well.
 
IMG_20230313_192350 (Small).jpg
Side by side. Coverage could have been better. Maybe extra coats. Will try more coats tomorrow.

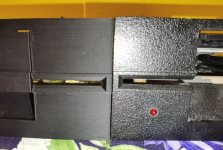
IMG_20230313_192312 (Small).jpg

Uncoated on left ( from the above pic - close up ).

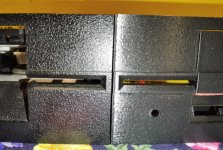
IMG_20230313_192320 (Small).jpg
Coated on right... A little bit overglossy, and the texture is all wrong.... Not gritty enough, but, well, it looks OK. And it does resist scratching - and zero prep - I just lightly sprayed the front once at let it dry.

I'm in two minds about this - but for what the objective was, it looks OK I think - What are the opinions?

David
 
It's a much closer match than the unpainted. If you increase the spray distance, you should get a rougher texture and less gloss.
 
I agree, I think you did a fine job; not that there is never room to learn, but it looks really good!
 
You could try the "fuzzy skin" option in your slicer and play with the parameters to get it the way you like it. I use PrusaSlicer and got some nice results with it.
 
Thanks Yoghoo - I don't have that option on my slicer - I might be able to generate it as a surface and print as such though, so I'll give that some though. Though the paint method isn't too bad - and it reduces post-painting marking when handling the drive too - if I want it any grittier, I could probably cover the surface with a light sticky coat of epoxy, then "sprinkle" some sand on it and then paint it, but generally, the texture of the paint Chickenman recommended turned out to be pretty OK - and it's not like I need it to be a counterfeit quality replacement for the existing drive.
 
Hi @Gary C ,

Chickenman already recommended a textured paint that was black to begin with, and was obtainable from a local shop.... Cost $22 or so from memory, but turned out to be a good paint.

However I was thinking to do that - find a different one and spray it black, though it's a shame to go black -anothercolor - black in the process. The once Chickenman recommended was actually suitable with a single coat also.

So it seems that black textured paints are directly available and reasonably inexpensive on 3D printed panels without any other prep-work or planning -

I was hoping the texture would have been a little closer to the drive face texture, but realistically, that would have been like expecting to win the lottery - as it was is good enough, and should be OK when reassembled, although I have left my O1 board outside of the case for the moment so that I can work on the 80 column adapter.

David
 
Back
Top