• Please review our updated Terms and Rules here

MicroPDP Help

w2hx

Experienced Member
Joined
Aug 20, 2014
Messages
84
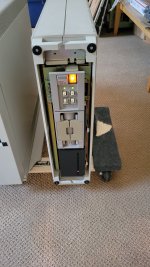
Hi all, DEC newbie here. I acquired this MicroPDP a few years back (don't recall exactly where or how). 0331181737a.jpg
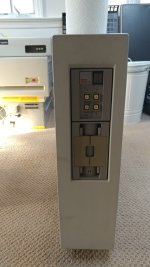


20240312_181847.jpg


Here are the boards...
M8639, M8067, M8189
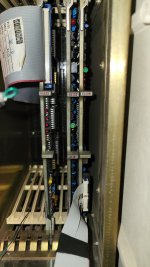
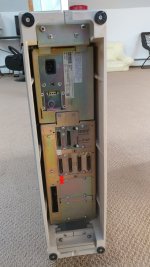
20240313_193930.jpg

the rear...

0331181738.jpg

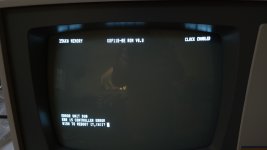
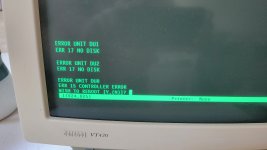
When I turn it on, it tries to boot


20240312_182034.jpg

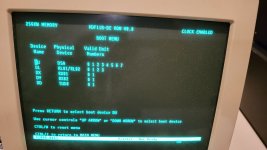
I can also get into a menu...

20240312_200911.jpg

But booting from DU0 never works. I do see the activity light on the drive turn on and off during this.

So? Do we think the drive is bad? Or should I be trying to boot from some other device or something?
I am planning to bring this to VCF consignment, but would love to see if I can get it to go further than this.

thanks in advance (and I hope these images aren't too big).

73 Eugene W2HX
 
I should mention too, that all 4 leds on the controller card go off after briefly being all on. I believe this means that the controller has passed the self-test.
 
Well, you haven't got an RL01/02 attached attached, so you can't boot from that.

The dual floppy drive is an RX50...

The TU58 should hang off one of the DL11 serial ports, and you could use an emulator on a PC or Pi for that.

If memory serves me correctly, the buttons on the front (especially the READY button) should control the hard disk. Does the READY button illuminate green? Have you tried pressing the READY button and then attempting to boot from the device.

I will check the card types out after I have done the washing up...

Is that a gap I see in the backplane? This may be significant (depending upon the backplane type). Do NOT shuffle the cards around though. You could do damage...

Dave
 
Yes, I see the buttons are identified as fixed disk 0 on one of your earlier photographs - so you need the READY light illuminated before it will boot.

The blank QBUS slot could prevent booting. Someone could have removed a card and left a hole in the bus. We need to know which slots are AB/AB slots and which are AB/CD slots.

Can you find out what backplane is installed in the machine?

Dave
 
M8639 is probably an RQDX1 (could it be an RQDX2?). You need XXDP diagnostics system on RX50 diskettes so you can try to boot them. I know where to find XXDP, but how do you get it onto RX50 media so you can boot it?

As far as I know all BA23 boxen came with the same backplane (first 3 slots AB/CD then the rest AB/AB). So the empty slot is a problem (hint: move the CPU and RAM down to fill the gap).
 
Last edited:
M8189 = 11/23+, bootstrap, line clock, 2 serial ports.

M8067 = Memory.

M8639 = RDRX disk controller.

Agreed, blank slot is a problem.

My guess would be that there was a dual-height DLV11-J serial card in the blank slot at some point connected to the quad serial bulkhead on the rear panel, but it has been removed.

Dave
 
Ok! Great information! So @Uniballer suggests I move the CPU and memory to the LEFT, is that right? So that will move the gap from between slot 3 to slot 1 (where slot 1= right most board), correct? Regarding the ready light, should I boot to the ODT to give me a chance to get the ready light on? Otherwise, it just goes straight into boot before I would have a chance to set the ready light? Confirmation of the board moves would be huge and then I'll go and try it!
BTW: forgive my vast ignorance on this...what exactly causes the problem of the blank slot #3? Is this where a "grant continuity" board would be used? thanks
 
Press the HALT button to enter ODT.

Yes, the blank slot disturbs the interrupt and DMA chains.

My brain is a little fuzzy as to whether the green ready lamp illuminates with the button pressed or released in conjunction with the disk status itself.

Dave
 
ok folks. I moved the CPU and memory cards to eliminate the empty slot. Things are definitely different now, but still no joy. First, neither position of the READY button (in or out) illuminates that button. However, I now get a different error message. It now looks to be trying to boot from DU1, DU2 and DU0. Whereas before, it did not try those other units.


after moving cpu and memory to close empty slot 3.jpg


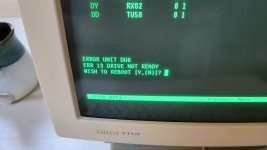
and, when I try to boot using the menu I get this:


20240321_172550.jpg


I think it is very interesting that it is now it says "Drive Not Ready" and I can't get the ready light to illuminate. Something tells me if I can solve this last bit, I might be able to boot. Last thing I'll mention. While trying to boot, the ready light DOES go on very momentarily. Probably less than 1 second and then extinguishes.
So! Any ideas about how to get this READY light to go on?

thanks again! I feel we're getting closer!
 
Just our of interest, when you try to boot from DU1 or DU2 do any of the floppy disk lights illuminate?

Dave
 
hmm. Are DU1 and 2 the floppy drives? I thought they were just other (non-existent) hard drives? Or maybe they are all DU units? To answer you question, I've tried booting DU0 through DU4 and the floppies never show any activity (or sound like there is any activity). Also, I made a little video showing that the READY light does show some activity during the attempt to boot. Only when the ready button is OUT. There is no activity on that light when the button is IN.
 
The RX50 floppies are DU devices (if my brain doesn't deceive me).

RX01/RX02 drives are big and heavy 8" jobs with a special controller.

Dave
 
The only other thing I can think of is to look at the cabling in the drive section of the chassis and see where all of the cables are plugged into.

Do not adjust anything though. Damage can occur if you plug things into the wrong place...

Dave
 
Now that you fixed the broken grant chain the boot firmware can tell that the disk controller can issue IRQs and perform DMA in/out of RAM (part of the MSCP protocol). So it actually tries to boot instead of giving up because the controller didn't respond.

If you had an XXDP floppy then you could try to boot from it and run diagnostics to see what the controller thinks (of course, if your RX50 is too dirty, or broken, then it won't work).

What hard disk is installed? A lot of those early MicroPDP-11 boxen had RD52 (e.g. Qume Q-540). 30ish MB isn't a lot but it is enough to run RT11 or RSX.
 
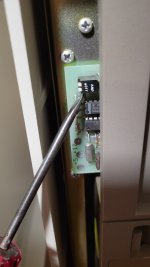
ok folks! good news! I got it to boot! I tried to check the cables, but I didn't get far because they aren't visible from the back (except the big ribbon cable which was ok at the rear) and I couldn't pull out the drives to see if they were connected (presumably because they were connected!). I then compared it to my MicroVAX sitting next to it, and I noticed there are two tiny dip switches right on the board behind the front panel switches...


20240321_195240.jpg

both switches were UP. But my MicroVAX had one switch up and one switch down. So I tried that, but that didnt work. For kicks, I reversed the UP/DOWN positions and when I turned it on, all of a sudden I could hear something was different. The hard disk was definitely spinning up now and it didn't make that sounds before!

Here is a video of what happened when it booted!

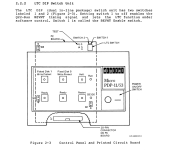
So...what are those two little dip switches for? Anyone know? One thing I noticed was that the CLOCK DISABLED message appears now, whereas before, it showed CLOCK ENABLED. Could the dip switches have disabled the clock? and could the clock have been impeding the drive/controller from starting up?

Thanks to everyone's help! It takes a village!
73 Eugene W2HX
 
For completeness:
Setting switch 2 (Restart/Enable) to ON allows the front control panel Restart
switch to function as described in Table 1-2. Setting the Restart/Enable switch to
OFF disables the front control panel Restart switch.
 
Well done!

In order to gain access to the drive wiring you have to completely remove the chassis from the case (by unscrewing a couple of retainers and sliding the whole thing out).

There is then a cover that you can remove to gain access.

There is also a cover for the QBUS cards.

If I am doing maintenence work, I slide the chassis out and remove the QBUS card cover anyhow. It is MUCH easier than playing around from the rear!

Dave
 
In order to gain access to the drive wiring you have to completely remove the chassis from the case (by unscrewing a couple of retainers and sliding the whole thing out).
Had to do that to install my Qprobe 2023 into my BA23. DEC certainly didn't make it easy to do stuff quickly inside the enclosure.
 
Back
Top