• Please review our updated Terms and Rules here

Blinken Lights needed for IBM 1401 Control Panel re-animation

fat265

Member
Joined
Dec 28, 2019
Messages
18
Location
Melbourne Australia
Hi Guys

I have recently acquired a IBM 1401 control panel ( well it is on its way from USA to Australia )
Thanks to a special person in the USA that helped to make this happen :)

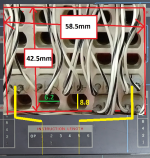
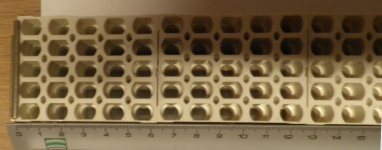
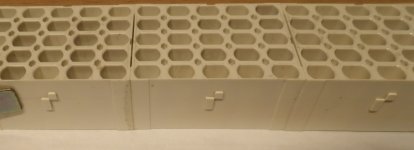
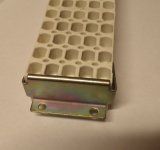
I need the honeycomb and lights that are missing from the panel.
I see the IBM 1130 uses the same lights and honeycomb and a person called Carl replaced his lights with LED's according to a youtube video I found.

Maybe this Carl doesn't want these lights ( or someone else can help )

Picture below / attached showing what I need.

My Ultimate goal is to have the panel working connected to a Pi running SIM-H emulating the 1401 ( not just flashing lights )

1401-PANEL-RESTORATION.png
 
The lights fixtures 'honeycomb' doesn't look too complicated to 3D print, until you find an original one. If you get some accurate measurements I could give it a go doing the CAD and model for you if you like. I'm also in Oz. A long time ago my dad fixed a 1401 fan with aluminium shroud to blow air through a 35mm film drying cabinet.
 
The lights fixtures 'honeycomb' doesn't look too complicated to 3D print, until you find an original one. If you get some accurate measurements I could give it a go doing the CAD and model for you if you like. I'm also in Oz. A long time ago my dad fixed a 1401 fan with aluminium shroud to blow air through a 35mm film drying cabinet.
Thanks. If I had a original honeycomb 3D printing would definitely be a great option.

My Dad operated the IBM 1401 at the State Savings Bank of Victoria ( now known as the Commonwealth Bank ) many years ago

Apparently it was one of the very few purchased not rented from IBM
No idea where it ended up. I don't know of any still existing is Victoria Australia

Only ones I know of are ACMS NSW and Powerhouse museum also in Sydney NSW
 
Hi,

I have 'honeycomb' that are used in the IBM S/3.
Any idea what the outer dimensions of a block of 5x5 lambs is ?
Or the distance between two lamps horizontal or vertical ?
(pref in mm)
 
Hi,

I have 'honeycomb' that are used in the IBM S/3.
Any idea what the outer dimensions of a block of 5x5 lambs is ?
Or the distance between two lamps horizontal or vertical ?
(pref in mm)
based on the attached image. I measured the center of instruction length 1 to 5 on my panel then I used a image i found online of the actual honeycomb 5*5 block and resized my image to match pixels per mm ( this is as close as I can get )
I also compared other known dimensions of my panel with other pictures online..

I assume also the same as the 1130 but only guessing..
 

Attachments

  • dimensions1401.png
    dimensions1401.png
    484.5 KB · Views: 9
Hi,
See pic's. I think they are the same. I have 1 strip of 4 blocks glued together.
If interested please contact my priv. See contact email on my website www.ibmsystem3.nl

Regards
 

Attachments

  • PB080255.JPG
    PB080255.JPG
    1.7 MB · Views: 7
  • PB080256.JPG
    PB080256.JPG
    1.9 MB · Views: 6
  • PB080257.JPG
    PB080257.JPG
    2 MB · Views: 7
I had a go at a CAD model as mentioned, using OpenSCAD. The height and width dimensions in the dimensions1401 image are swapped around. I set these to close imperial equivalents apart from the central hole.
If you can get some original measurements sometime, plug them in to the variables in uppercase in the script below.
IBM_1401_lamp_insert_block.pngIBM_1401_lamp_insert_block_cutaway.png

Script to generate the above follows, cut and paste into OpenSCAD then press F5 to preview, F6 to render then F7 to save STL model (see https://openscad.org/)


Code:
// Lookalike IBM 1401 lamp insert block
// Measurements are approximate. Side recesses and locating piece omitted for brevity.
// Adjust parameters to suit when exact measurements are taken with a digital caliper
// This OpenSCAD script last updated 20231110 Steve M

FACETS = 213;
$fn = FACETS;

INCH = 25.4;

LAMPS_WIDE = 5;
LAMPS_HIGH = 5;

LAMP_BASE_DIA = 11/32 * INCH;
LAMP_BASE_AF = 1/4 * INCH;
LAMP_BASE_DEPTH = 1/4 * INCH;
LAMP_HOLE_DIA = 6;
CHAMFER = 1/64 * INCH;

INTERSPACING_WIDE = 3/32 * INCH;
INTERSPACING_HIGH = 1/16 * INCH;

SOCKET_WIDE = LAMP_BASE_DIA + INTERSPACING_WIDE;
SOCKET_HIGH = LAMP_BASE_AF + INTERSPACING_HIGH;

PLATE_THICK = 3/4 * INCH;

// Individual component tests
//LampRecess();
//Baseplate();
//LampRecessBlock();
//LampArray();
//HexHole();
//HexHoleArray();
//Cutaway();

// The model proper
LampArrayWithHexHoles();

// The final model
module LampArrayWithHexHoles()
{
    difference()
    {
        LampArray();
        HexHoleArray();
    }
}

// Demo cross section showing recess profiles
module Cutaway()
{
    difference()
    {
        LampArray();
        rotate([0,0,-35])
            cube([999,999,999]);
    }
}

module LampArray()
{
    for (w = [0:LAMPS_WIDE - 1])
        for (h = [0:LAMPS_HIGH - 1])
            translate([h * SOCKET_HIGH, w * SOCKET_WIDE, 0])
                LampRecessBlock();
}

module LampRecessBlock()
{
    difference()
    {
        cube([SOCKET_HIGH, SOCKET_WIDE, PLATE_THICK]);
        translate([LAMP_BASE_AF /2 + INTERSPACING_HIGH/2 , LAMP_BASE_DIA/2 + INTERSPACING_WIDE/2, 0])
            LampRecess();
    }
}

module LampRecess()
{
    difference()
    {
        union()
        {
            cylinder(d=LAMP_HOLE_DIA, PLATE_THICK);
            cylinder(d=LAMP_BASE_DIA, LAMP_BASE_DEPTH);
            cylinder(d1=LAMP_BASE_DIA + CHAMFER, d2=LAMP_BASE_DIA, h=CHAMFER);
        };
        Chamfers();
    }
}

module Chamfers()
{
    ChamferOneSide();
    rotate([0,0,180])
        ChamferOneSide();
}

module ChamferOneSide()
{
        translate([LAMP_BASE_AF/2, -20, CHAMFER])
            cube([20,40,20]);
        translate([LAMP_BASE_AF/2, -20, CHAMFER])
            rotate([0,45,0])
                cube([CHAMFER * 20, 40, CHAMFER*20]);
}

// The elongated hexagonal holes between the lamp recesses
module HexHoleArray()
{
    for (w = [1:LAMPS_WIDE - 1])
        for (h = [1:LAMPS_HIGH - 1])
            translate([h * SOCKET_HIGH, w * SOCKET_WIDE, 0])
                HexHole();
}

module HexHole()
{
    scale([1.4, 1, 1])
        cylinder(d=INTERSPACING_HIGH,h=PLATE_THICK, $fn=6);
}
 
Last edited:
I had a go at a CAD model as mentioned, using OpenSCAD. The height and width dimensions in the dimensions1401 image are swapped around. I set these to close imperial equivalents apart from the central hole.
If you can get some original measurements sometime, plug them in to the variables in uppercase in the script below.
View attachment 1267697View attachment 1267698

Script to generate the above follows, cut and paste into OpenSCAD then press F5 to preview, F6 to render then F7 to save STL model (see https://openscad.org/)


Code:
// Lookalike IBM 1401 lamp insert block
// Measurements are approximate. Side recesses and locating piece omitted for brevity.
// Adjust parameters to suit when exact measurements are taken with a digital caliper
// This OpenSCAD script last updated 20231110 Steve M

FACETS = 213;
$fn = FACETS;

INCH = 25.4;

LAMPS_WIDE = 5;
LAMPS_HIGH = 5;

LAMP_BASE_DIA = 11/32 * INCH;
LAMP_BASE_AF = 1/4 * INCH;
LAMP_BASE_DEPTH = 1/4 * INCH;
LAMP_HOLE_DIA = 6;
CHAMFER = 1/64 * INCH;

INTERSPACING_WIDE = 3/32 * INCH;
INTERSPACING_HIGH = 1/16 * INCH;

SOCKET_WIDE = LAMP_BASE_DIA + INTERSPACING_WIDE;
SOCKET_HIGH = LAMP_BASE_AF + INTERSPACING_HIGH;

PLATE_THICK = 3/4 * INCH;

// Individual component tests
//LampRecess();
//Baseplate();
//LampRecessBlock();
//LampArray();
//HexHole();
//HexHoleArray();
//Cutaway();

// The model proper
LampArrayWithHexHoles();

// The final model
module LampArrayWithHexHoles()
{
    difference()
    {
        LampArray();
        HexHoleArray();
    }
}

// Demo cross section showing recess profiles
module Cutaway()
{
    difference()
    {
        LampArray();
        rotate([0,0,-35])
            cube([999,999,999]);
    }
}

module LampArray()
{
    for (w = [0:LAMPS_WIDE - 1])
        for (h = [0:LAMPS_HIGH - 1])
            translate([h * SOCKET_HIGH, w * SOCKET_WIDE, 0])
                LampRecessBlock();
}

module LampRecessBlock()
{
    difference()
    {
        cube([SOCKET_HIGH, SOCKET_WIDE, PLATE_THICK]);
        translate([LAMP_BASE_AF /2 + INTERSPACING_HIGH/2 , LAMP_BASE_DIA/2 + INTERSPACING_WIDE/2, 0])
            LampRecess();
    }
}

module LampRecess()
{
    difference()
    {
        union()
        {
            cylinder(d=LAMP_HOLE_DIA, PLATE_THICK);
            cylinder(d=LAMP_BASE_DIA, LAMP_BASE_DEPTH);
            cylinder(d1=LAMP_BASE_DIA + CHAMFER, d2=LAMP_BASE_DIA, h=CHAMFER);
        };
        Chamfers();
    }
}

module Chamfers()
{
    ChamferOneSide();
    rotate([0,0,180])
        ChamferOneSide();
}

module ChamferOneSide()
{
        translate([LAMP_BASE_AF/2, -20, CHAMFER])
            cube([20,40,20]);
        translate([LAMP_BASE_AF/2, -20, CHAMFER])
            rotate([0,45,0])
                cube([CHAMFER * 20, 40, CHAMFER*20]);
}

// The elongated hexagonal holes between the lamp recesses
module HexHoleArray()
{
    for (w = [1:LAMPS_WIDE - 1])
        for (h = [1:LAMPS_HIGH - 1])
            translate([h * SOCKET_HIGH, w * SOCKET_WIDE, 0])
                HexHole();
}

module HexHole()
{
    scale([1.4, 1, 1])
        cylinder(d=INTERSPACING_HIGH,h=PLATE_THICK, $fn=6);
}
WOW This is amazing.. thanks. the 3D printer may get a workout soon
 
Back
Top