• Please review our updated Terms and Rules here

Repairing aging plastics

DeltaDon

Veteran Member
Joined
Oct 26, 2016
Messages
884
Location
Dutchess County, New York, USA
Many of us have been seeking a solution to broken, cracked or missing plastics on vintage computes. I've tried epoxy, various glues and solvents to fix cracked plastics on laptop lids and other plastic parts. None have been a great success, IMHO. After tripping over the need to replace a missing ring of plastic forming one half of a hinge on a 5.25" floppy disk case, I had one of those light bulb moments. I dug out a 3D plastic pen tool that melts 1.75mm plastic filament (same as used with 3D printers) and formed a new raised ring of plastics and put the hinge back into service fixing the case. So then I thought why not try the pen on some scrap laptop lids and see what you can and can't fix. First I tried fixing a threaded metal insert used to locate LCD in the lid. I used a bit of crazy glue to put the bigger pieces of broken plastics back around the insert and then used the pen to extrude some supporting plastic (PLA) around the original plastic. I surrounded it with new plastic and let it cool. Meanwhile, I noticed a couple of more of the plastic standoffs were completely missing on this test piece. So I mounted up a new column of plastic of about the correct height just to see if it would stick well enough to support the LCD and maybe be drilled into to insert a new insert. I did two of these columns. Finally the hinge areas were broken off plus an area near where the latch should be was missing too. So could I fill in the missing plastics to form the basis to sand or file later on to recreate the correct appearance. Yes, it worked. The plastics bonded with the old plastic. Now I'm not an experienced model maker at all. The plastics wasn't beautiful like a molded piece. It is rough and will need work. The two columns were now cool and I wacked one with the handle of a screwdriver. It did not break off, so I grabbed some needle nose pliers and twisted, still didn't break off. The insert in my first repair is firmly locked in the plastics. The areas I filled in stuck to the old plastic and could be worked to match the original shape if so desired. I don't plan on doing more to the scrap piece, just wanted to see if the 3D plastic pen and some filament could be a useful tool for repairing plastics when there's no new pieces available. This isn't going to make new lid plastics or keytops, but for repairs to existing plastics, I think others should give it a try.

For completely new parts, such as drive face plates, perhaps some designers could come up with STL files for certain drives.
 
That sounds very promising! Now I'm just curious whether the repaired parts would hold under the stress of opening and closing a hinge... Hmm.
If that actually works as well as or better than epoxy, It sounds like it could be very useful in cases where laptop housings stress crack around the hinges. That way, you could do a far better color match to original plastics when adding material to reinforce it, so it wouldn't end up looking as ugly.

How expensive are these things?
 
Many years ago I had a flat piece of plastic that had broken on me and it was obvious that glue would not give it the strength that it would need. A person that I knew at the time had a single wire heating element that could apply heat in a fairly focused area and with careful positioning of the plastic was able to "melt" the two halves back together. That repair lasted the life of whatever device it was used on. I can't remember the details of the device, but I never forgot how effective that little heater was able to repair plastic.
 
For completely new parts, such as drive face plates, perhaps some designers could come up with STL files for certain drives.

I do a lot of 3D design, some of it professional, and have hundreds of models, many one-offs to solve a particular problem.

Making faceplates is not an issue, but getting accurate dimensions is an absolute requirement... And accurate tolerances... And sometimes the new part needs to be modified to work properly. A task I did last week had very tight tolerances, and while it seems initially to be a simple replacement of an actuator, the new actuator couldn't twist like the old one did and was rigid when mounted, so I have to completely redesign both ends where it attached also, with some weird angles so that things twisted correctly when the actuator moved.

The biggest issue I find is getting hold of original parts, either the broken part, or the part it attaches to... But if you examine the Gotek full height plate I made for the Osborne, you'll find the fascia is closely based on the original, enough that the file could be modified. Generally, making a new FDD face plate means having both the broken part, and also having the drive to make sure clips align correctly since 3D printers also have their own tolerance limits.

I recently repaired the flap hinge for a Kaypro II where the hinge was broken and the drive latch was floating. It looks quite different to the original hinge when finished, but wasn't apparent when it was installed so now the drive works fine and the disk can be latched.

There's a lot you can do with 3D printing, but making a good part is hard and time consuming, and there's no place to store files for that... In fact, I'm not even sure how often parts like latch hinges are required.

And then the other problem is that the person who wants the part needs to have a printer or access to one.

Methyl Ethyl Ketone ( MEK ) is used very commonly to repair plastic. It melts the plastic and you can bond it back together like new in many cases. It dries quickly too, but if the solvents in the plastic have leeched out, the plastic will still be brittle and repairing it is only a temporary measure.

Hot air from a PCB repair kit is also useful, since you can weld with the plastic, and there are soldering iron tips made for the purpose of welding plastic... More importantly, you can control the temperature quite carefully.

A small 3D mill can also be useful to cut out panels and windows, and even make some PCBs when they need repairing or an adapter is required.

I recently bought a Bondwell16 and the internal frame was smashed to pieces by the courier. Not a single piece joined left anywhere. Just a pile of loose plastic bits that, fortunately, seem to have protected what they were holding internally at least.

I'll rebuild an entire frame for that on my printer rather than repairing with MEK, since the original is going to shatter again if repaired, and there are dozens of pieces, so reassembling accurately won't be possible.

There's a lot you can do with 3D tools now. We almost need a forum just for repairs of old parts don't we? Different chemicals, 3D models. Stuff we currently are repairing. Mostly I see it just goes into the relevant forum area though.

David.
 
I've used IPS Weld-on 3 and 4 solvent cement--more aggressive than MEK and works quickly. Mostly methylene chloride with trike.
I've used Bondo auto body filler to supply missing pieces when something cracks into many small bits. Patience is your friend.
And yet, there's plastic that's just gone super-brittle and nothing will fix that.
 
Last edited:
My pen was $40 and there's cheaper and more expensive ones. These pens are not a precision tool that leaves a finish of a injection molded original. It's a 0.4mm squirt gun pushing out melted plastic like a cake decorating bag that a chef uses to put do-dad's on a birthday cake. Very skinny toothpaste squirting out of the tube, so to speak. Perhaps if a person was using one of these things daily one could develop skill at repairing without the need for finish work, but my idea was to make a functional repair, not to enter a beauty contest.

I have a lot of laptops with damaged plastics that I want to repair and sell. Most need hinge repairs or have other cracks that need to be reinforced. For most there's no perfect replacement parts that are available and so making use of what is available is the only way to return them to service.

So my original idea was to build up a mount of plastic to work as a replacement for the missing molded standoff. If you want pretty then you will need some hand finishing of what's mounted up. I was using the pen to replace these missing mounting standoffs on the inside of the lid - those used for screws holding the hinges or for LCD mounts. I was even thinking that I could just build up a mound, drill a hole into it, drive in a self tapping screw that would be faster than trying to reuse the brass inserts and factory screws.

Trying to hold the insert in place and building up plastic around it seemed like it would have many pitfalls - the need to leave a space for the screw below the inset, a way to hold the insert without burning my fingers. Maybe the need for shims if you get the height wrong after getting the insert in place? Maybe start with a long screw placed into the insert and hold that while building up new plastics around the insert? Then unscrew the screw before reassembling the hinge?

Lots of things to work out.

I also wanted to see if if I could glob some plastic to fill in any missing plastic if there was a hole in the lid. Yes, it works, but it is crude. You will need to build up the plastic and then shape it with sanding, filing and Bondo and then painting with a hobby spray gun. Color matching is not likely since the original parts are always painted from the factory and filament doesn't come in enough shades of grays (or other colors) to match the paint. Plus many case parts also have a sprayed on texture finish that would require undercoating with a matching texture paint of some sort. I tried some hobby rattle can texture paints in the past attempting to match the orginal finish look of laptops that had the paint worn off from use. Some were close to blending the repainted textured surfaces. Others, not so much. But I'm not a hobby guru that spent years making models.

I used PLA filament this time which is a brittle, yet a very strong plastic. It is cheap and easy to purchase, but is not good for use inside a hot car or for parts that need to flex. PLA is what many 3D FMD people first use for use to making things when they start out with a 3D printer. Items for which the use of engineering plastics isn't necessary. My pen can also print ABS which might be a better choice for effective repairs, but I was just experimenting. Should you use ABS? Many people scream about the health issues of ABS printing. I'll leave that up to each person to decide.

Are there other ways of achieving a repair? I'm sure there are, but I've not found one that works all the time. I've tried acetone, MEK and also polycarbonate cement, but not IPS Weld-on. I must look that up and see if I want to get some to try. Most big box stores don't sell real MEK these days and acetone is way too weak for the ABS/polycarbonate blends used on many of the older laptop case parts. Epoxy with fiberglass or other fibers works okay, it is messy and also needs sanding or other prep'ing of the plastics to bond if there's a sprayed on coating on the inside of the plastic piece. One Youtuber uses hot glue, but that's not precision either. then there's the use of staples, or pieces of a staple, melted into the plastic to bridge the crack. That might be strong, but I think it would damage the outside of the plastic part and therefore need rework too.
 
I've used stainless wire (a la dentisry) threaded through small holes to serve as reinforcement--and it's worked after a fashion.
But the basic problem is that plastic will age and crumble. It's a real problem faced by museum conservators.
I saw this great article about a museum conserving East German plastic items. They were extremely bold in what they were making out of plastic: https://www.atlasobscura.com/articles/east-german-plastics-preservation
 
The thing that gets me is the plasticizers in cables... And people left their power supplies, Commodore 64s, Spectrums, whatever, wrapped with the cables, and the cables melt their way into the body of the computer like hot wires, with not even a black mark when they touched for years... Especially stuff like polystyrene just seems to mould around cables.

I guess if something is made of plastic, and it goes brittle, redesigning it is the only way... At least it's still your grandfather's axe as computers go.

When I fix the Bondwell, making changes like allowing the PCBs and the power supply and even accessing the floppy drives without having to take the monitor out are more than forgivable changes though...

I figure if any changes are changes that the original part needed and they need repair, redesigning it to work properly counts as canon.
 
My cables all get coiled and bound with wire ties; if they're separate from the gear, they're hung on a rack. Otherwise, they're just stored with the gear, but bound up in their own coil. I don't know if this accomplishes anything, but it does keep things organized.

Any suggestions for what to do with old transformer wall warts?
 
If they are logo and original, then they are just as much a part of the computer as the box it came in... best left original and untouched and include a modern switching PSU as well to power the thing :)

When you bundle the cables, are they in contact with any computers / plastic surfaces / Polystyrene boxes etc? I get the feeling the safest thing to separate cables from computers is card or thick paper.
 
No equipment contact per se, aside from by big box o' wall warts, which have cables contacting other wall warts. But that doesn's seem to be a problem--I have some from the 1970s and they're just fine. What I don't do is bag or box things such that any fumes are contained.
 
A lesson learned.

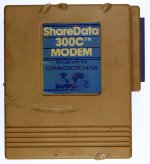
C64 power supply cord wrapped around a modem and tossed in a box + 25-30 years.

BadC64Modem.jpg
 
The thing that gets me is the plasticizers in cables... And people left their power supplies, Commodore 64s, Spectrums, whatever, wrapped with the cables, and the cables melt their way into the body of the computer like hot wires, with not even a black mark when they touched for years... Especially stuff like polystyrene just seems to mould around cables.
It's not just cord burn on the plastics, either :( On the (Japanese; American seems to dodge this so far) NEC PC-6001, the cord plasticizer leaches inside the machine and corrodes the contacts of the power switch and wall plug.

I'm currently rewiring one after desoldering the switch and throwing it through the ultrasonic.
 
Back
Top