• Please review our updated Terms and Rules here

Atari 520ST

Proper irons mean very little on a board where the solder was ruined by electrolyte or battery leakage over a long period. It turns to powder and removal of anything becomes a frustrating chore.
Agreed, but you are not saying the Atari PCB is in that state?
 
Agreed, but you are not saying the Atari PCB is in that state?
No not at all. This 520 ST is in excellent shape. Like I said all the RAM is good. The only major fault it had was the joystick/mouse ports needed reflowing as they didnt work. I couldnt see cracks but they must have been there as they didnt work.
 
I use both :) I like to desolder initially with my desoldering gun and then remove the IC’s using hot air. Usually do not have to go very hot since most of the solder has been removed. Never had an issue with pulling pads or damaging components or bending legs.

For the ram that I removed off of my 520 plan was to repurpose the chips and upgrade my 5160 to 640k (it’s a 256k board). Turned out one of the 16 was bad (I needed 18 total and had 2 other chips laying around from another project). If you do end up reusing make sure to test them out. I found these to be a great addition to my toolkit:

 
The design of the ST mainboards progressed over time. My 520STFM has unpopulated pads where an additional 0.5MB of memory could just be dropped in, but back in the day I decided I needed a little bit more, hence the ungainly add-on mod. It looks like hell, but with the lid on it looks no different to any other ST and to be fair it works impeccably.

I also have an STe, and on later versions of those the memory takes the form of 4 x SIMMs, just like in PCs of the period. (Early versions may have used SIPPs). My 1040STe originally had 1MB as the model number suggests but a few years ago I upgraded it to 4MB.
 
ST, STF(M), and STE have completely different mainboards - they are not revisions of the same mainboard.
 
I guess that explains it. I got one of those hdd emulators for my ST. It came with a couple folders one labed 1mb one 2mb I guess now i know that means RAM needed. eithsr way all the games wont load. even the utils keep telling me i need more ram.
Yes, the name of the root folder such 1 MB, 2 MB, 4 MB... indicates the required amount of RAM,

However, 4 MB ones usually requires a STE version of the computer

As well, if you have TOS 1.0, you need TOS 1.04 in order to read FAT16 partitions correctly;
due to TOS 1.0 have troubles reading the SD card image you have, unless you use the special
image for older TOS (1.0 and 1.02) but this special disk image can´t be managed easily in a modern
PC,

Furthermore, if you have the 6 chips version of the TOS, you can easily upgrade it burning 27C256 EEPROM chips

Explore if your 520 ST board can be easily upgraded to 1 MB RAM, with 1 MB RAM you can play almost all games (not all but near)
Many 520 ST mainboards were really 1040 ST mainboards with only half RAM chips fitted.

If you are lucky enough, you will find empty RAM chips locations in your 520 ST mainboard,
suitable to place another 512 KB of RAM, for a total of 1 MB
 
Last edited:
Yes, the name of the root folder such 1 MB, 2 MB, 4 MB... indicates the required amount of RAM,

However, 4 MB ones usually requires a STE version of the computer

As well, if you have TOS 1.0, you need TOS 1.04 in order to read FAT16 partitions correctly;
What do you mean by STE, what does it have my 520 does not have?

Would that explain why the folder names look all crazy like garbage characters? I was afraid it was a system fault at first (using the external HDD emulator.
 
What do you mean by STE, what does it have my 520 does not have?

Would that explain why the folder names look all crazy like garbage characters? I was afraid it was a system fault at first (using the external HDD emulator.
-STE is the second version of the Atari ST line, that includes additional hardware
such hardware scroll, extended colour palette, hardware blitter and digital audio output,
the sort of hardware features massively used in my Metal Slug port such example,
or in the renewed Lotus 1:

Atari ST at top, Atari STE at bottom:


Getting the most out of an Atari STE jeje:


Atari STE is backward compatible with Atari ST,
its mainly an upgraded version of Atari ST


-Yes, you are using the SD card image for TOS 1.04 and up,

TOS 1.0 and 1.02 can´t read correctly this SD card image (FAT16 partitions),
and you view wrong named folders, non existent folders... and TOS 1.0 / 1.02
can´t recover the data correctly from FAT16 partitions,


Try this one, the download link was a bit ahead in the hard disk usage tutorial:

The SD card image suitable for TOS 1.0, 1.02; but this SD card image, when deployed, can´t be read in Windows:

Thank you that really explains alot. Why I cant run anything from the hdd image as it currently stands.

I will be upgrading to 1.04. Seems silky not to at this point. I found the US 6 x ROM images. If it uses standard 27C256 eproms i can easily do this.
 
Ok So I tried writing the 1.04 TOS rom set I found online to SIX 27c256 Eproms but the system wont boot. It wont boot to my Atari ST diagnostic Cartridge either with those roms in place. Any advice?
 
I used a rom splitter that ran under a st emulator, I just booted it, then used the splitter on the 104us.img and selected 6 roms.
I actually used 6 27c512s and doubled up the rom per chip.

I'm sending you a PM
 
Could you show where you got the ROM images from, and how they are identified (in other words, how does the information which accompanies the ROM files indicate which chip should go into which position in the ST mainboard)?
 
Dabones split rom version worked like a charm! I tried 5 other versions before his. And I tried splitting my own twice all to no luck. The closest I got was a bunch of bombs on the screen and the CRC ROM check would fail on LO2 everytime but I never got a working set.

I just got a new shipment of 27c256 eproms and I was half convinced they were faulty!

Thank you! Now my 520ST is at TOS 1.04.

Next upgrade a 4mb ram board!
 
Well done Dabones, I thought for sure it had to be something to do with the ROM images because I knew for certain that my ST has its TOS 1.04 in 6 x 27C256. Unfortunately it wouldn't have helped Verault much to give him images of those EPROMs because mine is a UK model of course.

Regarding the RAM, try to find an upgrade which allows for the flexibility to select different RAM sizes from the total 4MB - there are one or two software titles which didn't anticipate the possibility of 4MB and they won't run in 4MB - bad programming of course, but to allow for the possibility it might be good to find one which allows you to choose between 1MB and 4MB, maybe 2MB as well if possible.
Thanks for the Heads-up on the RAM. I had already taken this into thought and have decided to go with this RAM upgrade. https://github.com/agranlund/STRam
I will install a toggle switch which will allow me to toggle between 1MB and 4MB to overcome the software which does not like 4MB.
 
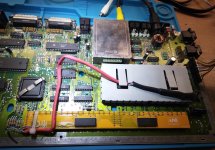
Ok so I spent the last couple of days getting the RAM upgrade working. And after much frustration I am done and its working perfectly! As I mentioned I am using this 4MB upgrade board https://github.com/agranlund/STRam . You have to remove all 16 RAM chips and clean out the IC holes for this new Board to work. removing all the chips wasnt difficult, just tedious and I took a few breaks. Getting the new header pins to the board lined up was a bit frustrating but I got there in the end.

Adrians Digital Basement did a video on this board(
) but he made the mistake of adding sockets so the board didnt fit. He also mentioned you had to swap the CAS1H and CAS1L headers but the github makes no mention of this and I found that not to be true so maybe thats why Adrian had such trouble with it.

I have to say the most trouble I had was figuring out the wiring to make a switch work to bring the 4MB of ram down to 1MB so I would have compatibility with some problematic games/programs. I figured it out in the end but it took me the majority of the day to do it.

Resized_20230911_175613.jpeg
Not sure anyone would buy them but I have a few boards I am going to try selling. Its definitely not an upgrade for someone with mediocre soldering skills.
 
Last edited:
So on to the next and final hurdle (I hope). Making disks for the Atari ST. I have both the SF314 and SF354 (double and single sided 3.5" Atari floppy drives). How do I make floppies from disk images?
I figured out how to make AMIGA disks using my Kryoflux which could not be easier. Also I have a greaseweazle now if that helps. Can someone point me in the right direction for making real floppy disks?

index.php
 
Well I was making some progress. I was able to use my greaseweazle to write some disks,, and the Atari ST read them from my sf354.. Then it sort of stopped. It was formatting disks but being picky, then stopped formatting or reading altogether. And now I dont think its spinning anymore. My SF314 wont even spin disks at all.. I guess its been a while since I last turned it on. I tried a couple different power supplies, all the same thing.

My drives dont have belts. Do you think this is a capacitor issue?

I guess I spoke too soon. If I cant fix one or the other gotek would be in my future. But I will try everything I can first.

This stinks.
 
Back
Top