• Please review our updated Terms and Rules here

Heathkit EC-1

billdeg

Technician
Joined
Nov 18, 2003
Messages
3,885
Location
Landenberg, PA USA
Hi
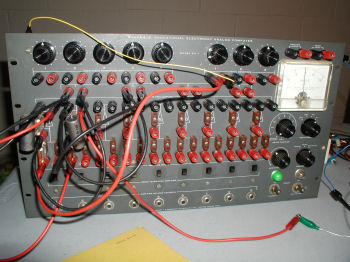
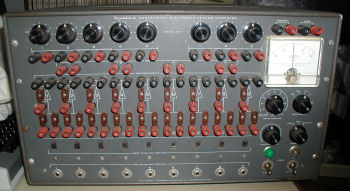
I got a "new" Heathkit EC-1 - Complete with manuals, cables, tubes, etc. As I test it and hook to an oscilloscope I will post updates.

http://vintagecomputer.net/heathkit/ec-1/

thm_Heathkit_EC-1.jpg
 
Cool. I was pointing out that system to my girlfriend a week or so ago when surfing through some auctions. Definitely let us know how it goes.
 
Hi Bill
Someplace I have a drawing for how to do the bouncing
ball in 7 amps instead of the 8 amps in the manual.
This leaves two amps unused, enough to make a sine/cosine
generator.
This means you don't need the hokey external 60Hz sine/cosine
generator to make the ball round.
You can still run the simulation with just a dot on the scope.
Also remember that there are two places to zero an opamp.
One is for zero volts out and the other is for zero current
in. For integrators, you want the zero current in so they
have minimum drift.
Dwight
 
Dwight,

I am going to work on this machine over the weekend, but first I need to test the electronics. I may not get very far, but if I do I will work on the bouncing ball as they have with the 8 amps to start. Whenever you get the chance to send your mod, no rush, and thank you very much.

Bill
 
Very cool, Bill!

I remember coming home from college over the holidays and visiting my old high school physics teacher, who showed me the EC-1 he'd just bought. Hadn't even been powered up yet. I spent the entire weekend getting the bouncing ball to work.

He thought it might be useful to teach the kids about computers, but I don't think he realized that he'd bought an analog computer--not the sort of system that you saw in Desk Set.

It's a shame that I didn't get to play with it for more than a weekend.
 
Dwight,

I am going to work on this machine over the weekend, but first I need to test the electronics. I may not get very far, but if I do I will work on the bouncing ball as they have with the 8 amps to start. Whenever you get the chance to send your mod, no rush, and thank you very much.

Bill

Hi Bill
To test, connect a resistor from input to output and then a same sized
resistor to the input.
This make a unity inverter. Use one of the voltage sources to make sure
the output tracks and goes the oposite polarity.
If this works in both polarities, your done.
The resistor values should be large, remember the output swing +-50v and
only a ma or so.
Dwight
 
Hi Bill
One thing I forgot to mention. Ground reference is really rare.
I forget if it is the meter negative or the ampout negative.
The three initial condition sources are floating and need
one end or the other tied to ground or could be used as
a floating offset.
The coefficient pots all have one lag tied to ground but it
is not pinned out to the front panel there. I always thought
that if I'd bought one new, I'd have punched some holes
and added a few ground reference jacks. It is a real pain
to need to daisychain all the grounds from one reference
point.
I don't want to drill my classic but if I'd had it new, I know
I'd have modified it.
Pomona banana cables work well for this because they
can be stacked.
Dwight
 
Thank you for the info. I will post an inventory of the resistors I have, etc. when I get the chance. It's such a nice weekend, I may have to wait until next weekend to make significant progress.
bd
 
Last edited:
Youtube.com Video of Heathkit EC-1

Youtube.com Video of Heathkit EC-1

thm_heathkit_ec-1_falling-body1.jpg


The first illustrative exercise in the manual is titled "The Falling Body Problem." I had a vintage hacking get together this weekend. Bob and Mike brought tube testers and fortunately the tubes were all OK. We cleaned all of the plugs and connectors with soap and water. Dan hooked up a Variac in series with an incandescent light as a current limiter, so we could monitor the reaction of the EC-1 to current load. Bob used a volt meter to test the electronics and cleaned up a few things (solder joints and a loose wire), but nothing major was needed to get the old girl back up in running order. Fortunately I had the two N-2H neon lamps needed to replace the failing lights on Amplifier #4. The bulbs were impacting the voltage flow. You'll see from the video that my oscilloscope is about trashed. I have one at work, but I forgot to bring it home.

http://www.youtube.com/watch?v=Fcazr2G--Y0

Detailed wiring pictures and info:
http://vintagecomputer.net/browse_thread.cfm?id=227

Thanks also Dwight for your tips, I printed them out and will keep with my manuals. Do you have a source for those input sockets? I have a few but I will need more to do the later exercises.

Bill

P.S. I don't like to use people's full names without their permission, but if you want your name revealed and you're mentioned here, just let me know.
 
Last edited:
Hi Bill
The sockets are actally crystal sockets but finding enough
old style crystals to destroy would be hard.
What came with the EC-1 was half of the older 300ohm
TV twin line connectors. I've looked a bunch for these
without success.
I found that the Pomona mini-banana plugs work. These
are about half the size of the regular banana plug, compared to
the larger terminals of the EC-1. I saw a bunch of the dual pin
ones on ebay about a week ago. They may still be there.
These are a little tight and may stretch the socket connectors.
I thought about removing the spring part of the plugs to
make them more like the original connectors but never
tried it.
There is a fellow selling a bunch of the larger ones and
I may buy some of these for my Comdyna. It uses the
regular size and spacing bananas.
Dwight
 
Hi Bill
The crystal holders are cool because one can mount the
resistor or cap inside. One can then flip the cover over
and put a nice lable on it ;)
Dwight
 
I dug around a bit and found this guy who's selling 20 FT-241 crystals for $10. Reworking them may be just the ticket.

The 300 ohm twinlead connectors seem to be history. Clear polystyrene with screw-clamp type wire connectors.
 
Today I switched to a better oscilloscope and was able to get a clearer output, do some experimenting. I am going to start working on the 2nd or 3rd exercise in the manual. I will post an update when I get one. I have not yet ordered more supplies.
bd
 
Back
Top