• Please review our updated Terms and Rules here

Homebrew TTL Stack Computer: TTL-Retro

mmruzek

Experienced Member
Joined
Sep 28, 2011
Messages
232
Location
Michigan, USA
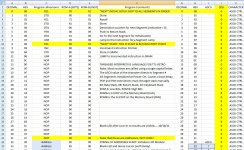
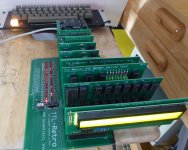
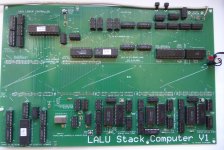
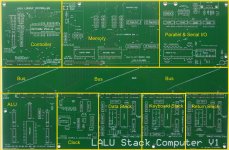
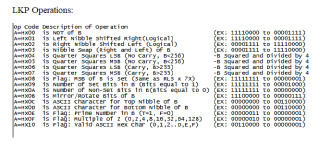
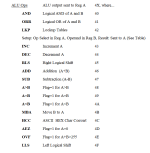
If you enjoy vintage computers you might want to consider getting into the homebrew building hobby. For about the past 2 years I have been building and coding a homebrew TTL Stack Computer called the TTL-Retro. I built the computer from scratch using TTL Integrated Circuits, and the computer does not use a CPU. The logical operations are done using a hard-wired controller made of logical IC's. The TTL-Retro operates at 1 MHZ and uses the 74F181 Arithmetic Logic Units with a 12-bit bus with pluggable cards and an Apple IIE ASCII keyboard with LCD module for display. One feature I am especially proud of is an Assembler based on EXCEL that runs substitution formulas on the instruction mnemonics to create the code for programming the ROMs. I wrote a Threaded Interpretive Language for the TTL-Retro, and I have to tell you it is alot of fun to be writing a language that is your own!

Here is a link to the project:


There is actually a forum for people doing this hobby! Here is a link:


One homebrew design I especially think is very well done is the Apollo computer. Here is a link:


Finally, here is a collection of links to other people's homebrew projects. This site can be a real rabbit hole!


Thanks! Michael
 

Attachments

  • assembler.jpg
    assembler.jpg
    365.6 KB · Views: 15
  • ttl_working.jpg
    ttl_working.jpg
    1.2 MB · Views: 16
Very interesting project. I had hoped one day I could create something similar of my own design. Sadly I lack the knowledge of how to really get started. I know the very basics like building a binary adder. If you held a gun to my head I could probably cobble together a very poor ALU - eventually, in theory. Well maybe not.

I did try experimenting with diode logic in a simulator program once. I managed to side-step the no NOT gate. Basically the whole circuit was mirrored or inverted. If you have a data line as 0 it has a corresponding line that is 1. NOT is achieved by simply swapping the lines around, so 0 becomes 1 and 1 becomes 0. I also did the same thing using an AND and OR gate. So I was effectively able to build a NOT gate out of just AND and OR gates. I managed to hook 2 of these together but the fan-out was a disaster. No practical use for this, just when told you can't do something I try to find a way.

I'll have a look at AnyCPU. Is there a simple CPU design called something like 'My first CPU'?
 
I've wanted to do a homebrew CPU project for ages, but it's only in the last couple years that I finally settled on an architecture design that seems both A. interesting to me, personally and B. simple enough that I might actually be able to do it. Details on the architecture are here. I've got a lot of studying up to do on low-level electronics yet (as well as a few higher-level issues - I understand basic digital/Boolean logic fine, but timing and state sequencing I'm a lot fuzzier on) before it'll ever exist as a tangible object, but one of these days... ;)
 
Or the LD12: https://retrobrewcomputers.org/n8vem-pbwiki-archive/0/35845334/38282303/96895548/index.htm.

I have developed a PCB for the computer and front panel, but still working on the construction manual. I have had an “enforced break” from this project for a while, but just started on the front panel again yesterday...

A slightly out-of-date main logic board can be found here: https://drive.google.com/drive/mobi...z9368KAnrhp_l?usp=sharing&sort=13&direction=a.

And the front panel here: https://drive.google.com/drive/mobile/folders/1vDuYyG8gLeZHAY4cQXbUq37ToabqLK40?usp=sharing.

You will find a large thread (well, multiple threads) on VCFED regarding the LD12.

The advantage of the LD12 is that it is DEC PDP-8 instruction set compliant, so it should be able to run most of the software available for a 4KW teletype PDP-8.

Be warned though, there is a lot of wire-wrapping on the LD12 logic board!

Dave
 
Fantastic article! It has truly inspired me. I recently completed an undergraduate course in digital electronics and plan to use this summer to construct a homebrew computer using TTL chips. I'm excited to explore all the resources you've shared. With my PCB design and assembly language background, I'm confident that everything will come together nicely. I've also been following some projects on Hackaday where folks have built computers from scratch, including custom programming languages, cases, and displays. Can you post any updates on your project, or have you abandoned it?
 
It is not abandoned, I just have work and other priorities at the moment.

However, all of the 'work' is effectively done in the book!

Dave
 
My original TTL computer project was the TTL-Retro, which is the first post in this thread. Since then I have moved on to a new homebrew computer design called the LALU Stack Computer. LALU stands for 'Lookup Arithmetic Logic Unit'. I burned ROM's to create my own CPU Controller and ALU for this new project. This gave me alot of flexibility to create an Assembly Language custom to my interests of stack computing. Here is a project thread (Scroll down the page to see the newest stuff):


LALU originally started as a multicard computer with a backplane. That allowed me to work out the bugs on individual cards. Recently I combined all the cards into a single PCB to create the LALU SBC (Single Board Computer). A few photos are attached of the SBC.

There is a long thread at ANYCPU.ORG about the LALU project. Here is a link


Attachments

  • lalu_sbc_filled.jpg
    lalu_sbc_filled.jpg
    1.8 MB · Views: 6
  • LALU_SBC_2.jpg
    LALU_SBC_2.jpg
    3.6 MB · Views: 6
Thank you for the update! I am meeting with my professor this week and hope to get some ideas on where I might begin. I would like to have the experience of starting from scratch. For now, I am reading Dr. Eckert's paper.
 
Thank you for the update! I am meeting with my professor this week and hope to get some ideas on where I might begin. I would like to have the experience of starting from scratch. For now, I am reading Dr. Eckert's paper.
The Eckert paper is excellent, and it's where I started. I found that once I really understood what the hard-wired version of the controller was doing (per his explanation and schematics) I could modify it for my own purposes. The TTL-Retro is pretty much his architecture design. Here is a link to the Eckert paper.

 
Table lookup math? You mean like the IBM 1620 CADET (1959)? It wasn't fast, either--but the tables were in RAM, not ROM.
Yes, like the CADET! When I first started I was using the 74F181 ALU chips. The use of Lookup Tables took awhile to figure out in terms of how to program the ROM target, but it really has been worth it. Attached is a list of the 16 ALU operations for the LALU computer. These operations have changed over time... as I found what was most useful/needed for writing code.

One of the more interesting Lookup ALU operations is what I call the Lookup (Opcode Hx42). This is a set of unary operations that can be performed on a byte, like nibble swaps, nibble shifts, mirrors, rotates, flags, ASCII converts and quarter squares for multiplication. As you can see, I have barely used 10% of what is possible.
 

Attachments

  • lalu_op_looks.png
    lalu_op_looks.png
    15.8 KB · Views: 6
  • lalu_opcodes.png
    lalu_opcodes.png
    17.7 KB · Views: 6
You'd think that math table corruption would have been a problem on the CADET, but it was exceedingly rare. The CADET was a fun-to-use machine, particularly if you had a 1311 disk drive to go along with it. It was one of the few systems that had characters (e.g. numeric blank) that could not be used in arithmetic, nor tested for presence. You just had to know that it was there.

Ah, they don't build 'em like they used to--and it's a good thing, too! :)
 
Back
Top