Upcoming Events:
- VCF South West - June 14 - 16, Davidson-Gundy Alumni Center at University of Texas at Dallas
- VCF West - Aug 2 - 3, Computer History Museum, Mountain View, CA
- VCF Midwest - Sept 7 - 8 2024, Schaumburg, IL
- VCF SoCal - Mid February 2025, Location TBD, Southern CA
- VCF East - April 2025, Infoage Museum, Wall NJ
-
Please review our updated Terms and Rules here
You are using an out of date browser. It may not display this or other websites correctly.
You should upgrade or use an alternative browser.
You should upgrade or use an alternative browser.
How to Disassemble a LK-401 Keyboard
- Thread starter Rcewilson
- Start date
If it's anything like a LK402, then my post here may be of help: https://microvax2.org/wp/2017/05/24/lk402-aa-keyboard-fix/
Good Luck
-Alon.
Good Luck
-Alon.
I disassembled a lot of LK-401s (or LK-411s, for that matter, they have the same screwless design), so I can give you some hints.
Having the keyboard keys down, you start with the four large clips, located in the legs row. Use a flat screw driver to carefully release all of them, so that the top of the keyboard opens up just a little. You have to push the clips toward the center of the keyboard to release those clips. Be gentle.
Now, you have to open the five smaller clips located at the bottom of the keyboard (opposite the the space bar row). All other slots are for releasing the key matrix, which is inside, so don't touch them.
In order to open those 5 small clips, you have to have a small flat screw driver (which ideally is as wide as the slot itself). Insert the tip and carefully apply the pressure toward the edge of the keyboard, so that the clip (which you should be able to see through the slit) gets released by the latch, which you are pushing. Be very careful not to apply too mush force, or you will break the latching clip. Start from the corner slit, and once it unlocks, maintain the gap (don't let it relock) and move to the next one. Once the last one gets released, the keyboard will open up.
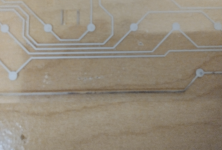
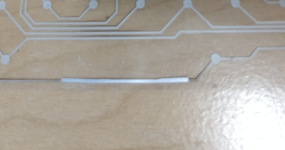
Usually the problem with non-working keys is the deterioration (corrosion) of the conductor on the keyboard matrix (which is under the black key holder, inside). But all keyboards I had, I was able to restore it by using some foil and a scotch tape, glued on top of the rotten section.
Feel free to ask if you need any more guidance.
Good luck!
Thanks for the quick response. That sounds like my problem. Beside the space bar the 0 and the Enter key on the numeric pad don't work and they are in line with the space bar.
I might have a work around as I have a 2nd keyboard. It was getting a error at power up but now I see the space bar is down all the time. Turning it upside down and powering it up seemed to work. So maybe I can rob a spring from the broken one if that's the case. I ordered a key puller from Amazon.
I might have a work around as I have a 2nd keyboard. It was getting a error at power up but now I see the space bar is down all the time. Turning it upside down and powering it up seemed to work. So maybe I can rob a spring from the broken one if that's the case. I ordered a key puller from Amazon.
You don't need a key puller, TBH. Once you remove the top cover, the keys can be pulled up just with your fingers, by starting from the corner keys and working from there, by grabbing the keys from the opposite sides (between the thumb and the index finger) and pressing into the gap between the key and the base of the keyboard -- it will just pop up. Once all the keys are removed, you can undo the black plastic frame by using a flat screw driver again. Make sure you go as gentle as possible on those plastic loops that you have to push a little sideways to release the notches -- half of them pointing in one direction and the other -- the opposite. Once you release all latches in one direction, the other side is easier.
The rubber dome membrane is under the plastic frame, you can just lift it up -- it's not glued. Then you would have to unscrew and disconnect the PCB, and then you will be able to get to the contact membrane. You can use a multimeter to beep out the leads. Usually, it's only one or two leads, which are not conductive at some point, but because they are serving a few keys, all those keys won't be able to scan by the keyboard processor.
If you are doing it for the first time, I suggest you take pics with your phone as often as you can, to be able to assemble the thing back together. There can be a problem with reinserting the membrane leads back into the PCB connectors (there are different connector designs, some with quick release, and some are not). If the connectors are too tight you can use a piece of thin flat plastic -- I cut these to size (the two terminals are of different size) from the plastic food containers from a grocery store. I pushed the contact ends of the membrane into the terminals by inserting them in between the fold that needs to go in, and then gently pulling just the plastic thing out -- worked like a charm.
Reassembling all the clips are very easy -- they just snap back in, both the frame and the keyboard case. And so do the keys.
If you want to wash the keyboard, while you're there, you can use hot water and dish washing liquid to soak all the keys in for a few minutes, and then give them a quick rub one by one with an old toothbrush. The rubber thing and the black frame, and the case, for that matter (although not the PCB and the membrane matrix) can be all washed under a hose, with some mild dish washing detergent as well. The membrane can be gently wiped with 90% rubbing alcohol, on the outside. The inside layers are not usually dirty at all.
I hope you will be able to fix your keyboard. I was able to fix all the "broken" 401's that I had. And it's much easier than doing so with LK-201, believe me The screwless design is just genius, IMO.
The rubber dome membrane is under the plastic frame, you can just lift it up -- it's not glued. Then you would have to unscrew and disconnect the PCB, and then you will be able to get to the contact membrane. You can use a multimeter to beep out the leads. Usually, it's only one or two leads, which are not conductive at some point, but because they are serving a few keys, all those keys won't be able to scan by the keyboard processor.
If you are doing it for the first time, I suggest you take pics with your phone as often as you can, to be able to assemble the thing back together. There can be a problem with reinserting the membrane leads back into the PCB connectors (there are different connector designs, some with quick release, and some are not). If the connectors are too tight you can use a piece of thin flat plastic -- I cut these to size (the two terminals are of different size) from the plastic food containers from a grocery store. I pushed the contact ends of the membrane into the terminals by inserting them in between the fold that needs to go in, and then gently pulling just the plastic thing out -- worked like a charm.
Reassembling all the clips are very easy -- they just snap back in, both the frame and the keyboard case. And so do the keys.
If you want to wash the keyboard, while you're there, you can use hot water and dish washing liquid to soak all the keys in for a few minutes, and then give them a quick rub one by one with an old toothbrush. The rubber thing and the black frame, and the case, for that matter (although not the PCB and the membrane matrix) can be all washed under a hose, with some mild dish washing detergent as well. The membrane can be gently wiped with 90% rubbing alcohol, on the outside. The inside layers are not usually dirty at all.
I hope you will be able to fix your keyboard. I was able to fix all the "broken" 401's that I had. And it's much easier than doing so with LK-201, believe me
Please make sure it is the bad section, by beeping it. It may look bad but actually is conductive... And what may look good it actually bad. To repair, I used just regular aluminum foil (the kind you use in the kitchen  , cutting a thin stripe (like a matchstick thin) and laying it over the bad section. Then I used a piece of scotch tape (yes, that one for paper / boxes) to run it over the the entire thing, plus a bit more, so that the foil is all covered and secured in place. It's okay if it also covers the other (unaffected) leads. All my k'boards fixed this way remain perfectly functional.
I couldn't make aluminum foil work. I ordered some copper foil from Amazon and it worked fine.
The other LK-401 keyboard I have has a problem in that the spacebar sags down all the time. Nothing to push it back up.
It gets an error at power up unless you hold it upside down. From the first one I see that the rubber sheet pushes it back up.
I have not taken it apart yet. Is this fixable?
The other LK-401 keyboard I have has a problem in that the spacebar sags down all the time. Nothing to push it back up.
It gets an error at power up unless you hold it upside down. From the first one I see that the rubber sheet pushes it back up.
I have not taken it apart yet. Is this fixable?
I'm glad that the foil patching worked!
> The other LK-401 keyboard I have has a problem in that the spacebar sags down all the time
The spacebar is also supported by a metal bar -- in addition to the rubber dome (in the center).
You should be able to clean it without taking the keyboard apart. Just use a very thin knife to gently prop the spacebar
up in the middle, and it should come off. Then clean all three holes and also the pegs on the key itself, clean off
the lube (can be hardened) from the slots, which hold the metal bar on the sides, and reapply some fresh non-liquid lube
(a bit of vaseline works). Then reinsert the spacebar back (with the metal bar already snapped in place in the key),
making sure the ends of the metal bar engage into the slots (use the knife to guide them while you are lowering it
the down into the keyboard). If the ends of the metal bar are misaligned the key will get stuck, so carefully
take it out and re-insert. Both ends must be engaged or the key will skew and may get stuck.
HTH

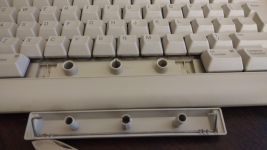
Mine is slightly different. The outer pieces on the spacebar are not round. I did lube it with some silicone grease, but it didn't help.
It feels like the rubber inside of the holes are just flat and not springy. I probably will take it all apart and see what the problem is. This is actually a spare keyboard as the other one is working now.
It feels like the rubber inside of the holes are just flat and not springy. I probably will take it all apart and see what the problem is. This is actually a spare keyboard as the other one is working now.
I see... Although I have quite a few 401/411 keyboards (most of which I took apart at least for cleaning), they happen to be all the same construction (at least for the spacebar).
In all of them, there's only one single rubber dome under the spacebar in the center (and that's what registers a keypress on the membrane beneath), the other two holes are just for alignment.
Maybe you can cut a spare dome from somewhere else from the rubber layer and put it in place for the spacebar? IIRC there are a couple domes, which do not have membrane
contacts under them (like the main Return key and the application Enter key, IIRC)... It can be tricky, though... a major surgery. The good news is that the domes are held in place by
the black plastic layer on top of them, with the holes for the keys.
Again, best of luck with your repairs!

![IMG_8242[10546].jpg](/data/attachments/85/85916-caada07acfea3f9566f189174a689dc3.jpg)

