• Please review our updated Terms and Rules here

NeXT 400dpi laser printer restoration

So, the thermistor is connected to pin J206-5 and from there directly to pin 34 of the IC A. There's a just a "332" (tested OK) resistor in between.
When I start the printer, the voltage at pin 34 briefly jumps to about 4.5 V and then it's game over.
According to the documentation, error conditions 1), 2) and 4) are time sensitive, so to speak, as they are checked after some time the printer is up and running. Condition nr 3) (temperature above 230 deg C) is the only one which seems to be constantly checked.
So, one possibility is that 4.5V as indeed too low (??? voltage drops as temperature raises) and it's triggering the safe mode. But 4.5V seems quite a high level...
I think we are looking at the wrong part of the printer, but honestly I no longer have ideas about where else to look at...
 
So, after some time I re-opened this cold case and - believe it or not - this time I finally have some real progress to share.
I re-started from page 2-28 of the service manual, which states that - in case of short circuit in the 24/5/-5 V rails - the protection circuits automatically switch down the PSU.
A good match for the symptoms.

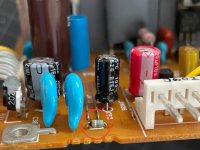
Long story short, I could eventually identify a faulty little resistor (see picture) in the 24V overcurrent protection circuit (at least what I think it is, I'm no electric engineer...).
The resistor is connected to the base of one of the transistors controlling the optocouplers.
It looked kind of suspicious (kind of blown) and it actually tested bad. Bingo.

Now, the good news: after replacing the resistor, the power supply is again operating, the printer is recognised by the main unit, but…
...the bad news: the printer is not printing. It powers up, but after some time it shuts down.

To me it now appears as if the main motor is not spinning when commanded, which sounds ominous...
Luckily, though, I can see the heating lamp briefly glowing, which keeps my hopes alive...

To be (hopefully) continued...

IMG_5780.jpg
 
Good find! Those tiny components buried under things are always the worst when they start acting up.

As for the motor, hopefully it's an easy fix. Maybe the lube dried up and it locked up?
 
Good find! Those tiny components buried under things are always the worst when they start acting up.

As for the motor, hopefully it's an easy fix. Maybe the lube dried up and it locked up?

Took me ages to get to this point, a lot of false leads, could have been whatever...
I eventually checked the resistor driven by sheer logic, once I started speculating that maybe the 24V overcurrent protection circuit was misbehaving... The bloody thing is too small (3 mm) for catching any visible damage just by visual inspection. Besides, probably under-dimensioned too, so I replaced it with a 1/6 W resistor, which I had to install with the leads folded, else it would not fit.

As for the main motor, what seems to be happening now is that the printer makes three attempts to spin the motor, and after failing all attempts it switches off.

I must confess it could be I messed something up on the mother board, as initially I suspected it could have been a short in the motor circuit, so I removed the drivers and the power transistors for testing them, but I damaged some pins in the desoldering process. I replaced them with some spares... unlikely, but could indeed be I messed something up...

Will now start checking the motor circuit, uff...

At least some progress, though...
 
My understanding is that parts of the printer are based on the Canon-supplied engine, which should be similar if not identical to many other printers made with the same engine.

Thus if you can find a Canon-engine service manual or troubleshooting guide, it might help.

(Canon was an early investor in NeXT by the way.)
 
My understanding is that parts of the printer are based on the Canon-supplied engine, which should be similar
Sure, as I wrote I am using the service manual of the NeXT printer. The engine is a Canon UX, very unreliable and soon discontinued by Canon. So, indeed not much documentation around, except the NeXT one, which is excellent, but unfortunately some key pages with the schematics and connecting protocols are missing.

Anyhow, the major hurdle is now hopefully behind, as I could get the PSU up and running again.
In my case, there is something more somewhere in the logic board.
For example, I just discovered that in at least one of the wire-to-board blade connectors some of the pin cracked, dislodged and were causing a short.

So, still some work ahead, I just hope nothing got damaged by the short…
 
Good to hear you're still trying to fix it. It looks like electrolyte corroded the resistor?

I managed to recap my slab PSU. As soon as I have some space freed up I'll bring the printer back from the basement
 
It looks like electrolyte corroded the resistor?
To me, it honestly seems more like an under-specced resistor. By the diminutive size of it, I’d say it’s probably 1/6 W, I replaced it with a 1/4 W.
The resistor regulates the voltage that controls a transistor that in turn operates the optocouplers.
My printer went dead after the first time it remained on for a few hours in a row. So, maybe it overheated or something.
Anyhow, I hope you have the same issue on your unit, it would also mean confirming a solid hint for all the dead NeXT Laser printers out there.
In my case, I am now dealing with some other issues on the logic board, including crumbled and shorted wire-to-board connectors.
It seems as though the connector pins crumbled in the process of disconnecting / reconnecting the logic board for recapping and later inspections.
I suggest that you carefully check each pin in each connector (motherboard side).
I am now in the process of replacing them, I hope it can indeed be the final setback of this endless journey…
 
I am now in the process of replacing them, I hope it can indeed be the final setback of this endless journey…
So, connectors replaced, no effect: the main motor is still not triggered into motion.
It should be spun for one second immediately after the printer goes live.
IC255 pin 11 should go low, but it remains always high. In fact, it seems as though IC B / 47 is not switching it, remaining always high, too.
However, if I ground pin IC225/11, the main motor comes to life, means that the corresponding circuitry is fine.
Why IC B is not spinning the main motor?
I guess there are some logical conditions that are not met, such as cover open and the like. Cover open / closed switch signal is OK, though.
So, it must be some other logical condition which is not met, I am afraid without proper documentation is basically game over…
 
That looks like corrosion damage to me. That resistor isn't under much stress, and clearly has not been overheated. I would take a very close look over all the boards, and the motor board for more damage. A stereo microscope would help here. In my experience, a close visual inspection is likely to save a LOT of time. The trouble shooting guides were written based on what they expected to go wrong with the printer, not for collateral damage from leaking capacitors.

In cases where there have been numerous leaking capacitors, 9 times out of 10, any additional problems were caused by the leaking capacitors. Also, don't blindly replace parts hoping to solve the problem. That almost never works. If you think a particular transistor might be bad, TEST IT. If it tests good, put it back.
 
Overheated resistors usually have their hull flake off, are brown/charred or the board around it is baked to some extent.

I would guess you probably have more corrosion and damage from the leaks going on and more components could be out of spec because of it. I would look for more black spots on traces or components, it can get everywhere and also under heatsinks and SMD parts
 
Could be whatever. In my unit, radial caps were basically still OK, only the very small ones were gone. I replaced all of them just as a precaution, but 90% of the caps tested perfect. So, in the area nearby the failed resistor everything looked clean. Nearby the leaked caps surely there was - unfortunately - some corrosion.
The faulty resistor tests randomly, it’s not open, but the resistance varies during testing.
What is noteworthy, though, is that on the 5V PSU, the paint that covers the rail which feeds the 24V is full of bubbles, that’s why I suspect some overheating.
Anyhow, the PSU now works, the new issue is that the main motor is not spun by the CPU (the motor and the motor circuit are OK), I suspect because of failed logic conditions detected by the CPU.
 
One step closer, almost there…
As I suspected, there was a failed logic condition that was preventing the printer from spinning the main motor.
I was trying to operate the printer without the covers, but in fact you need to have the top cover closed (easy to cheat), the toner cartridge in place, but also the rear door cover shall be in place, as it controls an optical switch on the rear. Once all the conditions are met, the main motor is normally operated.
The heating lamp is OK and the printer seems to be operating “as it should”.
The PP utility reads “Device OK”, but when I try to print something the process still fails throwing a fatal error.
I guess it’s now something related to the paper feeder, similarly to what I already experienced at the beginning of this nightmare…
 
...
What is noteworthy, though, is that on the 5V PSU, the paint that covers the rail which feeds the 24V is full of bubbles, that’s why I suspect some overheating...

Those bubbles are from corrosion. It seeps under the solder mask and leaves dark bubbles. Any time you see that, you need to scrape away all the damaged mask to check for opens, and prevent more corrosion. You generally don't need to re-coat it with anything.
 
Could you post a picture of your bubbles? If you have any blackened traces or vias it's most likely capacitor or battery damage and it can prevent proper operation. I guess your problem is corrosion on the logic board
 
Could you post a picture of your bubbles? If you have any blackened traces or vias it's most likely capacitor or battery damage and it can prevent proper operation. I guess your problem is corrosion on the logic board
The logic board is perfect, just maybe a little dirty. Would like to give it a proper cleaning with ultrasound cleaner or justplain water, but I am afraid of messing up the optical header. I always clean with IPA, but completely removing all the residual flux is impossible.
The corrosion issues are located on the DC PSU, nearby leaked caps only. As for the 24V rail with slightly bubbling mask, I guess it’s a mix of corrosive environment but also - as always in any chemical reaction - temperature. Will try to take a picture before reassembling everything.
 
Back
Top