• Please review our updated Terms and Rules here

Northstar Horizon wood cover replica

If I can be bothered to pull mine out tomorrow I can take a picture, but there’s not much to it. On each side there are two screw holes with counter-sunk borders deep enough the heads don’t stick out. (Somewhere between 1/8” and 3/16” deep.) Screws in mine are normal rounded-head Phillips machine screws, silver, nothing special.

(or did you mean how the wood is held together? No fasteners are visible externally, it’s possible there’s something under the veneer. I believe there are a couple of triangular braces inside positioned to clear the metal frame.)
 
The photos that I posted a link to clearly show a wood spline in each corner, which is pretty traditional and very strong.

Wood's not a bad idea--I've long thought about designing an "art" computer case, of which there are many fantastic examples on the web. The closest I've ever come, however, is a floppy enclosure made of Eastern Red Cedar (T&G 3/8" stuff that I had left over from a furniture project).
Art or necessity, my first PC was cobbled together in an old Tektronix scope case. My friend's first was some of those same parts assembled in a cardboard box.
 
Back in the mid 80's, I was involved in a project to make the PC a bit more fault-tolerant. Shoestring budget.

I managed to glom onto a few retired Fujitsu terminals (interesting biaxial synchronous feed); I canibalized the insides to make some passable monochrome monitors and then got a few surplus open-frame 5v/12v power supplies. Bought some cheap Taiwanese motherboards and monochrome monitors, floppy controllers, and serial interfaces. Designed a couple of boards that monitored the bus activity and could transfer data very quickly between machines. Assembled the whole mess on plywood boards stacked in a home-made cabinet.

It looked very crude, but it worked after a fashion.

Wrote a whole pile of software to get the setup going. You could clobber any one of the three machines, and voting logic would reset it and reload memory, and I/O ports. As a proof of concept it wasn't bad; it did not succeed however in getting venture capital, so chalk up another failure and move on. I still have the schematics and software in my files, but the boards themselves have long been disposed of.
 
Wood cased frankensteins, you say? This is my “daily driver” vintage machine.

index.php


It’s a Tandy 1000 HX motherboard, brutally hacked Wyse keyboard mechanism, and a bunch of homemade expansion dinguses strung together with tape and bailing wire. The case is made out of bits left over from tearing apart an old baby crib. (Old picture, it’s currently running a VGA monitor.)

Ironically I think it may be the most reliable XT class computer I’ve ever owned, and I’m counting the ones I had new 35 years ago.
 
"wood PC case" on Google image search will turn up pages of the things, some real eye-poppers.
Why shouldn't an important part of life be a stylist bit of furniture? :)

There's a guy by the name of Jeffrey Stephenson who seems to have taken this to an art form
 
Here is the information on my cover:

Exterior
Front to back: 17-3/8”
Side to side: 20-1/2”
Top to bottom: 7-1/2”

Wood thickness: 3/4”

Front mounting hole: 1-9/32” from front edge to center
1-1/2” from bottom edge to center
Rear mounting hole: 1-7/16” from back edge
1-1/2” from bottom edge to center


Mounting holes: 1/8” hole, countersunk 5/16” dia by 1/8” deep
6-32 x 1” brass machine screws
#6 brass flat washers


Front panel dado: set back 3/8” from front edge, 1/8” wide, 3/8” deep, runs up both sides top to bottom


cover braces are 1/2”x1/2” wood strips mounted on inside of cover between top and side covers. They are set back 1/2” from the front and 1-1/4” from the rear edge. They are tacked in

Photos:

left side.jpegfront.jpegrear.jpegmounting hole.jpegtop-right join from front.jpegrear join.jpegtop-side brace.jpegcover dado.jpeg

One of my kids decided to paint something years ago when the top was not mounted. He oversprayed on the wood lol. Also note the splitting at the bottom of the case at the dadoes
 
Outstanding! Thanks so very much for all that. If I can't make up a couple covers from that I'm a poor woodworker indeed.
I might cheat and line them with sheetmetal or PCB for some fire/EMI shielding, but we'll see.
Of course, I'm planning to get out of the S-100 thing entirely pretty soon but somehow I feel I owe at least one of these cases a cover first.
My UNIBUS machines may be a little more boring and corporate, but they dim the lights in just that special way that makes it feel like home. You know how it is.
 
Sorry I took so long to post this. As I mentioned, I've already recreated the Horizon cover, hoping to replace mine with a nicer hardwood cover. The original is 1/2" (nominal) plywood. Like @Ttpilot reported, this cover is stained but otherwise unfinished. There's no veneer, but there aren't any glaring voids in the edges, and the staining job isn't bad. It's just really plain, stained, dull-looking medium-grade plywood. I have no reason to think that my cover is not original.

I have a Vcarve file to CNC the cover parts. I tried to attach it, but the forum software won't let me. VCarve format is useful because it allows the toolpaths to be embedded, and also most folks with access to CNC machines also have access to an up-to-date VCarve.

DXF format would be more generally useful, but my Vcarve copy is a makerspace edition that can't export DXF. I'll have to get to the Makerspace sometime this week to generate DXF files. If anyone here has an unrestricted copy of Vcarve 11, feel free to generate the DXF files and post them here.

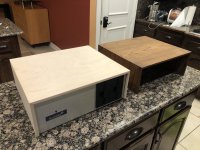
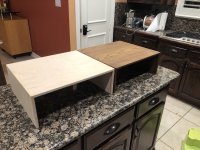
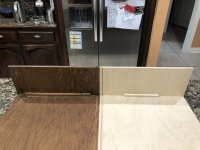
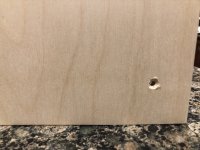
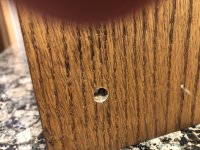
Here are some photos. This is a test run using 1/2" Baltic birch plywood, on a CNC machine with a 90-degree 1.25" V-carve bit for the mitered edges and a 1/8" downcut endmill for everything else. It's critical to measure the thickness of the stock with a caliper to get the miters to come out perfect. Based on this test run, I've adjusted the design file to fix the groove thickness. I have included the counterbore in the file, but since all the milling was on the inside, I used a drill press with an end-mill to make the counterbores by hand.

I was hasty with the glue-up and could have done it better, which would make the mitered edges much cleaner. I have done nothing to finish the case, so it's kind of rough.

If anyone has a suggestion about how to post the DXF or VCarve files, let me know. Otherwise, PM me with your email if you would like them. I plan to post the design on github, like the Sol-20 sides, but I'd like to prove it out with a nice quality build first.
 

Attachments

  • Horizon-cover.JPG
    Horizon-cover.JPG
    53.6 KB · Views: 23
  • fitted.jpg
    fitted.jpg
    270.6 KB · Views: 22
  • side-by-side.jpeg
    side-by-side.jpeg
    260 KB · Views: 26
  • inside.jpg
    inside.jpg
    200.2 KB · Views: 26
  • counterbore.jpg
    counterbore.jpg
    186.7 KB · Views: 23
  • original_counterbore.jpg
    original_counterbore.jpg
    282.6 KB · Views: 18
Last edited:
Not to be a wet blanket, but your "original" cover doesn't look much like any of the others on the web. I'm wondering if yours was a one-off by someone whose original was getting pretty beat-up looking.
Baltic birch is a nice cabinet wood (I use it extensively for drawers), but really has no visible grain. Are you going to veneer these? In any case, you'll need to edge-band them to cover up the laminations.
 
Not to be a wet blanket, but your "original" cover doesn't look much like any of the others on the web. I'm wondering if yours was a one-off by someone whose original was getting pretty beat-up looking.

Actually, I'd say their original looks almost identical to mine; the wood grain is nearly identical, the color is "close", and the finish of the counterbore holes on the sides looks the same. And if you do a Google Image search for the Northstar Horizon you'll find a lot of examples of this cover. Here's a page that includes modern photos of a computer with this cover, and they also have pages from a 1980 Northstar Catalog; the cases in the catalog look like this one in terms of woodgrain, orientation, and thickness.

The original is 1/2" (nominal) plywood. Like @Ttpilot reported, this cover is stained but otherwise unfinished. There's no veneer, but there aren't any glaring voids in the edges, and the staining job isn't bad. It's just really plain, stained, dull-looking medium-grade plywood.

I couldn't be bothered to unscrew the top (nor do I think I need to, because after seeing the inside of this one I'm positive that's what mine looks like as well) of my unit, but I did flip the machine around to get some detail shots of the back. First off, here's a very close-up shot of the wood with the ruler up against it:

veneer_thickness.jpg

On the veneer-or-not question, I initially reported my cover as 7/16" instead of the 1/2"-nominal 15/32" thick, but when coming at it from the back I think I may have been mislead by a slight taper to the veneer strip on the front? It still seems like it's a *hair* thin, but from the cross-section I could be convinced it's "cabinet grade" plywood with a roughly 13/32" 3-ply core and 1/32" finish veneer on both sides? If it were 3/8" with veneer added the core would be a little thinner? Or maybe it's just a weird thickness of core plywood? I know 1/2" and 3/8" are the common sizes, but I would swear I've seen oddball ones before.

And for the record, here's a detail of the corner joint construction. Mine is slightly cracked.

corner-detail.jpg
 
And for the record, here's a detail of the corner joint construction. Mine is slightly cracked.

FWIW, given there also seem to be a lot of pictures out there of NorthStar's with covers more like Ttpilot's with 3/4" plywood, and that the picture in the 1980 catalog looks more like mine, I'm starting to wonder if the thinner covers are the newer ones and were a possibly ill-conceived cost cutting measure. As you can see in the picture of the rear of my unit the thinner cover doesn't fit particularly snugly in the rear, IE, the rear back plate is slightly too small, so the cover has to support itself from the side screw holes if something heavy is placed on top. (Or, alternatively, they would have had to make the miter cuts for the front panel deeper; very possibly too deep and prone to breaking off.)

I guess that might actually be a pretty good argument for duplicating Ttpilot's if you're making one from scratch; the thinner one isn't completely structurally sound.
 
Not to be a wet blanket, but your "original" cover doesn't look much like any of the others on the web. I'm wondering if yours was a one-off by someone whose original was getting pretty beat-up looking.
I thought it looks pretty similar to others that I have seen on the web, but I suppose there's not way to be certain of the provenance. I really don't know the history of this machine.

Baltic birch is a nice cabinet wood (I use it extensively for drawers), but really has no visible grain. Are you going to veneer these? In any case, you'll need to edge-band them to cover up the laminations.
The plywood is for testing. I don't plan to finish it because I don't plan to use it. I have a nice piece of walnut stock prepped, but I didn't want to touch it until I had tested out some details first. But then the COVID happened, the makerspace was closed for over a year, there was personell turnover and now they are requiring everyone to take a new class get re-checked out on the CNC and basic wooshop tools, which I haven't had time to do yet. . .
 
Ttpilot,

Nice to have those measurements. Mine are close, but there are some differences:
Exterior
Front to back: 17-3/8”
Side to side: 20-1/2”
Top to bottom: 7-1/2”

Wood thickness: 3/4”
Front to back: 17-1/2"
Side to Side: 20-1/2"
Top to bottom: 7-1/4"
Wood thickness: 1/2"

Front mounting hole: 1-9/32” from front edge to center
1-1/2” from bottom edge to center
Rear mounting hole: 1-7/16” from back edge
1-1/2” from bottom edge to center
Front and rear mounting holes:
1-1/4" from front/rear edge (center to edge)
1-1/2" from bottom (center to edge)
0.18" diameter
0.3124" counterbore
#6 pan-head machine screw
Front panel dado: set back 3/8” from front edge, 1/8” wide, 3/8” deep, runs up both sides top to bottom
Dado 0.2" wide, 3/8" deep

I think the 3/4" case looks better. The CNC files will still work with the 3/4" stock, but now I have to do the stock prep all over and find another use for my 1/2" stock.
 
FWIW, given there also seem to be a lot of pictures out there of NorthStar's with covers more like Ttpilot's with 3/4" plywood, and that the picture in the 1980 catalog looks more like mine, I'm starting to wonder if the thinner covers are the newer ones and were a possibly ill-conceived cost cutting measure. As you can see in the picture of the rear of my unit the thinner cover doesn't fit particularly snugly in the rear, IE, the rear back plate is slightly too small, so the cover has to support itself from the side screw holes if something heavy is placed on top. (Or, alternatively, they would have had to make the miter cuts for the front panel deeper; very possibly too deep and prone to breaking off.)

I guess that might actually be a pretty good argument for duplicating Ttpilot's if you're making one from scratch; the thinner one isn't completely structurally sound.
I think you are right. The side-to-side width is identical, which means the extra 1/2" of wood (1/4" on either side) is extending inward toward the metal of the rear (and front) panels. I guess going to 1/2", there's a choice of making the overall dimension smaller, making the panels bigger, or leaving a gap.
 
I thought it looks pretty similar to others that I have seen on the web, but I suppose there's not way to be certain of the provenance. I really don't know the history of this machine.

Like I said, so far as I can tell from the pictures it's nearly an exact twin of mine (and the pictures in that 1980 catalog), so unless the same guy made knock-off covers for a lot of units they're the real deal.

I think the 3/4" case looks better.

I personally think the thinner wood *looks* a little nicer, but this exercise of looking at how they actually fit has sold me that the thicker wood is what the metal chassis was dimension-ed around. I'm kind of tempted to fit some kind of shim around the real panel to take the load off the side screw holes.

EDIT: Ultimately, if the goal is to look "original", it seems like you have a lot of choices. It's a cruddy picture, but the unit in the Smithsonian Institute appears to have this thinner cover. By contrast, DigiBarn has two Northstars, one has what looks like the thicker cover, the other has a metal one. So... honestly, this doesn't look like an exact science, any old U-shaped hunk of wood is probably going to be close enough.

I did manage to google up a long PDF of NorthStar catalogs/brochures covering several years, but unfortunately it was a really lousy monochrome-only scan so the pictures were useless. (It *kind* of looks like the wood case may have gotten thinner in 1979, but the photo is too lousy to really tell.) Mainly curious if the catalog ever said anything about the characteristics of the wood cover, and the answer seems to be no; from early on the catalog offered the choice of wood or metal, but never went into more detail than that. Was hoping it might at least say what color stain the wood was supposed to be, but, no. (I seem to recall that, for instance, SOL ads used to specifically point out that the side parts of the case were "oiled walnut" or something like that.) It could be variations in aging/sun exposure or just camera "things", but photos of NorthStar cases seem to show at the very least there being "dark" and "light" variants (the low-res color catalog pages on the site I linked to a few posts ago show two photos that could be interpreted as blond-ish and dark versions on the same page), and some of the thick wood cases appear reddish. So... even when it comes to what color stain you use it's probably fair to use whatever you feel like.
 
Last edited:
Back
Top