• Please review our updated Terms and Rules here

PDP-11/35: What have I got myself into?!

Twylo

Experienced Member
Joined
Feb 12, 2009
Messages
230
Location
Poulsbo, WA
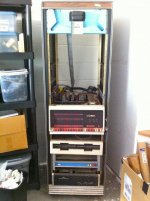
This beast just arrived in my garage:

pdp-1135.jpg

It's a PDP-11/35 with a DSD 440 (RX02 compatible) floppy drive, RK03 drive, and an EECO paper tape punch/reader. It was originally owned by ATARI, but I have no idea what they did with it.

This thing is not what you would call "show room ready". It's been stored in a shed in Washington for well over a decade, and is caked in filth. Until I've taken every single screw out, put every piece through a hot soapy bath, and given everything a visual inspection, I'm not even going to think about applying power to anything. What I'm saying is, it'll be a while before I start debugging it :)

But I'm excited to have it. I've wanted a blinkenlights PDP-11 forever. Now that I have one, I'm a little scared of the amount of work I've got myself into, here!

3, 2, 1... panic!

EDIT: I thought I'd edit my post and attach a picture of the card cage, too. The picture isn't the greatest, but it gives an idea. The fluffy stuff is insulation that mice stuffed into the card cage. Shockingly, my first visual inspection doesn't show any major corrosion or damage - just dirt!
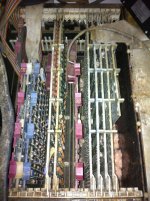
cards.jpg
 
Last edited:
I would not complain too much, yea it’s not clean and will require years of work and lots of money to get right but that’s the best part of owning one. My low end 11/23 is all working and 100 % with drives, RL fixed drives and everything else and that took about a year or two, fortunately the card cage was not that bad. But that’s all the best part because once everything is working you can run it up but most of the fun stuff is over. Besides me there has to be at least a dozen other on here that would kill for an 11/35! Congratulations on finding all be it dirty and in need of much restoration one of the “Holy Grails” of DEC collecting and I will look forward to seeing your progress.
 
What fun would it have been if it didn't require restoration??

:geek:
 
I would not complain too much, yea it’s not clean and will require years of work and lots of money to get right but that’s the best part of owning one.

What fun would it have been if it didn't require restoration??

Alright, alright, I confess... I love getting my hands dirty and getting my logic probes into things, too. I'm actually looking forward to this :)
 
Man where do you guys find these units? I wish I could just find any pdp-11. Heck even a backplane and ps to get started. I'm so jealous.

Robert
 
Don't be too jealous, Robert! It took me 14 years of looking, and this is the only one I've found. I just got lucky, is all. I don't have any other PDPs.
 
Over the years of searching for this stuff, persistence pays off. Don't take your foot off the gas and just keeping flipping over rocks. You'll find one, and probably in the most unlikely place. I found a PDP8e and a teletype at a hospital surplus auction for $8. I just picked up a VAX 8250, drives, books, tapes that came from an auction at the Dept of Motor Vehicles. Don't be afraid to ask questions. If you know anybody who works in a machine shop or field service, there are a lot of PDP8e's and a's still running machine tools.
 
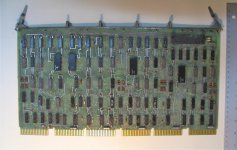
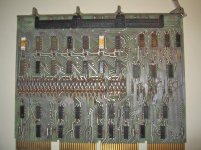
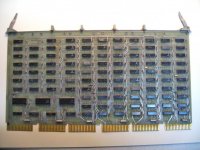
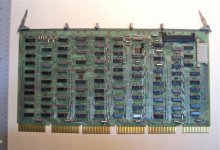
I started pulling apart the 11/35 tonight. I'm going slow. After inventorying everything and taking hundreds of photographs documenting everything exactly as it is right now, I started by just removing the first four CPU modules: M7232, M7231, M7233, and M7235. Here they are, fresh from the system:

M7231.jpgM7232.jpgM7233.jpgM7235.jpg

They look like they're in very good shape. Some oxidation on some chip leads, but WAY better than I thought it would be!

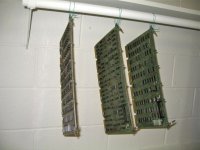
After taking multiple pictures of each board in its original state, I submerged them in warm soapy water, brushed the especially dirty parts very gently with a soft toothbrush, and then rinsed them with distilled water. They're hanging up to dry right now.

after_washing.jpg

I will probably still go after the few little spots of oxidation with De-Oxit or something. I'm going to read through the archive here to see what other folks have had success with.

Well, it's a first step, anyway. After I have inventoried, cleaned, and inspected all the boards, I'll pull the front panel and take it apart, cleaning everything piece by piece. The power supply will come after that, then the chassis. The chassis is in BAD shape with lots of rust, it's going to need to be totally stripped and re-painted. But I hope to have everything looking like new when I'm done!

-Twylo
 
TBH, I have much more luck with a modified version of the same process. At the end right before you rinse them off, use a tiny bit of jetdry. Water seems to sheet off alot easier. And for drying, I use hangers with bungees to suspend the boards in front of a small convection space heater. Have yet to have the crusty white oxidation after drying since! =)
 
I almost don't really see a reason to be washing those boards. A blast with compressed air and a run over with a brush and you should be good.
 
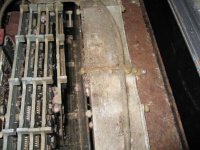
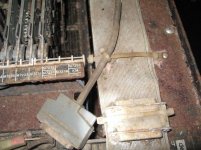
You're probably right. On the other hand, this is the state of the card cage in general, so I almost felt a compulsion to wash the cards:

filth2.jpg

filth1.jpg

EEEEEEEeeeeeeeewwwwwwwwww!

Once I've washed everything, I'll have to deal with that rust.
 
Just a quick note to say I'm still actively working on this guy. I've got the H750 power supply working, and tomorrow I'm dropping off the metal parts (the H750 box and the KD11-A chassis) to be sandblasted and repainted. When they're done I'll start putting everything back together.

I've been documenting my progress on my blog (here: http://www.loomcom.com/blog/ ), but I'll post here too as I go along!
 
Well, I’m new to this forum but am very interested in your current project and the steps you are taking in restoration. I am especially anxious to see the results of your chassis repaint since one of my machines may require this as well. With regard to this task, I have a few questions for you:

  • What prep work (if any) have you done before sending the parts off to your painter?
  • Who is doing the actual blasting and painting and how did you locate him? (Is this an auto body shop, office furniture restorer or someone else?)
  • What did you decide to do with the serial number tag and all of the other labels affixed to the chassis? (Remove and forget about them, remove and replace them after painting, remove and replace them with replicas? If you are blasting, I would assume masking off and painting around is probably not a possibility.)
Please continue to update us with details as things progress. Sounds like you have a real classic there.

Kevin
 
Last edited:
I occasionally have parts for vintage vehicles sandblasted, and also do my own sandblasting for small parts. There are a few different types of media for blasting. Sand is the one that immediately comes to mind for most people. It's cheap and effective, but more suited for larger 'coarser' jobs such as removing rust from a vehicle frame. On thin panels the sand grit can cause bowing and gouging if the operator concentrates too long on one spot. A better solution would be to media blast with peanut shells or soda which is a lot less agressive on the job. It does cost a little more than standard sandblasting.
For items such as labels and other things you want to keep, good cloth or duct tape will protect it and make sure you point it out to the operator or company contact. It's common to blast vehicle bolts and other delicate parts, and tape up the threads so they're not affected. As long as they know not to remove taped bits, you'll be fine with labels etc.

Another option would be to alkaline-dip the box. It won't need to be completely disassembled for this and the results are absolutely first-class. The item will come out of the dip like a shiny tin can, even if it was very rusty and greasy/oily. The downside of dipping is that the job needs to be thoroughly washed to neutralise the alkali, and dried and painted soon after. Labels would definately need to be removed though. Also no aluminium can be dipped, just steel.

There are various primers they could use, for instance black epoxy primer would probably be fine, powder coat even nicer. Get the blasters to at least prime it as they can all do that as part of the job.

Steve.
 
Last edited:
Hi Kevin! Glad to have you here, I always love meeting other DEC fans.

What prep work (if any) have you done before sending the parts off to your painter?

Not very much, to be honest. I just removed all the plastic parts, wiring harnesses, card guides, and screws. Anything that COULD come off DID come off. That includes the serial number tags and labels, which leads to the next question...

What did you decide to do with the serial number tag and all of the other labels affixed to the chassis? (Remove and forget about them, remove and replace them after painting, remove and replace them with replicas? If you are blasting, I would assume masking off and painting around is probably not a possibility.)

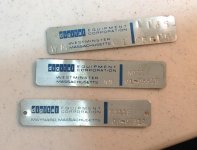
There were three metallic serial number tags located on the chassis. In fact, here they are:

pdp11_tags.jpg

I carefully peeled these off and I'm keeping them. When I get the chassis back I will put on fresh adhesive and re-apply them to the same places they were before.

There were also some printed labels that I could not remove. I photographed those very carefully and took measurements. I'm actually going to make the best quality replicas of these labels that I can muster and re-apply them. I want everything to be as close to original condition as possible!

Who is doing the actual blasting and painting and how did you locate him? (Is this an auto body shop, office furniture restorer or someone else?)

Unfortunately the guy I had in mind turned down the job :( It turns out he isn't comfortable working with sheet metal, he's used to big heavy parts that can take serious blasting. But after he turned me down, I called around some more and found a sandblasting and powder coating company nearby who actually have experience doing computers. That was just blind luck. They won't be able to start the job for a couple of days at least, so I haven't actually brought them the parts yet. I should be able to do it early next week.

As for how I found them, I just Googled for "sandblasting" in my area. I've never done this before, so it's totally guesswork!

-Twylo
 
Thanks guys for the info about sandblasting. I was aware of the differences between “sand” and “media” blasting but was curious about the places you located that were receptive to small jobs. To be honest, I never got far enough to research my options locally, so maybe there are more resources around than I realize.

Seth, I think your strategy in dealing with tags and labels is generally consistent with mine. I repaired an H777 power supply during restoration of an 11/34A “small box” (BA11-L chassis) and was faced with deciding what to do with crumbling paper labels virtually impossible to save. I suppose to the average person, even thinking about this kind of stuff probably seems crazy.

Kevin
 
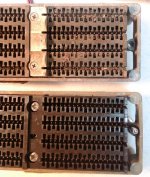
Check out how delicious the Unibus backplanes looked before cleaning! Mmmmmmm, tasty! Sort of a "Before and After":

before_and_after.jpg

The top is one I still have to clean. The bottom is one that I cleaned last week. It's painstaking, but I think it will be worth it.

-Twylo
 
Back
Top