• Please review our updated Terms and Rules here

Repairing Small Broken Plastic Parts.

Hugo Holden

Veteran Member
Joined
Dec 23, 2015
Messages
4,808
Location
Australia
When plastic ages it hardens, and if it is in an application of some force transfer, it can fracture.

I'm posting a plastic repair job here on a small sized item, not because it is part of a computer or disk drive , but to draw attention to three very helpful tools/parts to have in the workshop for fixing broken parts, could be in a computer drive or elsewhere in a computer system.

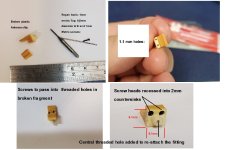
Often, if the fracture surface area is small, in this case it was only about 6mm x 2mm, then just gluing (or plastic solvents) alone would not work, the broken piece of plastic would simply break off again due to the forces when the antenna rod is pushed into the clip, splaying the two arms apart. It requires physical support as well as gluing.

When the parts get small though, the tools and screws have to shrink in size too.

1mm diameter screws can be a very useful size. The drill for a 1mm metric Tap is 0.8mm diameter.

Clearance holes are made for the screws and the holes were countersunk to clear the heads and set the amount the the screw projects into the broken plastic fragment across the fracture interface. The fragment was threaded with the 1mm Tap. Everything for this job is done by hand, with the drills and Taps held in small hand (pin) chucks.

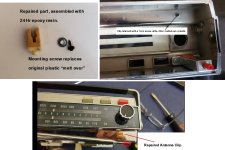
Once the assembly is complete and the parts screw together well, then the screws and fracture interface is coated with 24Hr high strength epoxy resin (like JB weld) and the screws done up and the excess resin wiped away.

This broken part was an Antenna clip on one of my favorite vintage transistor radios.

The point being that this very tiny screw & Tap hardware allows the repair of items that would otherwise have to be replaced. In a lot of cases, these days, many broken plastic parts get 3D printed rather than repaired.
 

Attachments

  • cliprepair1.jpg
    cliprepair1.jpg
    239.3 KB · Views: 46
  • cliprepair2.jpg
    cliprepair2.jpg
    296.2 KB · Views: 46
When plastic ages it hardens, and if it is in an application of some force transfer, it can fracture.
That's nearly the same as what I do. I drill a pin hole (or two) across the break and insert metal pins and glue (two part epoxy)
I had a hinge pin that broke (disk drive door) I drilled out hinge pin and replaced with a brass rod (and epoxy)
 
It is repaired and works Is great. I've done plastic welding on some parts. With a good sanding/filing and a lick of paint it is difficult to see a repair has been made.
 
I've wanted to try the supper glue and baking soda. I've seen several comparisons to other method for strength but wonder about lifetime.
Dwight
 
I draw in 3D CAD and print them with TOUGH Resin. I've fabricated the Bumper for a
Harbor Freight Finish Air Nailer with TOUGH Resin, and smashed one with a Hammer to
see what force it would withstand. It didn't fracture and break like the OEM part.
I've got several printed, but probably won't use them.

The second part is a Tandon TM-100 Door Hinge that's still working.......For several VCF Folks.


Larry

Tandon-TM-100.png

NailerPart.png
 
Unless, of course, you've got an old Apple bit of plastic. If you repair one part, another is guaranteed to shortly break. Apple gear has been known to spontaneously break plastic bits off when sitting undisturbed on a shelf.
 
Unless, of course, you've got an old Apple bit of plastic. If you repair one part, another is guaranteed to shortly break. Apple gear has been known to spontaneously break plastic bits off when sitting undisturbed on a shelf.
I remember in the 2000's we would go to a location we hadn't been to in a long while only to find the Cisco router circuit board
sitting on a small pile of plastic bits. Some plastics just don't hold up well. The router was still working.
 
I had an Apple Quadra 650 case propped up at an angle to help it dry after washing.
It fell over, just 6" or so, and pieces broke off.
 
I've used zip ties with a bead of decent superglue (or sometimes thin plastic model cement after the fact, test a small area first) around split or broken screw receptacle studs in the VIC-20 and C-64 top cases. Making sure the screws themselves are not covered in corrosion, which further expand if the corrosion worsens. Sections of zip tie also can be used as splints if there's space. Finding a decent adhesive for both surfaces is a bit of a trick at times. Pinning is definitely a nice stealth-repair method though.

Really going to have to get my head around 3D modelling and printing. There's retro-resto application, but also those little jobs EVERYWHERE else that need some replacement small plastic McGuffin that is no longer available (or ever available).
 
It depends on the case.

For instance, I had an Amstrad PC-1512 whose 5 1/4" slot cover had some of its supports broken so I took some chinese Lego clone parts and used them to solder it back in place.

On the other hand, my System/23 has one of their two back cover parts broken with the fragment missing, so I had to design a part and print it. As of today, with a 20% infill density it is holding the cover alone (the original parts have been removed to storage for preservation).
 
covered in corrosion, which further expand if the corrosion worsens.

This is a point that is often missed.

Corrosion of any kind results in volume expansion. This is because the oxides expand. Rust is the better known example, you see it expanding and pushing paint of surfaces.

There are many very interesting examples in electronics.

One common one now is failure of Sinterglass diodes used in SMPS's and VDU's. The leads corrode and it splits the glass body of the diode and the leads physically fall off.

Another interesting example is a type of film resistor made from ceramic, that the manufacturers inserted lead wires into each end. They corrode and with volume expansion, split the ceramic and the resistors go open circuit. These resistors were used in a lot of Telequipment scopes from the UK, I call them "Self Cracking Resistors", explained in this article:

www.worldphaco.com/uploads/ELECTROLYTIC_CAPACITOR_FAILURE_MODES_IN_TEKTRONIX_TM_SERIES_POWER_MAIN_FRAMES.pdf

I particularly like Telequipment scopes because they used them on the control panels of the Thunderbirds, and Brains is my Hero, because he designed and built the whole of Tracy Island and designed and built the Thunderbirds, but he was socially inept, to quote him: " I have f..f..finally done it Mr Tracy, I have finally made a Martini".

And if you have amalgam fillings in your mouth, don't be surprised if a cusp cracks off your tooth. The expanding oxides on the amalgam filling surface pressurize the interface. At least they don't often work loose, so they have that going for them.

PS: somebody tried to save Brains from his social awkwardness and make him cool, and did a pretty good job on it too:

 
Last edited:
...you have to wonder if amalgam was possibly used to encourage repeat, long term customers
 
Unless, of course, you've got an old Apple bit of plastic. If you repair one part, another is guaranteed to shortly break. Apple gear has been known to spontaneously break plastic bits off when sitting undisturbed on a shelf.
A lot of the Apple stuff is REALLY BAD (looking at you, powerbooks, LC 5xx, 5xxx AIOs, and many others), but it's far from an isolated Apple problem. The plastic most of the computer industry is just as bad. You see it the worst with Apple stuff a lot of time because they cost cut and used a lot more plastic in the structural bits than most PC cases did. Go and look at PC laptops though, it's a big struggle to find any that aren't trying to fall apart.
 
I'm not sure if this will be enough for small part creation.... but I'm a visual person and tinkercad seems like a path of least resistance. I've just started watching this video on part recreation

[

(starts around 6hrs in, couldn't get the url with time start to work)
 
Brains is my Hero, because he designed and built the whole of Tracy Island and designed and built the Thunderbirds, but he was socially inept, to quote him: " I have f..f..finally done it Mr Tracy, I have finally made a Martini".
Brains was great but he did stuff up, only once: In 'Sun Probe' he got the boxes mixed up and brought along Braman instead of the computer. And in 'Thunderbird 6' he uncharacteristically lost his form-follows-function Thunderbirds design mojo and couldn't come up with any further useful vehicle creations.

Great thread BTW. I do much the same as you but for longer pins use carbon fibre. If the repair isn't too cosmetic I may also bind with Kevlar thread for an unbreakable repair (see photos https://forum.vcfed.org/index.php?t...ing-plastic-crack.1242789/page-2#post-1312195). Everybody should have a reel of this, it's not expensive.

radventure: if you have any programming knowledge, why not give OpenSCAD a try as well? I make a bold claim that no other CAD program is as fast to get started for an absolute beginner opening the CAD program for the first time to produce a 100 mm cube model and saved STL file ready for slicing: about 30 seconds.
 
radventure: if you have any programming knowledge, why not give OpenSCAD a try as well? I make a bold claim that no other CAD program is as fast to get started for an absolute beginner opening the CAD program for the first time to produce a 100 mm cube model and saved STL file ready for slicing: about 30 seconds.
hmmm, I might give this a look over, thanks @1944GPW
 
I am enjoying this thread and it inspired me to fix a small plastic part. Up front, I have to say that there is nothing sophisticated going on in this particular case, but I was happy with the result.

timer done 20240206_135403.jpg
I have had this kitchen timer-alarm for at least 8 years. It is a useful piece of equipment. You can replace the battery by a quick turn of this little holder on the back. Pop the old battery out, put the new one in, replace the cap, turn it and then it locks into place with these little plastic tabs on the cap. I have replaced the battery several times over the years.

button tab broken 20240206_104044.jpg
Then one time, a tab broke off.

Sure, I tried some tape and this made it even was worse because it would only work intermittently – and it would look like it was working at the start, only to find out later that it had gone dead while I was believing that it was timing. A timer-alarm that works in such a fashion is a distinct annoyance.

These devices cost something like $10-$15, so I could have just replaced it and moved on, like a normal person. What was so infuriating, however, was that the whole device became worthless only because of this tiny bit of plastic – it was unacceptable. How hard could it be to replace a simple little piece of plastic?

After seeing harder fixes in this thread, I decide to give it a try.

tab slice 20240206_104929.jpg
I scrounge up a little piece of plastic (probably from some other tab that broke off) and I shave a little piece off. This is real precision work; magnifying glasses, surgical tweezers, a scalpel – the whole nine yards. I’m doing this!

To be completely honest, I managed to drop that piece in the picture and it was lost forever through a black hole that exists in the carpet - I have encountered it before when working with small screws and smt ICs . I did cut another piece from the other side, so the principle is still sound.

Next, I had to cut a little slot into the holder for this new tab to fit. Close examination revealed that the tab has to leave a little bit of space underneath where it extends so that the cap be be pushed down and turned.

I used some stripped wire to make a loop such that the tab could rest on that. It was a tenuous placement, but stable enough to hit it with some cyanoacrylate adhesive (super glue). I make some minor positional adjustments, add another drop, spreading it carefully to avoid any spillage to the underside where the wire is, and let it dry.

tab being placed 20240206_120156.jpg

tab glued final 20240206_120604.jpg
Finished, and it looks pretty good and feels strong enough. Would it fit and hold?

tab finished and in 20240206_125809.jpg

Yes and yes. It has been tested over the last few days and has performed as it did before the catastrophic failure. I am pleased. :)
 
On the other hand, there are plastic bits that are nearly impossible to repair, as far as I can tell. My most recent case in point is the heatsink retention bracket on older AMD (AM2, AM3...) CPUs. Eventually, given heat, tension and age, the likelihood of one of the tabs breaking off is finite. There is an actual market for replacements, also plastic.
A couple of years ago, I ran into an all-metal version of these, but it seems to have lapsed into very-hard-to-find-land. One of my boards uses these, but my most recent will have to make-do with the plastic replacements.
71hYvI1-yNL._AC_UY327_FMwebp_QL65_.jpg
 
CPU bracket  20240209_113232.jpg
Coincidentally, I was just cleaning up around here and was going to throw out an old box from a P7 CPU heatsink/fan and noticed that the mounting bracket was in there (I saw no reason to use it as the old one that was installed looked fine). This one is made decently, but I can't say the same about yours. Why plastic and are those ledges to the left of the screw hole? Is the middle part some kind of clip. What a pita.
 
Back
Top