• Please review our updated Terms and Rules here

Repairing the Locking Mechanism in an Epson SD-600 Floppy Disk Drive

rjarratt

Experienced Member
Joined
Mar 30, 2008
Messages
127
Location
UK
I have an Epson SD-600 5.25" Floppy Disk Drive. The locking lever on the front wouldn't lock and hold in the floppy disk. On inspection I found a plastic cam that holds the drive mechanism in place was cracked and was no longer in the correct position. I have attempted a repair by rotating it into the correct position and then using super glue to glue the two cracked halves together again. I am not sure if this is going to hold so I was wondering if anyone has a suggestion for a better repair? You can see the part in question in the attached picture, the part is circled (badly).

Thanks

RobIMG_20230102_175839.jpg
 
Superglue is not great for structural repairs where the piece is being stressed. I have had good results with JB Weld Plastic Bonder, though not in this specific application.
 
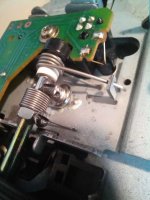
Are you able to disassemble and remove the cam? If so, repairing it by binding may be a solution. It also doesn't require the crack itself to continue to be structurally sound.

Clean the removed cam with isopropyl alcohol and use a fine thread (I use Kevlar, a cotton-reel size spool is cheap on eBay or at a fishing tackle shop. Get the unwaxed variety).
Put a tiny drop of superglue on the exterior, say 2mm from one end, and attach the end of the thread to this. Then start winding around the cam.
After one turn, pull the thread over the start of the thread to hold it and start applying tension, making sure the crack is being closed.
After another turn, apply more tension and put a tiny drop of superglue across the threads. Try another 5 or 10 turns, superglue. Cut the thread (Kevlar is very tough, use a new Exacto #11 blade or very good scissors) and glue the thread end down then run superglue right around the binding. Do the same for the other end.

I've used this technique many times for things such as cracked RC car wheel hubs and chassis (combined with carbon fibre), telescope mounting repair, hand drill pinion gear repair (the chuck drive pinion was cracked in two pieces), handle repair and so on. It really works and it may well be stronger than the original. A small reel of Kevlar thread will last you many many years for these sorts of repairs, if you can't get it then polyester sewing thread may be used but it's not as strong. Dental floss too, if you can get it unwaxed.

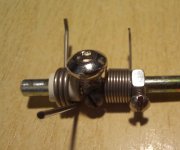
Example of Kevlar thread
 
I did look at removing the shaft, but it looked like a lot of disassembly. I am wondering if I might be able to use the kevlar binding technique without actually dismantling it, but I will certainly look into this and the plastic bonder too.
 
Just got the same drive with the same problem. Before I saw this post, I also super glued the crack but I also used JB Weld on the end of the plastic cam to keep it from spinning of the shaft. So far the repair has held but it might be for naught as I'm getting the dreaded "Drive not ready" error.

IMG_3862.JPG
 
Ah, finally a way I can contribute!

If someone has a broken part they can send me I probably can machine up replacements out of Delrin.
 
I tried fixing the problem with a couple of zip ties and while it kinda works, I am unable to tighten the zip ties as much as needed. As a result, the mechanism doesn't lock up fully and lets go as soon as you release the lever. Maybe I'll try loctite next but since it's cracked on both sides, I'll have to disassemble this part of the drive first.
 
Here is my Epson SD-620 fixing experience, hope it may be useful to someone. After 4 unsuccessful attempts to fix plastic part (1 - superglue, 2 - liquid ABS plastic, 3 - injecting metal wire using soldering iron; the last one, to be true, failed because i've put this plastic part 180 degrees wrong and found it when everything has been done), decided to fix it completely other way - i.e. using appropriate metal bolt as a replacement for plastic cam. So, one large M6 (or similar) bolt with round head (sorry - all metric, but sure this won't be an issue), two small M2 bolts, some drills (M1, M2, M2.1 - last one is for M2 bolt to go freely thru new metal cam at image 4), one M2 threading tap (see image 1), one M4 nut as a limiter (see images 5 and 6), some PVC tape under springs, about 2 hours of work, and - finally - FDD is alive! On the last photo you may see that the latch is not 90 degrees aligned, that's because shape of bolt's head and original plastic part differ a bit. It sure may be addressed with some extra grinding, but i personally didn't bother much. In fact, it latches pretty firmly - no unexpected/occasional unlocking yet.
 

Attachments

  • p8.jpg
    p8.jpg
    91.5 KB · Views: 7
  • p7.jpg
    p7.jpg
    815.9 KB · Views: 6
  • p6.jpg
    p6.jpg
    895.5 KB · Views: 5
  • p5.jpg
    p5.jpg
    156.6 KB · Views: 6
  • p4.jpg
    p4.jpg
    114.8 KB · Views: 6
  • p3.jpg
    p3.jpg
    82.2 KB · Views: 6
  • p2.jpg
    p2.jpg
    153.5 KB · Views: 6
  • p1.jpg
    p1.jpg
    453.1 KB · Views: 6
  • p9.jpg
    p9.jpg
    106.8 KB · Views: 7
Last edited:
Back
Top