• Please review our updated Terms and Rules here

WANTED: Beta Tester(s) for HI-TEK Key Switch Parts

ldkraemer

Veteran Member
Joined
Mar 14, 2013
Messages
2,626
Location
Chaffee, MO
Searching for a Beta Tester(s) for Hi-Tek High profile Key Plunger. Beta tester(s)
will need to make sure they fit, work, stand up to daily use, and provide feedback
if changes are needed.

There were used on Lear Siegler ADM3 terminals, and possibly other Terminals.

Replacement parts are printed with Tough Resin, and Photo's are attached.

REF:


Larry
 

Attachments

  • KeyStack_1.png
    KeyStack_1.png
    58.4 KB · Views: 2
  • KeyStack_2.png
    KeyStack_2.png
    66.8 KB · Views: 3
  • KeyStack_3.png
    KeyStack_3.png
    69.8 KB · Views: 2
I can assist. Give me more reason to keep working on my ADM3A. I take it you are really looking for fit testing correct?
 
That type of switch was used on ADM-3A, TRS-80 Model I (original version), Atari 800, TI 99/4A, VT-100, DecWriter II/III/IV, and H-19/H-89 at the very least. The plungers are probably compatible between all versions, regardless of manufacturer.

My ADM-3A did have broken plungers (the vertical corners cracked), but fortunately for me, I had acquired a few spare parts keyboards back in the day, and was able to replace the sticky ones from my own supply.

Since you say you're looking for beta testers, and I have quite a variety of keyboards to try them in, I guess you might want to DM me. I may not need more plungers right now, but I can definitely test them.

Also this was interesting:
I had not been aware of the difference before, and I might not ever have seen an actual Stackpole keyboard. Taking a moment to look at some old keyboards I have, I was surprised to see the VT-100 "crenelated" plungers for the first time. I had always popped off SET-UP, but not much else!
 
Mick,
Yes, Fit testing, and make sure they work well as replacements, making/breaking
contacts. Also the Keycaps must fit properly letting the key make a full stroke.

Bruce,
The more Keyboards the Plungers can be tested in will be GREAT!

I'll be in touch via DM shortly.

Larry
 
They look like the ones on my Hazeltine 1500 that have the white plastic plungers that spit at the corners and jams in the key board base.
I'd be interested in checking one out. I'm curious as the what the pricing would be.
Does anyone make a removal tool that can be used without removing to base from the PCboard?
Dwight
 
Dwight, Yes my Brother has 3D printed the Removal too also.
Send me a DM with your USPS Address.

Larry
 
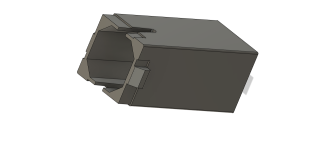
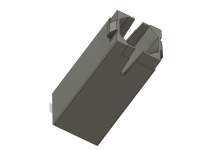
I finally got around to getting everything together to try these out. They definitely seem to fit in every Hi-Tek keyboard I tried, but they were a bit hard to put in, probably because they don't have as many cuts in the side to relieve the pressure. That last push sometimes wouldn't work, then I would push again a minute later with success. Once fully pushed in, they work and feel just like the originals, except that your key caps don't fall out. Note that the cuts on the hook side have rotational symmetry, so the plungers are identical if you rotate them 180 degrees. There's also sometimes two dots of flash on one side of the replacements, but that should shave off with a razor blade. You can see it on the first one in the second picture.

IMG_20230924_221053313..jpg IMG_20230924_221439251..jpg IMG_20230924_221721347..jpg

I realized that my usual method of pulling them out with needle-nose pliers could break the little edge at the top of this design, but it's not really a problem because you shouldn't need to pull them back out again unless they break, just be careful. Sometimes one edge didn't print well, giving a side to pull on, but even if you break the middle of an edge, its purpose is to reinforce the corners, so not all that bad.

Anyhow, the "usual rules" for replacing plungers successfully still apply, some of which I had to re-learn:
- Don't use a screwdriver or other object as a lever to pop off the key caps, as that could put stress on the plunger corners and make them worse. Use a proper wire key cap puller instead. If they easily come off on their own with just your fingers, that should be okay, but that means a corner may already be broken.
- Make sure the bar is in the right direction, but you can also tell the orientation by the hooks on the bottom.
- When pushting the plungers in, stop just before you reach the metal fingers to make sure that they line up. Sometimes they're a little off and won't separate around the bar properly, and you could squish the metal fingers. If you don't mess them up first, you should be able to nudge the metal fingers over just enough to center them. Replacing the fingers (assuming you even have donor parts) is much harder.

You shouldn't need to replace every plunger, just the ones giving you trouble. The main troubles are sticky keys and key caps that fall out too easily.

And these won't replace the plunger of a mechanical caps lock key. I noticed that it has a special plunger with one of those clicky pen mechanisms, but no way was I going to take it apart with the chance that I couldn't put it together again. Fortunately the one I looked at did not have its corner split.
 
Okay, I know it's been almost two months, but just as I got the most recent version in my mailbox, all my free time suddenly evaporated and this is the first time that I've been able to play with keyboards again.

There's a big problem with the late September and early October versions. There are a lot of key caps that simply won't stay in those plungers. As in no friction at all to keep them from just falling out. I tried the same key caps with the two early September versions, and they were fine.

I think that maybe adding a hair more thickness on the inside corners would not only make them tighter, especially if the key cap stems are a little rounded in the corners, but it might make those corners a bit stronger too.

Another problem I noticed was that in some key mechanisms, the late September version was a bit too tight, but at least I could shave it a bit looser with a razor. Some of that seemed to be roughness glitches in the 3D printing though.
 
Back
Top