• Please review our updated Terms and Rules here

Starting my first Pet, a 4032 in desperate need of some love

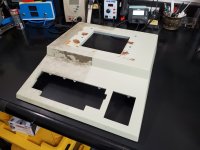
I got it broken down into all its glorious parts and have started a cosmetic restoration on the case while waiting for some parts to arrive. I figured I would ask you all for some advice rather than just shooting from the hip...

My goal on this one is as close to a museum quality restoration as I can do without breaking the bank with reliable functionality (Of course that is for a 40 year old machine, I don't expect like new reliability). Sometimes I like to preserve the war wounds but this one feels like it wants to look nice
  • What do you recommend for paint?
    • I need to completely repaint the white metal frame that holds the monitor
    • The bottom black metal pan needs touch up at best and a full repaint would probably be better
    • The paint on the plastic case has some gouges and scratches that need filled and touched up
I was wondering if there is a particular type of paint you have found works well or just go for a color match with some acrylic on the plastic and a rust inhibiting black paint like Rustolium for the metal.

For the electronics I was going to go a bit further than I usually do and replace the bridge rectifier, voltage regulators, all electrolytics (I'm not usually a shotgun recapper but these have had too much moisture I think) and the power connector (RIFAS) along with anything that is badly corroded after cleanup like the TO3 transistor on the VDU shown earlier (Already on order).

Is there a blog or resource I can use to find the more unusual replacement parts (Like the power connector with build in filter caps)? I usually order from DigiKey

Top Half 4.jpg
 
A good paint that is close is just a shade of off white, not vivid white. It is a type of spray lacquer made by Dupli-Color, the particular one fairly close to a PET but just a shade lighter is DST-56.


This paint has the advantage of a highly volatile solvent, quick drying, it surface etches well into most aged paint and plastics and gives an amazing bond that won't flake off. Also, unless you go out of your way to over apply it, it is very thin and it allows preservation of the original textured paint or plastic. But, I'm not sure of its equivalent product in Oregon. You can use standard auto shop body filler for the plastic repairs & this paint is compatible with those.

Surface rust is best treated with Fertan organic rust converter, that changes the rust crystals into a harmless non progressive dark blue-black compound.

If I had a badly rusted black metal pan, I probably would get it fine garnet bead blasted and re-electroplated with Zinc, to make sure the rust was eliminated and send it to the Power Coaters, because powder coating gives a great finish, is super adherent and scratch resistant and amazingly long lasting in an indoor setting. Have a look at the black transformer covers and and EHT cage (done with this method) for a vintage 1946 TV restoration. The EHT cage case was even more elaborate, I got the powder coaters to mix up some special coat that looked very similar to the original dark copper like finish on the cage. As usual I might have gone too far.

www.worldphaco.com/621TSARTICLE.pdf

But if you don't want to go that far I would use the Fertan on it and use Dupli-color gloss black.


There are some remarks in this article about restoring rusty PET VDU housings:


The paint on that second restored VDU is a whiter shade of white compared to the DST56.

One point, I would completely avoid both enamel and acrylic paints and other products with those bases claiming rust inhibition. They are too soft, don't adhere well without the correct undercoats, have a habit of peeling off and to get right usually require oven baking. The also don't bond well with old paint, as they (their solvent) doesn't etch the surface well.

I'm not saying that there is anything wrong with an enamel painted surface that has been properly done in a commercial setting and baked on, But in a home workshop environment, for equipment restorations, the results relating to surface bonding, wear and flaking resistance with enamels & acrylics are much poorer than the automotive lacquers like Dupli Color. Not everybody is aware of this, and those who have tried plastic case restorations with acrylics and enamels usually meet with disaster, and cannot consider the notion of painting plastic as a restoration technique. But, not all know about paints like Dupli-Color with the quick drying highly volatile solvents or have experience with them. I have a lot of experience with Dupli-Color, I have used it extensively in electronic & automotive restoration work since the 1970's. And I'm pretty fussy with my restorations as you can see from that TV article.
 
Also, there was a 4th category of spray paint that I could mention, useful for various restoration purposes. These sprays come in a number of colors and are Nitrocellulose based. They don't come from typical hardware stores, but Luthier supplies and are used in the manufacture of & repair musical instruments, typically guitars. Stewart MacDonald is a major supplier of these. They are perfect for painting wooden surfaces like guitar bodies and give an amazingly high gloss surface finish. This is why the paint jobs on electric guitar bodies look so good when you see them in music shops. I have used these paints to do repair/restoration work on guitars where I have replaced the disintegrating plastic binding around the guitar body & neck:

www.worldphaco.com/uploads/Gretschdoc.pdf

 
Thanks for the info Hugo! I have to admit that I am always drawn to "Do too much" but, after leaving messages at several local finishing companies, and getting no calls back, I think I will just go with sanding, Fertan, filler for pitting, self etching primer, and Dupli-Color on the metal. I'll use Bondo and a matched touch-up paint for the plastic.

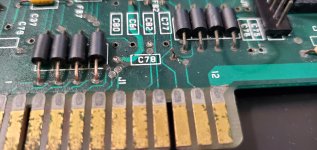
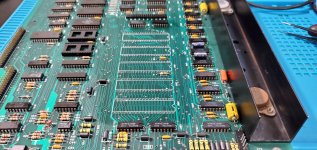
The mainboard looks much better after a short ultrasonic cleaning but it is very dull and has a film that nothing seems to touch (alcohol, CRC Electronic Cleaner, and I even tried BW-100 contact cleaner in hopes it would at least shine up the vias). The only areas that look good are around sockets that I used Deoxit D5 on but that stuff is oily so I usually only use it on sockets.
20221118_165401[1].jpg20221118_205653[1].jpg

You can see how much better the board looks on the right where D5 over-spray was wiped off.
20221118_211138[1].jpg

The 47 pf axial caps are all looking nasty so I'll replace them too before I start troubleshooting too.
20221118_205516[1].jpg
Luna wants to know why I am doing this and not throwing the ball of happiness!
20221117_184316[1].jpg
 
There is a moderate amount of corrosion on both the soldering (can see it on the solder in the vias where it has turned grey) and rust on some IC pins (TI used tin plated steel). Also interesting how some of the components must have had pressed on steel end caps that have rusted under the paint and the expanding volume of the rust crystals has caused the paint to crack and split away from the surface. The board must have been in a very moist environment. All of the oxidized solder could be replaced with fresh solder. Sometimes it can be necessary to gently scratch off the grey coating as it is a thermal insulator, to be able to replace the solder. And the board re-cleaned, and the badly rusted parts replaced, would be a long job. You could also replace the rusted voltage regulator.

If you want to get a good finish on the pcb last thing, you can apply Inox MX-3 to it with a cotton cloth then keep rubbing it down with a fresh cloth until most is removed, the small remainder in the microscopic surface pores of the matte conformal coating will give the board a much better, more glossy & uniform finish & protect it too.

One thing to be aware of is that the original Commodore IC sockets are single wipe. You can test them for friction by applying a standard IC pin soldered to a small wire handle. Don't insert anything other than a standard geometry IC pin, to feel each one. You may find some of those sockets require replacing and you can go to dual wipe type that are much better.

Luna is cute.
 
Can anyone suggest a good source for parts. I usually use DigiKey but they have no TO-3 Voltage regulators (7812) and I am having a hard time sourcing the 47pf axial capacitors. From what I can tell they are multi layer rated for 2kv. Obviously that voltage rating is not needed but I can't find any axial caps and would prefer something that looks more like the originals (See the image in post 26 if you want to see how they are degraded). I was looking at something like this one at Jameco if I cannot find the right thing (https://www.jameco.com/z/COG47-100-...ic-Ceramic-47pF-100V-plusmn-5-37-_332567.html)

edit: it looks like I will also have to sub radial caps for some of the axials (such as the 10uf 25v which I can only find at 400v which is much higher than the 2-3x I prefer to go on voltage ratings)

Mike
 
Last edited:
Can anyone suggest a good source for parts. I usually use DigiKey but they have no TO-3 Voltage regulators (7812) and I am having a hard time sourcing the 47pf axial capacitors. From what I can tell they are multi layer rated for 2kv. Obviously that voltage rating is not needed but I can't find any axial caps and would prefer something that looks more like the originals (See the image in post 26 if you want to see how they are degraded). I was looking at something like this one at Jameco if I cannot find the right thing (https://www.jameco.com/z/COG47-100-...ic-Ceramic-47pF-100V-plusmn-5-37-_332567.html)

Mike
The TO-3 case is now officially obsolete, which was stupidity in my view because epoxy packages have slightly poorer thermal properties at the max temperature area. But TO-3 doesn't lend itself as well to modern construction techniques. But they are probably the better power transistor package ever made. So these parts are turning up less & less at major suppliers now.

Many of the TO-3 cased 7812's are on ebay.

There is a very good mil spec version from a trusted seller on ebay, they cost a little more but they are really good quality parts:


Axial ceramic capacitors with the stripes are available on ebay, you might have to buy these overseas, or check the local major suppliers first. Mouser and Newark are the two to check.


If you did not mind a altered physical look you could use axial polystyrene caps or the mustard colored larger ceramic ones made by Kemet:

 
Last edited:
I have a couple questions for you all

Does anyone have suggestions for badly corroded solder? The back of the board is pristine and solders like a dream and, fortunately, the 40-pin sockets all came off easily but the solder on the top side of the board is black and I have tried all my tricks and the only thing that has worked is more heat and friction than I like to use. Even the vias are black and crusty as you can see:
20221213_151343.jpg
The solder look better in the pictures than in person but looking at the ferite beads here you can see how bad it is.

20221213_143918.jpg
I have tried cleaning with alcohol, BW-100, Deoxit-D5 and Inox MX-3 (Thanks for the tip BTW, it makes the rest of the board look wonderful). I have applied plenty of good quality flux and more solder - that won't stick unless I really rub the iron around and add a lot of heat and friction (Tested on a via). I started at 350C on my irons but found that the solder mask wasn't holding up that well so I lowered to 310C. I tend to prefer a hot iron with very limited time on the parts.

My main concern is that when I solder on the replacement parts the solder isn't going to flow through to the part side of the board as it should.

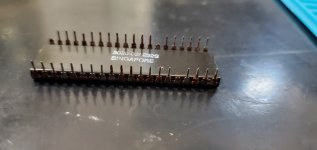
My second question is where to buy 6520, 6521, 6820s at a reasonable price? All 5 of the 40-Pin ICs on the board shed pins when removing them from the sockets. I did lube the sockets with Deoxit and let them sit overnight but it was unavoidable, they are just rusted through. I have plenty of 6522s and 6502s but I think the only place I could scrape up a 6520 would be to rob them from one of from my 8050 drives. I see them on eBay for $20 each but I have pretty much blown my budget already.
20221213_091930.jpg
 
I would very carefully scrape off as much of the black and grey oxidation as you can from the solder on the vias an pads with a small tool such as a Jeweler's screwdriver with a tiny blade perhaps 1 to 1.5 mm wide. You may start to see the copper appear in the case that most of the original solder has oxidized. With that sort of corrosion there, it can be hard to make a good thermal contact with the soldering iron because those oxides are excellent thermal insulators. You will have to be patient and deal to them all, carefully, one by one, so it will be a long job, don't rush it.

(in a worse case scenario of a failed or corroded away via, these can be well repaired with miniature Brass eyelets, I did an article on this once)

Do it under a very bright light with magnification, and be careful not to scratch the board surface and coating around the via and pad. Then add fresh solder to the via and pads. Make sure to use a good quality 60:40 multicore flux solder like Ersin Multicore or the equivalent product in the USA under the brand name Loctite. If you are stuck here I can find you the part number. There are a lot of very poor solders out there now. This will help disperse the slag (oxides and ash debris) to the perimeter of the the new solder, then you can clean that up again with the cotton tip cue sticks and IPA or contact cleaner. I would fill the entire via and plated through hole with fresh solder, then you can solder suck the holes as you need to fit new components.
Interesting, i think i have just the set of tools for that.... I've done quite a bit of miniature work in the past so your advice sounds like something right down my alley. Thanks!

As for solder I've been using MG chemicals 63/37. It's not multi-core but is very fine. Would the other products be significantly better?

Mike
 
Probably your solder is ok, but the best solder in the world is, and always has been, the 5 core Ersin multicore, invented in the UK, made to the near exact formula in the USA by Loctite. (And of course there have been many things invented in the USA superior to those in the UK, so it balances out). In this case the Brits aced the design. The flux is also inactive below soldering temperatures and it is safe to leave it, if you have to.

The exact one I use, 0.7mm dia, but if you search there are a number of variants:

https://www.newark.com/multicore-loctit ... n%20solder

The same solder comes in a range of diameters. I use the small diameter mainly because I do a lot of restoration work with IC's and pcb's.

The flux is far superior and it is better for soldering to imperfect and oxidized surfaces, once you start using it , likely you will never go back to any other kind of solder. And just a tip, don't go anywhere near Lead free solder, not even with a barge pole.
 
Yeah, i tried lead free once. I still have 99% of it... somewhere...

Currently I'm using a dab of chipquik flux along with the solder. I just tried cleaning the vias with a scraper and it looks good. My neck can only do a few at a time so i think I'll start by treating anything under parts I'm installing then do the rest after the board is working. Bonus, as i was doing that i opened the 47pf axial caps i ordered only to find 100 470pf caps... d'oh now i have to wait for the seller to replace them.

I've been trying very hard to search out new products and techniques, since i know my expertise is dated, so i appreciate the advice.
 
Bonus, as i was doing that i opened the 47pf axial caps i ordered only to find 100 470pf caps... d'oh now i have to wait for the seller to replace them.
Well, apparently they don't actually have these, they changed the listing to 470pf and refunded me. I cannot find that type of cap anywhere (Multi-layer axial) for the original look so I am guessing that radial or axial ceramics are the best substitution. Grrr Now I am back to square one time wise...
 
Last edited:
Well, apparently they don't actually have these, they changed the listing to 470pf and refunded me. I cannot find that type of cap anywhere (Multi-layer axial) for the original look so I am guessing that radial or axial ceramics are the best substitution. Grrr Now I am back to square one time wise...
Well at least there is plenty more work to do cleaning it up and with the vias etc to keep you busy. Probably you will need to get some IC's on order too, to replace the ones with the badly rusted pins.

Have you ordered new voltage regulators yet to replace the rusted ones ? There are mil spec versions of the 5V ones available too as well as the 12v versions, and also if you search uA7805 and UA7812 you can find the TO-3 ones on ebay. Also the LM309k can be used for the TO-3 package 5V regulator. LM309k-steel are still available from major suppliers , but they are highly priced over $70 so its better to get new old stock on the bay.

Also a good time to identify the screws (lengths & thread types)with the rusted heads, to order new ones. And the Hitachi Horizontal output transistor in the VDU.
I do have the voltage regulators and VDU transistor now, along with most of the needed hardware and screws. I am sure I will need to order more ICs but am on a budget so I've only ordered the obvious ones.

I was looking at the schematics for some of the other board revisions and they don't have the cap and FB filters on the IEEE-488 port so I am thinking I can move ahead and install caps when I can find the right ones. I also managed to break a contact off the fuse holder when reinstalling it (It was fatigued from bending) and the ones I had on hand turned out to be too big so I have them on order as well.

I ordered 8 74LS10s and it turned out to be 8 Oz (or about 60 ICs) so I know I'm good there :)
It sounds like it will be great when it is finished !
 
The transformer is done. I tested the paint and learned to reform a cap so very interesting.

There's an unlisted video at
. It will go live Saturday or Sunday but i thought I'd give you guys the early look since you helped so much.

Thanks
Mike
 
Back
Top