• Please review our updated Terms and Rules here

Any interest in a SOL-20 keyboard replacement?

I have interest for a Kaypro replacement. My Kaypro keyboard doesn’t work. I tried putting new foam but it did not work.
 
I have interest for a Kaypro replacement. My Kaypro keyboard doesn’t work. I tried putting new foam but it did not work.


I have included a 4-pin serial connector on the ASCII encoder board. To use a serial interface compatible with the Kaypro would be a matter of swapping the parallel out function with a serial-out function in the hardware layer. Adding DIP-switch selectable serial-vs-parallel is on the list of things to do, but I haven't yet done that.

However, the keyboards I have so far are not an exact mechanical replacement for the Kaypro. The kaypro seems to have some funny shaped keys, like a 10u spacebar, L-shaped Enter key, and wide 0 key on the keypad. The Kaypro seems to use a selectric-style layout, which means you could buy a PC-104 compatible set of Cherry MX keycaps to approximate the kaypro layout, and it would not be hard to extend the "classic" layout for the Kaypro, to get something very close. Or, just use the SOL-20 layout, which has plenty of keys that can be mapped to produce the proper codes for the Kaypro.

What kind of data does the computer send to the keyboard on the serial port?
 
I've made progress on the firmware front, and the ASCII interface is pretty much ready for the SOL-20 keyboard. I just received the new interface PCB with the SOL-20 connector, but won't be able to build it until this weekend.

There have also been some setbacks. The minor setback is a somewhat bonehead mistake. I created the keyboard PCB and aligners with the wrong distance between the numeric pad and the main keyboard section. I received those PCBs and aligners today. Luckily, the outlay for those boards didn't break the bank, but it means another week before I can try to build up a test keyboard.

mismatch.jpg

The greater and more grim setback is that the keycaps are manufactured in Washington state, which has been hit hard by the epidemic and is under lockdown. I don't expect to see those keycaps until after the epidemic is somewhat under control and the lockdowns start to ease up. I would not want anyone to take even a tiny chance on keeping production running for something like this. I wish all the folks in WA (and NY, Italy, Spain, and everywhere else in the world for that matter) good health and safety.

In the meanwhile, if anyone just likes keyboards and wants to build up an almost-Sol 20 keyboard, let me know and I'll sent you a PCB set for the cost of shipping. The Interface PCB will work and can be used with the corrected keyboard PCB, as well as with the OSI/Apple/ADM keyboard on Github. For that matter, it can be made to work with any keyboard matrix you have lying around, such as the surplus keyboard matrices sold by Radio Shack.

If you have a cheap source of cherry or futaba keys (such as the $4 for 20 futaba keys from Electronic Surplus), it would be a nice and inexpensive way to try out a preview of the SOL-20 keyboard and provide feedback, and also a way to burn some hours during the worldwide lockdowns. Even without the proper SOL-20 keys at the moment, it should be possible to fit this keyboard with a standard set of PC Cherry-MX keycaps, like the ones Al Kossow posted about here, or other keys. I would be happy to work with anyone on modifying the keymap as needed.

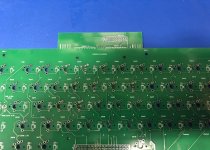
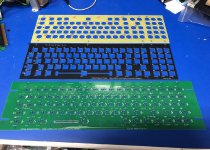
The pics below show the PCBs and aligners, and the alignment between the mounted keyboard and interface PCBs with the SOL-20 connector exposed.

Dave

kbd+interface.jpg pcb+aligners.jpg
 
Last edited:
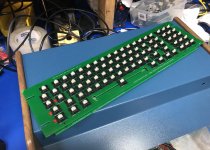
I got some new PCB's that I thought might be close enough to do a test build. I used the Futaba switches.
One change from the original revision is that I moved the mounting tabs from the PCB to the aligner. This allows the PCB to drop down below the mounting brackets so the keycaps will be at an appropriate height. The cherry keys can be lifted to the right height using spacers.

kbd.jpg

As a result, the triple-decker PCB stack of aligner/keyboard PCB/controller is about 6mm too thick to fit properly. This means that the controller won't clip directly onto the keyboard, but will mount further toward the back and will connect with a ribbon cable. On the next PCB revs, I will adjust mounting holes on the PCB to reposition the controller, and will add some additional mounting holes to the controller to make it more adaptable.

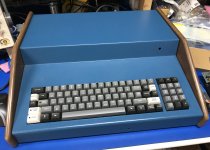
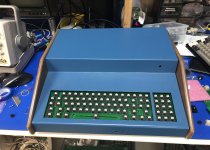
A test fit of the keyboard in the SOL indicates that I need to move the mounting slots toward the front by 0.1", but otherwise the fit is good.

fit.jpg

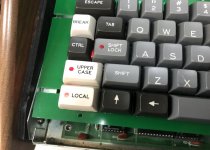
The controller board I have been using for development doesn't have the SOL connector, so I tried out the keymap in my Replica 1. The keymap appears to be working, for the most part, including the ALL CAPS, SHIFT LOCK, and LOCAL switches and LEDs. There are a couple of glitches I still need to iron out.

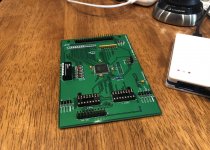
The newest versions of the controller (in ATMega328P and ATMega2560 flavors) have the SOL connectors. I built up a 2560 version, but haven't yet had a chance to do the port (which should mostly consist of simplifying the routines from the 328P).

controller.jpg

The keyboard+aligner "sandwich" is fairly rigid, so additional stiffeners may not be needed, but I've included holes for spacers or stiffeners along the top and bottom just in case anyone wants to use them. I am also waiting to get some wire I've ordered to evaluate various stabilizer configurations. The stabilizers will simply work for the Cherry keys, but might need some modification for the Futaba keys.

In the meanwhile, it seems that I may have the keycaps in hand sometime in May.
 
Progress marches on! Thanks for the update.

Personally I am looking forward to the day when someone makes a complete Sol MB replacement the size of a playing card with a 3D printed case - but with genuine oiled walnut side panels of course!
 
The keyboard is pretty much fully working now, except that I'm still waiting for keycaps.

There's one functional deviation from the original. The Sol keyboard produces a reset when UPPERCASE+REPEAT are pressed at the same time. The firmware is kept simple by avoiding any hard-coding of key codes or behaviors. The code uses keymaps to map the matrix to codes or functions, and there is a separate keymap for each modifier (plain, shift, caps, ctrl). I


In order to avoid hard-coding a special function for the Sol, and also to avoid adding an extra map just for the UPPERCASE+REPEAT combination, I'd like to remap this function to CTRL+REPEAT. Do any Sol enthusiasts have sufficiently strong feelings about this?
 
The keyboard is working with my SOL-20. The behavior is faithful, with the above exception of CTRL+REPEAT for reset, instead of ALL_CAPS+REPEAT. This keyboard is configured for autorepeat (in addition to the REPEAT key), which is the other known deviation from the original. However, the autorepeat can be enabled or disabled using a DIP switch. To use this keyboard with the SOL-20, a DIP switch will also need to be set for negative Strobe.

Still waiting for the keycaps with fingers crossed. . .
 
I finally got the keycaps in!

Bear in mind that the basic keycap set has to be a good fit for several different machines, and therefore won't be an exact match to the Sol. The Sol-specific add-on keyset matches the basic set. These keys are less glossy than the Sol keys, more of a satin finish. I ordered "deep dish" F and J keys for homing, but once I have them I see that the "deep dish" keycaps are closer to the original key shape. The rest of the keys with the normal SA shape are slightly shallower. But the keys are look and feel great, and are high quality double-shot keys (except for the keys with LED lenses, which had to use dye-sublimation printing since the window uses the double-shot process).

I added the keycaps on my keyboard, and took some photos:
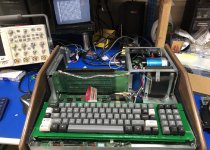
kbd_in_operation.jpg led_keys.jpg kbd_fit.jpg

My lab is washed in LED lighting, so the pics don't capture the LED lights very well, but they do look good, and that's without trying to optimize the LED installation. I think the LEDs will benefit from mounting a little higher off the board and bending them inward at the level of the aligner.

The fit is overall pretty good. The keyboard I have is one rev behind the latest. The latest rev moves the slots slightly to better position the keyboard within the cutout, and also adds some mounting holes on the right side of the keyboard, to allow mounting the encoder board so it doesn't bump into the main board. I have some of the new revs, but was too eager to try out the keycaps to build a new board up. In fact, I may just keep what I have and do some drilling and filing instead.

I think the futaba keys are not too far off the feel of the original, and they're cheap, so I used futabas in this build. I believe I have a solution to use the cherry stabilizers for the futaba keys, and will post the stabilizer results soon.

I did notice some errors, seen in the photo below:

errors.jpg

There may be more, but what I noticed is that:

1) The RETURN key is gray, but should be black. I believe this is a factory mistake, and hopefully they will correct it.
2) I forgot to order a DEL/_ key. You can see I fitted a RUBOUT key from the basic keyset, but I will probably go ahead and order the DEL key for completeness.
3) I specified the keyboard decimal character as a period ("."), and it's not centered in the key. That's my fault. I'm not sure if I'm OCD enough to order a replacement, though.

Anyway, as far replacing the missing keyboard for my "unibody" Sol, I think I'm set. If anyone is interested in building one up, I have quite a number of keysets available.

Dave
 
Huzzah! That's wonderful, Dave! I will have to get one for sure, I know not when. I just moved and am still living in a sea of cardboard boxes in a house which needs a HVAC replacement and a bathroom remodel. In other words, I don't see getting my workshop set up for months. Hell - I'd pay double for an assembled unit just to be sure I could use it before I kicked the bucket!

But it's a great accomplishment and I salute you.

I second that, a fantastic effort, very impressive.
 
Thanks!

I contacted the manufacturer, and they will remake the RETURN key in the dark gray (near black) color. While they are at it, I am also ordering the DEL key and the centered decimal (.) key. I think the lead time will be much shorter this time.
 
For future reference, I have sorted out the stabilizers.


- For both Cherry MX and Futaba spacebars, use the screw-in PCB mounted stabilizers. The PCB is ready for these at the Spacebar and 2x SHIFT position.

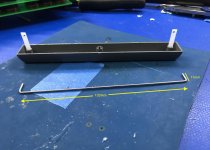
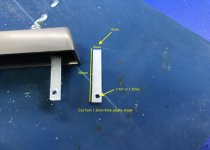
- For both Cherry MX and Futaba keys, there is no available pre-made 8x stabilizer rod. To make one, start with a stainless steel rod at least 6"/150mm long, but that leave no room at all for error. I suggest at least 8" or 200 mm long. The diameter can be 1.5mm or 1/16 inch. Bend/cut the rod so that it is 133mm long, with a 90 degree bend and an 11mm arm at either end. (see picture.) Measuring is nice, but it's best to eyeball the rod as you work.

- For the Cherry MX, assemble according to instructions, using the 8x rod you made. The ends of the rod slide through the post and snap into the small detent at the front of the screw-in base. Since the cherry keyboard kits come with 2x stabilzer bars, and since the PCB can accomodate the stabilizers, you can also install the stabilizer for the 2x shift key.

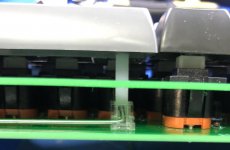
- For the Futaba keys, the cherry stabilizer posts are too short, so you will have to make your own from 1.5mm plastic sheet material.
  1. Cut two 4mm x 28mm strips, and drill a 1/16" (or 1.5mm) hole close (1-2mm) to one end of each strip. Make sure the holes are about the same distance from the end.
  2. Insert the strips into the spacebar stabilizer slots, using pliers to push as far in as possible, so the holes are the same distance from the spacebar
  3. install the spacebar, and then install the 8x stabilizer bar as for the cherry keys.
  4. I found that the 2x shift key was plenty stable without a stabilizer. But if you want to install it, then follow the same procedure as for the spacebar. You should be able to use the 2x stabilizer bars that came with the cherry MX stabilizer kit.

futaba_stab_bar_and_posts.jpg futaba_stab_post.jpg futaba-stabilizer-in-place.jpg
 
I tried the following metal rods:

McMaster-Carr: Tight-Tolerance Easy-to-Machine 303 Stainless Steel Rod
Ebay: 1.5MM STAINLESS STEEL ROD BAR SHAFT 300MM MODEL MAKER 316 MARINE GRADE ROUND

It looks like 1/16" TIG welding filler rod would work as well. Here's an example:
Ebay: ER308L 1/16" x 36" 1-Lb Stainless Steel TIG Welding Filler Rod 1-Lb

For the 1.5mm material, I recommend a plastic sheet with slippery surfaces. I've tested the following:
McMaster-Carr: Moisture-Resistant HDPE 4" Wide, 0.05" Thick
Ebay: US Stock 2pcs 1.5mm x 7.87" x 9.84" Black ABS Styrene Plastic Flat Sheet Plate
 
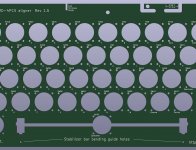
Last night I experimented with adding in a wire-bender to the PCB, but I got the most consistent results using a pair of pliers and a couple of guide holes, so I added the guide holes to the Cherry and Futaba PCBs. I also added four aligner posts to the Futaba PCB, to elminate the need to order and cut a plastic sheet. The posts can be broken off, and the top filed to the right thickness. I also included a thickness gauge for the posts, not yet tested, but the keys themselves are the ultimate guide.

aligner-guide.jpg
 
Last edited:
Back
Top