• Please review our updated Terms and Rules here

Model II boot error RS next steps

TXNathan

Experienced Member
Joined
Mar 15, 2018
Messages
84
Location
DFW
Hi all

So I have this model 2 that I have been tinkering with for months with little success. I went from nothing to a boot error RS. Previous posts led me to chasing voltages and I determined that the 5V was low at 4.6V anywhere I could check. I ended up replacing the power supply with a meanwell and now all the voltages check good everywhere. But still no change.

My primary question is where do I do from here? Other questions are what should the reset switch do in this state? It doesn’t do anything. I have homed it out and it’s functioning but nothing happens.

I ohmed out the big cable from the FDC to the Drive and it’s good. I have disconnected the drive from the system and nothing changes.

If I had extra cards I could swap them but I do not. I would be happy to send the cards somewhere to someone that could test them in a working machine but there were no takers

Open to suggestions

Thanks in advance

Nathan
 
@TXNathan

Using the reset switch should turn off the drive, clear the screen and after a few seconds it should display 'Insert Diskette'
The RS boot error tells that the drive could not recognize the diskette as a TRSDOS bootable diskette.

Steps to take:
Remove each card and carefully clean the 80 finger connector on both sides with a soft pencil eraser.
Re seat each card in his slot and check if it is fully inserted !!!! (Use a lamp and mirror to be sure)
Clean the connector on the FDC and the drive with the pencil eraser and check the orientation.

If you have a Shugart SA800 drive you NEED to use the terminator on the external connector.

As an alternative you can use a HxC adapter or a modified Gotek adapter and a 34 to 50 adapter to replace the diskdrive.
In that case you don't need the termination as it is inside the HxC or Gotek.
 
Ok I cleaned all the contacts on both sides of the cards. Much brighter now but no change. I fiddled with the reset switch some more and found the schematic for it. It doesn’t do anything at all when I actuate it. I verified it’s working with the meter both at the switch and at the card but nothing. I get 5V at one of the pins on the card that the switch connects to and it goes low to zero when I flip the switch. I assume that is the idea. Odd that not even a screen flicker when I do that. I’ll investigate a bit further but am hoping someone can offer some guidance on both issues. I assume they could be related?
 
Some things to try.

Remove the reset cable from J2 on the CPU-board and turn the power on.
What happens, Does the screen clear, What is on the screen, Is the floppy led on, is there a keyboard led on.
Next to check the big chips on the CPU board. Try to swap the CPU (Z80) and CTC chip. What happens ?
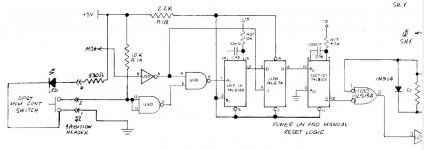
Check the reset logic with a probe: U20, U30, U27, U28

Reset01.jpg
 
Last edited:
Thanks Hans

I’ll see what happens when the plug is unhooked. I’ll also do a better job of telling what I am seeing. As for swapping the chips, the CTC is listed as a 8047882 in the tech manual. On my board the chip with that part number is a 28 pin chip. The CPU Z80 is listed as PN 8047880 which is a Z80 40 pin chip. There are two others on there that are also 40 pin chips labeled 8047883 and 8047884. Should I swap one of these? Is the chip the same? I also have a Z80 CPU from an old arcade that is believed good but I’m not sure if they are all the same

Thanks
 
The system is running a 4 mHz. So all the big chips need to be made for 4 mHz.
You can see the additional -A to the device name, like Z80-A.
The Z80 and CTC are dead in most cases, so start to swap them first.
 
Ah. You mean swap them with other like chips not with each other. That makes sense. I’ll hunt for some to swap
 
Yes of course, you must swap a Z80A with a good working (new) Z80A and a CTC for a CTC too.
I think it is the easiest way to find them on Ebay.
Try to search on internet for: buying Z80A. I got a lot of hits.
 
Allow me one more likely dumb question. I see these chips at mousers with 6Mz clock speeds. Is there some backwards compatibility with respect to speed?
 
Either a Z80B rated for 6 or a Z80H rated for 8 should work fine at 4. I don't know about the CMOS versions (Z84C00xx) chips, although you can get those in up to 20MHz ratings. There are some minor differences between the NMOS and CMOS chips, but they are at least supposed to be compatible.
 
Feel free to PM or email me and we can arrange for you to send me your cards. I'll test them for you so at least you can get a sense for where the issue may be. It can be very difficult to troubleshoot some issues without spare working cards.

pete@pski.net
 
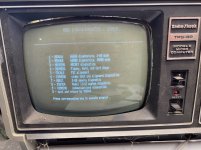
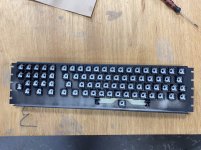
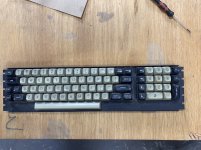
I believe I have learned more from this group and the trash talk podcast than I could have anywhere else. After Pete tested my cards I still could not get the system to boot up. I recalled an old trash talk podcast where they said the video board from the model 3 was the same as some model 2 machine. As one of you pointed out I was getting a lot of trash on the screen of my model 2 during the testing. I went ahead and swapped the video board from one of my model 3’s that I knew to work and the entire system calmed down. I got the insert disk prompt on a stable screen. I was extremely excited at this point. I hooked the floppy back up, cleaned the head and inserted the boot disk. My only boot disk. Nothing. I flipped it over and it booted. I can’t believe it. Of course the keyboard is a disaster but I didn’t want to invest any more into this until I made some progress. I ordered the key pads from Texelec. With these in hand I’m ready to make take the next step. I have all the old pads out but the keys are filthy. I saw a video where the guy pulled all the caps and cleaned them. I can buy a cap puller but can I not run the key part through the dishwasher? Will it damage the springs? What is the best course of action here?
 

Attachments

  • 3AE526D3-D90A-4BBE-B17A-BEEED5553EAD.jpeg
    3AE526D3-D90A-4BBE-B17A-BEEED5553EAD.jpeg
    408.4 KB · Views: 8
  • 1FFE02A3-51CD-4945-87BC-D70B705198CA.jpeg
    1FFE02A3-51CD-4945-87BC-D70B705198CA.jpeg
    495.6 KB · Views: 8
  • A8C79F58-F4B7-4E76-B5D9-DE5F690D3F57.jpeg
    A8C79F58-F4B7-4E76-B5D9-DE5F690D3F57.jpeg
    462.3 KB · Views: 9
I saw that the key assembly clips into the metal panel that makes up the keyboard. I removed one but on the second one a clip broke so removing the key assemblies is not desirable. Perhaps the caps is the way to to go or just throw the mechanism in the dishwasher. I wait for input from all of you since you have got me this far

Thanks,

Nathan
 
My first inclination is to moisten a rag with Windex and gently wipe off the keys in place. If they are past the point where that is practical, pull the keycaps and wash them in a basin using dish soap and a toothbrush. Old plastic gets very brittle (as you've discovered) and I would not recommend removing the individual mechanisms from the back plate. The dishwasher approach is controversial and I've personally never had the nerve to do it.
 
Thanks Shirsch

I also feared the dishwasher for the keyboard itself. Although I did run all the plastic housings through there and it cleaned them up to a point that I can use them. I ordered a key cap puller last night so we will see how that goes. I’ve seen it done but never tried myself. I assume they are just clipped on and will pop right off with the puller ? That’s how it looks in the videos I have seen.
 
I believe you can simply pop them off, but absolutely check with the friendly folks on the Tandy Troubleshooting Discord to double-check. If they are removable it's very simply to tug them out, but make sure the puller doesn't snag the adjacent keys as you'd run the risk of torquing them unevenly and breaking something.
 
Back
Top