• Please review our updated Terms and Rules here

DEC RX02 Emulator - AK6DN

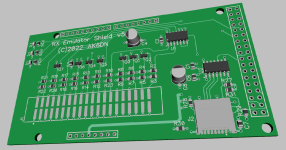
Well, did some more fooling around and ended up with this version. MicroSD card is now on the edge, removed three unused Arduino headers to give edge access.
Fabbed a proto thru JLPCB, and it looks like they have about 95% of the components I used in their assembly stock, so may get a few built for testing.
Only the Arduino headers need be hand soldered. Sticking with all other components as SMT. Have not found a 40p connector that is SMT but has wings for secure mounting.

rx02_emulator_3d.png
 
Well, did some more fooling around and ended up with this version. MicroSD card is now on the edge, removed three unused Arduino headers to give edge access.
Fabbed a proto thru JLPCB, and it looks like they have about 95% of the components I used in their assembly stock, so may get a few built for testing.
Only the Arduino headers need be hand soldered. Sticking with all other components as SMT. Have not found a 40p connector that is SMT but has wings for secure mounting.

Nice, but I think you put your MicroSD connector on backwards. I little hard to tell from the picture, but looks like it's one of those models/footprints that has the connectors in the front so it's currently facing inward on the board and card insertion would be blocked by the components in front of it. Also, I tend to run these right up to the edge or the board, and sometimes even overhang a little depending on the footprint, to make it easier to insert and remove the card, especially when cased.

Generally tend to use this style push-push model, it's the same footprint as the ones you see all over eBay or AliExpress.

 
LOL I think you are right about the MicroSD socket orientation. I just assumed all the connectors were at the back. Datasheet is not real clear but I think you are right. Whoops.
 
Ok, fixed. Don't know if my protos will be usable. Only cost $7 for three boards tho so no big deal. Thanks for the design review!

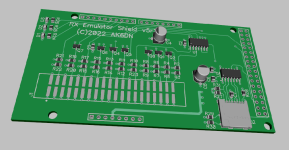
Updated version ...

rx02_emulator_3d.png
 
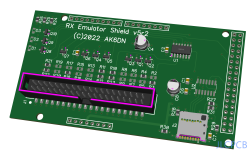
Well, some more progress. Uploaded new gerber and bom and pick and place file to JLCPCB, and here is what I get.
Notice D1-D3 and U2 are missing. They are out of stock, need to find some compatible replacements (or change footprint, yuck).
JLCPCB says assembled cost per unit is $13 in a build of 5 units. PCB is $7 and parts are $5 and assembly is $1. Shipping is the most expensive part LOL.
capture-2022-10-19T04 01 49.510Z.png
 
Last edited:
Your new board looks great and for this type of application surface mount and assembly by JLCPCB makes a lot of sense.
I had a very good run with JLCPCB both with PCBs and 3D printed parts.
As you wrote shipping is the most expensive part, but at least to Australia it is very quick (2 - 3 days).
Thanks for your amazing work for the DEC collectors community.
Tom
 
Well, some more progress. Uploaded new gerber and bom and pick and place file to JLCPCB, and here is what I get.
Notice D1-D3 and U2 are missing. They are out of stock, need to find some compatible replacements (or change footprint, yuck).
JLCPCB says assembled cost per unit is $13 in a build of 5 units. PCB is $7 and parts are $5 and assembly is $1. Shipping is the most expensive part LOL.
View attachment 1247449
With artwork like that, next thing you know two whackos will run in, throw tomato soup all over it, glue themselves to your workbench, and start ranting slogans.

;-)
 
Note for those still interested, as of today I have a total of (8) PCB($10) + microSD($5) + full parts kits($15) available.
Note this is the original thru hole v4r2_2n7k based design (thru hole, not SMT) that goes on a standard ArduinoMega2560 platform.
DM me if interested.
 
Last edited:
Well, I went ahead and did a build of 10 SMT protos thru JLCPCB. I wanted to source all the parts thru them (makes the assembly process go smoothly) and not have to do any rework myself.
So I could not find a suitable low current 2ma LEDs and had to go with standard 20ma devices, so I added 2N7002 driver transistors for each of the three display leds. Not a big deal.
For the 5V/3.3V 4bit bidirectional translator TXB0104 I used, they did not have the SOIC14 package in stock, but I had to substitute a TSSOP14 instead.
So after the UPS box arrived today, I unpacked and soldered on the thru-hole Arduino headers (now 2x8P, 1x10P, 1x36P). This is the only hand assembly required.
I think I could have had that done by JLCPCB also, but I was using the one-sided basic SMT process and did not want to perturb that flow. So some hand assembly required, about 5min of work.

And the board works, 100% compatible with the existing Arduino code and the microSD card. Just swapped out an old thru-hole v4 board on my 11/44 setup with this new v5 board,
swapped the microSD card in, powered up, and off to the races. Ran the basic DEC RX02 diagnostics (ZRXFB0 logic test, ZRXDC0 data exerciser) and they both fully passed, same as old v4 version.
Will run it on my PDP-8m RX8E/28 later this week, but I don't expect to see any different behavior.

Overall I was very happy with the working with JLCPCB. I had built bare boards with them before, so no change there. Quantity 10 of this 55x100mm 4 layer board cost just $2 each.
Surface finish leaded HASL, if you want ENIG gold it has a adder.

Overall total cost to me per board (PCB fab + parts cost + assembly cost + UPS shipping) was about $12.50 each. Much lower than I thought it was going to be. I was expecting about twice that.
JLCPCB has an extensive inventory parts library and their cost per device is usually 1/4 to 1/3 that of buying small quantities of parts from Mouser, DigiKey etc.
Anyway they did an excellent job overall (PCB fab in 4 days, assembly in 2 days) for a build of 10 boards. I used UPS shipping this time vs DHL other times. Same cost but arrived in half the time (3 days).

Here is a picture of the board (headers not yet attached on the backside) as delivered from JLCPCB:
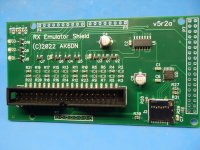
rx02_emulator_pcb_4layer_v5r2a_smt_tssop14.jpg
 
Last edited:
Very nice. I you have a STEP file output from your EDA software I can whip you up a 3D printable case design. Got the process down to less than an hour with DesignSpark if I have something to model around and don't have to rely on manual measurements.
 
If this design makes it to actual hardware, please count me in.

Does the emulator firmware support emulating more than one drive on a single board?

Would it make any sense to replace the ATMEGA with a Raspberry Pi Pico instead (faster, more RAM, dual core, better parts availability)?
 
If this design makes it to actual hardware, please count me in.

Does the emulator firmware support emulating more than one drive on a single board?

Would it make any sense to replace the ATMEGA with a Raspberry Pi Pico instead (faster, more RAM, dual core, better parts availability)?

Yes, it emulates two drives.

AK6DN already has a through hole version of this available for several years now, https://github.com/AK6DN/rx02_emulator Last I saw he still has boards/kits available if you would like to build one now.
 
If this design makes it to actual hardware, please count me in.

Does the emulator firmware support emulating more than one drive on a single board?

Would it make any sense to replace the ATMEGA with a Raspberry Pi Pico instead (faster, more RAM, dual core, better parts availability)?

You can read all about the emulator here: https://github.com/AK6DN/rx02_emulator.

But simply, it does everything a standard dual drive RX01 or RX02 can do, on any compatible DEC interface (RX11, RX211, RXV11, RXV21, RX8E/28 and other systems with embedded RX ports).

It could even do RX03 or RX04 or ... if there was any software to support them. The bits are there TRACKS(8b) x SECTORS(8b) x HEAD(1b) x BYTES/SECTOR(256.) to allow for a disk to contain up to 256x256x2x256 = 3.25MByte total addressable storage. So is this an RX09? Dunno.

I originally looked at the base Arduino but it was not powerful enough and lacked sufficient internal RAM storage. The Mega256 came along (this was like 8 or 9 years ago now) and it was perfect. I did briefly look at the RPi back then but it did not provide any benefit over the Mega2560 and indeed would have made the software more complicated. The Mega2560 can run the interface as fast as the hardware can run, so even with infinite computing power it would not be any faster in practice. Mega2560 clones just $10 on AliExpress. The RX interface is the limiting performance factor with its bit serial implementation.

And this is still true:

Note for those still interested, as of today I have a total of (8) PCB($10) + microSD($5) + full parts kits($15) available.
Note this is the original thru hole v4r2_2n7k based design (thru hole, not SMT) that goes on a standard ArduinoMega2560 platform.

I also have about half a dozen extra of the SMT version. If anyone wants to play around with one of those let me know. $20 plus shipping.
100% compatible with the thru hole version, exact same software and microSD card images work. Same Mega2560 platform.

DM me if interested.
 
Last edited:
You can read all about the emulator here: https://github.com/AK6DN/rx02_emulator.

But simply, it does everything a standard dual drive RX01 or RX02 can do, on any compatible DEC interface (RX11, RX211, RXV11, RXV21, RX8E/28 and other systems with embedded RX ports).

It could even do RX03 or RX04 or ... if there was any software to support them. The bits are there TRACKS(8b) x SECTORS(8b) x HEAD(1b) x BYTES/SECTOR(256.) to allow for a disk to contain up to 256x256x2x256 = 3.25MByte total addressable storage. So is this an RX09? Dunno.

I originally looked at the base Arduino but it was not powerful enough and lacked sufficient internal RAM storage. The Mega256 came along (this was like 8 or 9 years ago now) and it was perfect. I did briefly look at the RPi back then but it did not provide any benefit over the Mega2560 and indeed would have made the software more complicated. The Mega2560 can run the interface as fast as the hardware can run, so even with infinite computing power it would not be any faster in practice. Mega2560 clones just $10 on Amazon. The RX interface is the limiting performance factor with its bit serial implementation.

And this is still true:

Note for those still interested, as of today I have a total of (8) PCB($10) + microSD($5) + full parts kits($15) available.
Note this is the original thru hole v4r2_2n7k based design (thru hole, not SMT) that goes on a standard ArduinoMega2560 platform.

I also have about half a dozen extra of the SMT version. If anyone wants to play around with one of those let me know. $20 plus shipping.
100% compatible with the thru hole version, exact same software and microSD card images work. Same Mega2560 platform.

DM me if interested.
I agree that a Raspberry Pi would be way overkill for an RX0X emulator. However, the Raspberry Pi Pico RP2040 is an embedded micro made by the Raspberry Pi Foundation. The chip costs $0.80/500. It does require an external QSPI flash chip for program storage.

The basic Raspberry Pi Pico dev board lists for $4 in single quantities.

I plan on making my PDP-8 debugger using this chip and a programmable logic chip.

Here are it's basic specs:
  • Dual-core Arm Cortex-M0+ @ 133MHz
  • 264KB of on-chip RAM
  • Support for up to 16MB of off-chip Flash memory via dedicated QSPI bus
  • DMA controller
  • Interpolator and integer divider peripherals
  • 30 GPIO pins, 4 of which can be used as analogue inputs
  • 2 × UARTs, 2 × SPI controllers, and 2 × I2C controllers
  • 16 × PWM channels
  • 1 × USB 1.1 controller and PHY, with host and device support
  • 8 × Raspberry Pi Programmable I/O (PIO) state machines
  • USB mass-storage boot mode with UF2 support, for drag-and-drop programming

Well, if I were starting the project from scratch today I might consider it. But eight years ago it was not an option.
Most of those features are overkill or irrelevant for an RX device emulation engine.
When I need to hammer small nails to hang a picture I don't use a 20lb sledgehammer.
 
Last edited:
Well, if I were starting the project from scratch today I might consider it. But eight years ago it was not an option.
Most of those features are overkill or irrelevant for an RX device emulation engine.
When I need to hammer small nails to hang a picture I don't use a 20lb sledgehammer.
If the 1lb hammer will do the job but costs $10 and the 5lb hammer will more than do the job and costs $5 the decision may be different. However, the RP2040 wasn't available when you designed the original emulator.

I was only suggesting the RP2040 as an option for a potentially lower cost board.
 
If the 1lb hammer will do the job but costs $10 and the 5lb hammer will more than do the job and costs $5 the decision may be different. However, the RP2040 wasn't available when you designed the original emulator.

I was only suggesting the RP2040 as an option for a potentially lower cost board.

I get that. Given the choice I will always buy the better, more expensive tool. But using the wrong tool is not a good solution.

At this point though the market for an RX drive emulator seems to be saturated and in decline. Everybody that wants/needs one appears to have bought one.
Not sure a cheaper version would really matter too much. I did the SMT version just because I wanted to play with SMT assembly. Not because the market was there.
I've had ten thru hole kits for sale for the past two years and sold two I think.
 
Last edited:
I get that. Given the choice I will always buy the better, more expensive tool. But using the wrong tool is not a good solution.

At this point though the market for an RX drive emulator seems to be saturated and in decline. Everybody that wants/needs one appears to have bought one.
Not sure a cheaper version would really matter too much. I did the SMT version just because I wanted to play with SMT assembly. Not because the market was there.
I've had ten thru hole kits for sale for the past two years and sold two I think.
I've never understood the "bigger hammer" concept, but then I've never been a Ford fan. I can tell you it's a bit dicey trying to drive a 4d finishing nail with a 20 pound hammer.

Picking the best tool for the job is a better policy IMHO.

And I can vouch for you having sold at least two emulator kits in the last year. They're right here on my desk.
 
Back
Top