• Please review our updated Terms and Rules here

Fred the Floppy's Repair Log (8050M)

Just realised your name should be read backwards ...:) seen your posts on FB

The transformers are usually reliable though I wondered if someone cut the plug off as part of a disposal process ?
I have a 2001-8 that is missing the plug also. The silver sins filter defo. Needs to be removed as it will pop with interesting smells...

Andy


Cleaned up OK... will leave to fully dry out whilst I look elsewhere...

View attachment 65484

Need to spend time with the Power Supply... although I will probably look at the case next due to the flaking paint... not only was the plug chopped off it seems that a green Earth wire inside is also chopped... I hope they isn't something nasty going on.
 
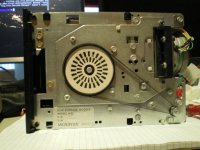
Interestingly one of the 8050 diagnostic programs displays the drive speed and you can adjust the pot in situ .... I wonder if the calibration disc was for crude setup and the diagnostic program for fine tuning ?

It was part of the standard drive manufacture back then. I have various other makers' drives with the same strobe disc. The advantage is that you can adjust the speed without connecting the drive to anything other than a power supply. Just ground the "Motor On" pin and Bob's your uncle. The discs went the way of the dodo when direct-drive motors became the standard.
 
Last edited:
I've taken out the two drives and have started brushing off most of the crud.

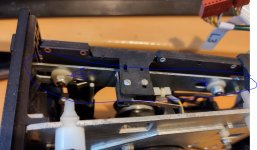
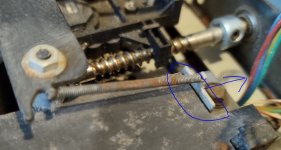
I noticed that the slider bar (sorry I do not know the technical term) which is pushed down by the floppy does not slide easily, specifically the rusty spring doesn't pull it back.

Would it be OK to add lithium grease around the nylon washers?

Capture.JPG

and

Capture2.JPG
 
Lithium Grease will attract Dirt/Dust. Why not use some Dri-Slide (a Motorcycle cable lubricant that does not
attract dirt/dust)? It available at most any Motorcycle shop, and a small can will be a lifetime supply. It's also good
for lubricating all your Locks on the car, house, toolbox, etc.

I also use it on the Head Guide Rails for 5.25" Floppy Drives, and the Scanner Rails. Works Great.

Larry
 
You'll notice the nylon bushings used to attach the diskette ejector bar. These are meant to be self-lubricating; the bar is not a high-duty item, so it should slide freely. If it doesn't, loosen (one at a time) the locknuts on the bushing studs and inspect them--there's probably a fair amount of dirt there that needs to be cleaned off. Re-install the locknuts just so the ejector bar moves easily. If you use any sort of oil or grease, it will attract dirt which will grind its way into the nylon bushings. The exact tension on the bar isn't critical--the whole thing is made to eject the floppy when the door is opened.

Micropolis didn't really change the basic mechanicals on their drives until the 1115, so you can use the 1015 service manual in bitsavers as a guide.
 
Just to show you how similar that 101x drives to the 100x ones, here's a shot of one of my 1015s:

IMGP0002a.JPG

Since this is a single-sided drive, I've been thinking about swapping the stepper/leadscrew with the one on my 1115 96tpi drive to 100 tpi. The 1115 is a beast of a drive.
 
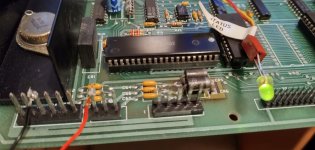
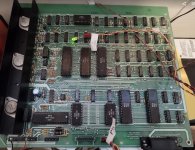
I took the main PCB out (I am disassembling so I can sort out the paintwork) and couldn't resist a quick test.

I applied 9V to pins 3 and 8 of P4... i.e. the +ve and GND of VR3. It sinks a quite considerable 1.65A @ 9V...

Anyway with just the bicolour status LED connected (which I think I have the correct way round)... it starts RED, changes to Green, quickly changes back to Red and then quickly changes to steady Green and stays Green. Not sure about the transition but the steady Green seems hopeful... in fact so hopeful maybe I should not tinker further.

The 6532 at UE1 feels quite toasty; others warm.

Capture.JPG
 
It’s difficult to say but the solid green light suggests at first glance it has passed its tests. However I have never carried out this specific test so cannot comment further. I have always had everything connected up. I assume you have a copy of the blink codes ?

There are 8050 diagnostic programs I can send you if you PM me.


To be clear... +9V to Pin 3, GND to Pin 8!
 
It’s difficult to say but the solid green light suggests at first glance it has passed its tests. However I have never carried out this specific test so cannot comment further. I have always had everything connected up. I assume you have a copy of the blink codes ?
Yeap. I have Page 2 of the Service Manual... I think perhaps the initial colours are probably during RESET so maybe it actually be correct... e.g. the Drive LEDs start on.... they blink (OFF, then ON) and then go off and stay off, meanwhile the ERRLED starts green, blinks red and then stays green.
I had expected either ROM or RAM issues as these were present on my PET... maybe I got lucky... especially given some of the ROM is in the 6530 which looks unobtainium.
 
Being the sort of person I am I decided to dump the ROMS... Specifically UL1 901482-07 and UH1 901482-06...

The really weird thing is that these ROMs do not match the images at http://www.zimmers.net/anonftp/pub/cbm/firmware/drives/old/8050/index.html or more specifically they do match but the wrong way round! My UL1 901482-07 matches 901482-06.bin and vice versa!

The UK6 901467-01 ROM does match.

I can only assume that whoever originally dumped the ROMs mixed them up?
 
Last edited:
Discussed with zimmers and looks like I was right. The images in the wild are the wrong way around. There also appears to be a bug in the service manual... the blink codes refer to UL1 and UH1 the wrong way round and it seems many people have taken that as a source so they also have it the wrong way around. UL1 is $C000-$DFFF and if removed you get three blinks. (So UL1 and UH1 are the wrong way around on p5 of the service manual; also the UH1 ROM is $E000-$FFFF not as stated).

Anyway the board is working nicely when powered with the bench supply (takes around 1.7A @ 10V)

Solid Green after diagnostics

Capture.JPG
 
Something fun I discovered along the way is that the ROMs have their own checksum self-defined... if you checksum the $C000-$DFFF ROM you should get $C0; and if you checksum the $E000-$FFFF ROM you should get $E0.

Code:
from pathlib import Path


def calculate_checksum(fname):
    data = Path(fname).read_bytes()
    sum = 0
    carry = 0
    for b in data:
        v = int(b)

        sum = sum + v + carry
        carry = 1 if sum > 255 else 0
        sum = sum % 256

    # Add in extra carry
    sum = sum + carry
    sum = sum % 256
    return hex(sum)[2:].zfill(2)


fnames = ('fred_UL1_901482_07.bin', 'fred_UH1_901482_06.bin', '901482-07.bin', '901482-06.bin')

for fname in fnames:
    print(f"{fname} {calculate_checksum(fname)}")

which gives...

fred_UL1_901482_07.bin c0
fred_UH1_901482_06.bin e0
901482-07.bin e0
901482-06.bin c0
 
That’s Good to know.....the rom mixup find is also a nice find.


Something fun I discovered along the way is that the ROMs have their own checksum self-defined... if you checksum the $C000-$DFFF ROM you should get $C0; and if you checksum the $E000-$FFFF ROM you should get $E0.

Code:
from pathlib import Path


def calculate_checksum(fname):
    data = Path(fname).read_bytes()
    sum = 0
    carry = 0
    for b in data:
        v = int(b)

        sum = sum + v + carry
        carry = 1 if sum > 255 else 0
        sum = sum % 256

    # Add in extra carry
    sum = sum + carry
    sum = sum % 256
    return hex(sum)[2:].zfill(2)


fnames = ('fred_UL1_901482_07.bin', 'fred_UH1_901482_06.bin', '901482-07.bin', '901482-06.bin')

for fname in fnames:
    print(f"{fname} {calculate_checksum(fname)}")

which gives...

fred_UL1_901482_07.bin c0
fred_UH1_901482_06.bin e0
901482-07.bin e0
901482-06.bin c0
 
Back
Top