• Please review our updated Terms and Rules here

Newly acquired 11/23+

So after spending time reforming the CPU box power supply, and burning it in for several day, I finally did a smoke test of the CPU board and 256k memory.

The diagnostic lights (image attached) show "off - Power - on - off - off", according to the manual (EK-245AA-MG-001, table 3-1) means the basic system diags passed. But I cannot get anything from the console. I've verified my cabling a dozen times, and checked the default switches and jumpers (figure 1-1 and table 1-3 in the same manual). A scope on the console pins show no activity. This weekend, I plan to build a franken-cable, just three loose wires (tx, rx, gnd) that I can run and visually verify, but I wager I won't get any different results.

I notice that the power LED on the diagnostic LEDs seemed a bit dim, so out of curiosity, I checked the 5v rail, and it measures a steady 4.9v. Not sure if that is too low or what.

So currently stalled, not sure what to do. I recall reading "somewhere" about calibrating the H7861 power supply, but now I can't find the info. The other possibility is the UARTS. Sadly they're not socketed, and I really dread the idea of using a desoldering station on this thing.

View attachment 1285635
I have done repairs on a bunch of the KDF11-B CPUs... It might not be the UARTS, but the transceivers that convert the logic RXD and TXD signals to RS-232 signals levels. Check the TXD of the actual UART (6402 pin 25) to see if the UARTs are actually transmitting data. Check for +/-12V at the transceivers.

Also, depending on which boot ROMs you have, it may be in the mode of trying to boot some device... <ctrl-C> can break out of that loop and bring you to the console prompt.

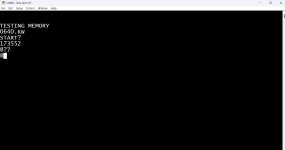
Ah, I just took a close look at the photo of the EPROMs - you have the 23-339/340-E2 ROMs... they should print a number indicating the amount of memory, and then a "?", and then wait for an input (typically a boot device identifier, like "DY0" for an RX02 floppy).
 
Last edited:
I have a board with similar symptoms. The tests pass, but the ODT is silent. It turned out that the SLUTs do not work. Apparently, the quartz is damaged, since initially the board had jumpers - take the external clock frequency. If you install a board that plays the role of an external console SLГT - you can communicate with the board.
 
I have a board with similar symptoms. The tests pass, but the ODT is silent. It turned out that the SLUTs do not work. Apparently, the quartz is damaged, since initially the board had jumpers - take the external clock frequency. If you install a board that plays the role of an external console SLГT - you can communicate with the board.
Or use an oscilloscope to work out the real cause of the problem. If it is just a quartz/crystal or more likely oscillator that is easy to source and replace.
 
If I read the manual correctly, the LED code is:

1725035130703.png

This implies (to me) that the SLU may be duff - but the same failure scenario could (as has been previously mentioned) result from a faulty SLU clock signal or signal buffer fault.

Dave
 
A scope on the console UART (E129) at pin 25 shows a brief burst of activity. I see the same burst on the console buffer input (E118 pin 3).

I see no corresponding activity on the output of the buffer (pin 6). I need to learn to use the storage feature of my scope, Just In Case.

I do see +12v on the buffer at pin 8 and -12v on pin 5, so the voltage looks correct. The baud rate crystal is on J20/J21, and that looks good.

I guess the first order of business is to replace the serial buffer. Are these known to fail? And is there a source for replacement? The prints only identify it as "9636", the stamp on the device says "UA9636ATC"
I always assume that the devices that a user can connect directly to are the most likely to be damaged by improper use...
Here you go: https://www.digikey.com/en/products/detail/texas-instruments/UA9636ACDR/562822
 
I always assume that the devices that a user can connect directly to are the most likely to be damaged by improper use...
Some can even be damaged by proper use....

I briefly used an SLU that would occasionally fry the buffers if the terminal was powered on before the computer. How that slipped through a design review is beyond me.

CW
 
Whoohoo, I replaced the RS232 driver and now I get a console prompt!

I put every board back in, but the DLV11-E causes an immediate halt. I'll look into that "soon", but for now, I have a bigger fish to fry...

I powered on both RL02 drives, and both had disk packs in them. One pack I was able to remove. Another pack seems to have a broken release handle. It never sits flush, and when I slide the "eject" lever, it doesn't lift out.

Screenshot 2024-09-04 160628.jpg
 
Last edited:
Nice work!

On the stuck RL02, the pin on the slide latch is probably out of its groove in the release mechanism. You can line them back up and get it back in by having the slide lock halfway over and the lever halfway up, then releasing them (slide lock to spring driven resting position, lever down). It takes some fiddling.

Be sure to replace the cooling air intake filter behind the fronts of the drives -- 10 years ago, mine were fine, but when I opened them for servicing this year, the foam was turning to chunks and dust!

Getting the DLV11-J going is definitely not critical with the KDF11-B in there, you get console + SLU0 for TU58 emulation onboard.
 
I'm guessing that the switch settings (on the CPU board) are such that it is trying to boot something, and fails at that address. If you set the switches to be in console mode you can enter a boot device, like "DD0" after the "START?" prompt. Apologies if you already know this stuff...
 
Last edited:
For now, I just pulled the DLV11-E out. I'll dig into the jumpers eventually. The KDF11-B has two serial ports, and the system came with a DLV11-J 4-ports, so there's no lack of ports.

I did finagle the stuck disk pack out. And thanks glitch for the reminder on replacing the filters. I just pulled them out and they basically disintegrated at the touch.

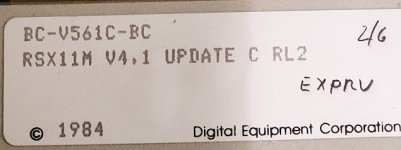
I have three RL02 packs, one of them appears to be part of a distro RSX-11M v4, and the other two appear to be copies or work disks. I'll see if I can boot everything tomorrow.

IMG_20240904_183748059.jpg
 
Clean and inspect the packs before you do anything else:


You can order the 99% isopropyl alcohol and lint-free Kimwipes off McMaster, should be there next day anywhere in NJ. It really does need to be 99%, drugstore 91% has too much water in it and will leave residue, which increases the chances of a head crash. You must use a lint-free wiper like Kimwipes or Alpha Wipes or something, paper towels will positively not do!

Clean the heads, too, of course. Lint-free swabs are best but Q-tips work fine (DEC even says so in some of their field service bulletins). Pinch the head of the Q-tip between your fingers to flatten it a little, as they come they're a little too thick to be jamming between the heads.

If there's potentially good stuff there, you may want to borrow a scratch pack from someone -- there are lots of other hobbyists with running RL02s in the northeast. You can get vtserver up and running and dump the packs you do have once you're sure everything is operating. If you really can't wait, do at least clean everything well and make sure the write protect switch is in :p
 
You can order the 99% isopropyl alcohol and lint-free Kimwipes off McMaster, should be there next day anywhere in NJ. It really does need to be 99%, drugstore 91% has too much water in it and will leave residue, which increases the chances of a head crash. You must use a lint-free wiper like Kimwipes or Alpha Wipes or something, paper towels will positively not do!
Wear nitrile gloves while doing the cleaning, unless you want really dry skin. 99% will strip the oils off your skin just as well as it will clean packs.

Do clean the four "velocity tubes" behind the front panel, and look for glue / seal disintegration where the ends of the tubes come out in the front.
 
Wear nitrile gloves while doing the cleaning, unless you want really dry skin. 99% will strip the oils off your skin just as well as it will clean packs.

RetroHacker_ and I discovered that the hard way, the first time we cleaned packs!

Do clean the four "velocity tubes" behind the front panel, and look for glue / seal disintegration where the ends of the tubes come out in the front.

Also good points. I swab the air-to-air heat exchanger with a ball of paper towels held in a long piece of insulated copper wire (think #12 AWG). I soak them in Windex, one pass usually does it unless the drive was run without proper cooling air filter changes in its service life, or if it was run with a destroyed filter/no filter at all.
 
Last edited:
Wear nitrile gloves while doing the cleaning, unless you want really dry skin. 99% will strip the oils off your skin just as well as it will clean packs.

Do clean the four "velocity tubes" behind the front panel, and look for glue / seal disintegration where the ends of the tubes come out in the front.
For sealing/resealing engine parts, I'd use some flavor of RTV silicone. But they tend to release acidic vapor when curing and afterwards whereas aquarium glue does not. Anything here to be concerned about when choosing what to use to reseal those tubes?
 
Back
Top