David_M
Veteran Member
This board came from a recycler and while not a first generation pentium board it has something to offer in the way of information
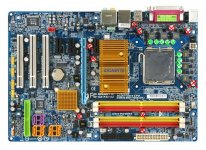
When I got it, it failed with a post code of C1, the BIOS was unable to detect the RAM installed. To solve the problem I replaced the bloated electrolytic capacitors. There were 10 in total and they are marked in red.
After replacing them the board works perfectly. The caps marked in green are solid capcitors and were fine.

I have another socket 775 that is a couple of years older, it worked for a short time and then failed and now shows no POST activity at all. This board does not use solid caps around the CPU and every one of those caps is swollen.
The capacitors I have on hand are slightly too large to fit in under a CPU cooler so I've ordered some solid capacitors that will fit to replace the electrolytics around the cpu. I fully expect replacing those caps with bring the board back to life.
So the lesson to be learned from these boards.... don't throw away a board that doesn't pass a BIOS POST test. In all likelihood $2 worth of capacitors from ebay will bring it back to life.
When I got it, it failed with a post code of C1, the BIOS was unable to detect the RAM installed. To solve the problem I replaced the bloated electrolytic capacitors. There were 10 in total and they are marked in red.
After replacing them the board works perfectly. The caps marked in green are solid capcitors and were fine.

I have another socket 775 that is a couple of years older, it worked for a short time and then failed and now shows no POST activity at all. This board does not use solid caps around the CPU and every one of those caps is swollen.
The capacitors I have on hand are slightly too large to fit in under a CPU cooler so I've ordered some solid capacitors that will fit to replace the electrolytics around the cpu. I fully expect replacing those caps with bring the board back to life.
So the lesson to be learned from these boards.... don't throw away a board that doesn't pass a BIOS POST test. In all likelihood $2 worth of capacitors from ebay will bring it back to life.
