• Please review our updated Terms and Rules here

My "new" Northstar Horizon: where to get started?

Eudimorphodon

Veteran Member
Joined
May 9, 2011
Messages
7,074
Location
Upper Triassic
It's been kind of a running joke for five years that I owned an S-100 computer that I'd never actually seen in person before. (A story primarily comprised of a long-distance adoption followed by several years of "how in the world am I going to safely ship this thing?") But now, thanks to some of the awkward circumstances our current world has imposed on traveling my Loch Ness Monster of a machine is now in my hands. And, man, I'm simultaneously excited and totally at a loss.

I haven't had any chance to clean it up so I'll save pictures of the outside, but a quick inventory of the inside:
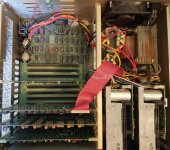
insides.jpg

Reveals four, or maybe three and a half, cards; there's a NorthStar Z80 CPU board, I think it's this one:

http://www.s100computers.com/Hardware Folder/Northstar/Z80CPU/Z80CPU.htm

A double-density Northstar controller:

http://www.s100computers.com/Hardware Folder/Northstar/MDS/MDS.htm

And a California Computer Systems 64k memory card, I think it's this one:

http://www.s100computers.com/Hardware Folder/CCS/2065 64K DRAM/2065 64K DRAM.htm

There's also a CompuPro Active Terminator plugged in:
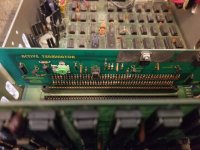
terminator.jpg

Besides the computer itself I have one copy-paper size box of manuals, a few disks, and two spare memory cards, a 16k static board that is similar but not identical to this one:

http://www.s100computers.com/Hardware Folder/CCS/16K RAM/16K RAM.htm

(It says (c)1978 JTM on the back, the positions of the switches and some other components differs slightly from the California Computer Systems board)

And a 16k Northstar dynamic board like this one (but with the parity sockets populated... but empty):

http://www.s100computers.com/Hardware Folder/Northstar/16K Dynamic RAM/16K DRAM.htm

(and for some reason the leads have been clipped on the lower voltage regulator so... broken?) I assume the 16k board is what came with the machine? Judging from some of the penciled notes in the manuals I think the machine may have been assembled from a kit instead of purchased fully built.

Anyway... I'm currently at sort of a loss how to approach resurrecting this sleeping giant. The power supply is the S-100 Linear stereotype with a transformer the size of a softball and a couple coke-can capacitors:
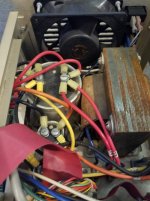
power_supply.jpg

I don't have a variable transformer available to try to slowly "preheat" it like I've seen suggested sometimes, but at the very least are there some preflight checks I can do with standard tools (IE, multimeter) to determine if it's likely to just go nuclear when plugged in? (And, also, would it be better to pull all the cards and disk power plugs for the initial power-up? Unfortunately the Northstar has active components on the motherboard, IE, serial and parallel circuitry, so I can't easily just reduce it to a bare backplane. There's kind of an intimidating spider's web of wires between those capacitors and their tie-downs on the motherboard that I haven't wrapped my head around yet.)

The next step after that is, well, I'm deeply concerned about the state of both the floppy drives and the disks I have. The disks are *really* dusty, some of them look scratched, and at least some others the plastic of the jackets is coming apart. I've tried to do some research on what the state of things is, but does anyone know if there's at this point a working solution for using a floppy emulator with the Northstar hard sector format?

According to my research so far the Horizon didn't have a boot monitor ROM by default, the CPU board just blindly jumps to the 256 byte PROM on the disk controller? I assume that PROM doesn't send anything out the serial console, so unless I by some miracle have a working CP/M boot disk and can get a drive to work I'll be flying blind from a console perspective?

... and speaking of drives, I'm sure at the very least the original drives will need belts and a lot of TLC. If a floppy emulator isn't an option, is it possible to use a later slimline 5 1/4" drive with the Northstar controller to read the original disks? (I have available the stock drive from a Tandy 1000 EX, which used standard Shugart jumpering, and I think I also have a similar vintage drive pulled from a PC clone kicking around that's old enough to be jumpered conventionally.)
 
You've been patient getting your hands on this beast. I'd suggest you exercise a bit more patience. Buy, beg, borrow, or steal a Variac or clone thereof. While you're waiting for the Variac to show up, do the cleanup and inventory you know you really should do first. Make notes of what plugs in where. Make more notes of how all the circuit boards are optioned. Then put it on the Variac and bring it up slowly as others have outlined on this board.

If you do it the way you know you should do it, and it still smokes, you know you did your best. Stuff happens.

But if you skip that Variac step and it smokes. Somebody is gonna be really upset.

And that someone is most likely to be you.
 
I don't think borrowing one is in the cards, looks like relatively low-amp China specials are around $50. Given there aren't a lot of electrolytic capacitors in the machine (I actually don't see any outside the power supply on an initial look, although I'll go through the board manuals and make sure) maybe the better part of valor would be to preemptively replace the giant ones? I actually haven't had any issues with the electrolytic caps in several other things of similar vintage, like my Commodore PETs, but the sheer size of these ones is intimidating.

There *are* a fair sprinkling of tantalum caps on both the motherboard and the Northstar-branded cards, maybe I should actually be more worried about them. Since these appear to be south of the voltage regulators is a variac going to do anything to keep them from blowing up, or if it's going to happen it's going to happen?
 
Yes, N*H cards were available as kits.

Just checkout one of the floppy disks. If memory serves me correctly, they were hard sectored - and the chance of buying hard sectored disks today is...

At one stage I only knew of one vendor selling hard sectored 5 1/4" floppy disks - and they don't anymore. They may have offloaded these further down the supply chain.

This may also limit the use of disk emulators.

Yes, the basic N*H just vectored off to the 256 byte PROM on the disk controller card - no user interface. Just a spinning disk and nothingness if it doesn't work...

But it will be a nice machine when you get it going :)!

I would be inclined to take the cards out (after first identifying where everything goes and how they are configured of course) and then remove the large electrolytics (one at a time), check them with a multimeter and (if not short-circuited or leaking/bulging) try and reform them out of the machine.

I would next make sure that the mains safety earth was good and that the transformer itself wasn't damaged by powering it up (with nothing connected to the secondaries) and checking the AC voltages with a multimeter.

Check the bridge rectifiers for short/open circuits with your multimeter and reassemble the power supply.

If you have the option of disconnecting the PSU from the motherboard - do it, and measure the unregulated DC supply rails.

Check that there are no direct short circuits on the motherboard with your multimeter.

You could also power up the motherboard via series current limiting resistors (e.g. 10 Ohms). At 5V this would limit the current to 0.5A. You could then measure the voltage developed across the resistors to ensure the motherboard was not pulling too much current.

Then, take the plunge and power up the motherboard without the series current limiting resistors and check for tantalums exploding...

That will keep you busy for a while!

Dave
 
Last edited:
That will keep you busy for a while!

Yeah, I suspect that's going to be a masterpiece of understatement before it's all over. :)

I'll track down the schematics for the power section and try to put together an action plan. Googling around I have found several blow-by-blow accounts of reviving long-dormant Northstars which should be useful. For instance:

http://www.retrotechnology.com/restore/northstars.html

and:

https://www.glitchwrks.com/2019/03/04/horizon-restore

and:

https://deramp.com/downloads/north_star/horizon/Horizon Restoration.pdf

One thing they do all have in common which gives me some optimism is the linear part of the power supply was working fine with all of them. (And I will say other than some surface rust on the transformer mine at least looks nice and clean.) But on the flip side they did all have shorted tantalums. Woot!

Yes, the basic N*H just vectored off to the 256 byte PROM on the disk controller card - no user interface. Just a spinning disk and nothingness if it doesn't work...

The deramp site has the image for a port of a Vector Graphics monitor that can go on the CPU board, if attempts to get a disk to boot meet with the failure I'm pretty sure awaits maybe I'll start there... or, more accurately, branch to that after the 37 steps it takes to get there.

(On the hard-sectoring front I have found several schematics out there for phase-locked index pulse generators to let you use soft sector media with hard-sector controllers like the Northstar, but the only reference I can find to someone using one in front of a floppy emulator is with the old Semi-Virtual Diskette. There's a very long confusing thread on the HxC forum about the status of hard sector support in that firmware family and the TL;DR seems to be that they have it mostly working on Heathkit machines but the Northstar is pickier. I wonder how hard it would be to use a Blue Pill as the start of hard sector floppy emulator... again, cart before the horse, I guess.)
 
There used to be a DIY "kit" to convert soft sector disks to hard sector. I haven't seem one of them in many decades.

Bringing back the NS power supply could be done with a couple of large power resistors in lieu of a variac, but the cost might be even higher than the variac. The large cap's used back then didn't fail often, not like the later day Chinese junk.
 
Adding the PROM monitor on the Horizon CPU board is a lifesaver when it comes to getting the machine up and running. Very simple to do with a 2716 or 2732 (as a 2716) versus the 2708 it was designed for. See https://deramp.com/downloads/north_star/horizon/roms/ZPB-A PROM Mod.pdf.

The North Star floppy controller is surprisingly reliable in its old age. Most likely you have Tandon drives in the computer. Usually you can get them going again with a bit of cleaning and WD-40 to free up the hub and stepper bearings. If the original drives don’t see salvageable, most any 5.25” full height or half-height drive will also work. For media compatibility with other North Star users you’ll want to stick with 48 tpi drives, but if that doesn’t matter, you can use 96 tpi half-height drives like the Teac 55-GFR. Only the first 35 tracks will be used and the media won’t exchange with an original drive, but you could easily have a two-drive system up and running.

I have hard sector disks (10 sector) for $20 for 10 disks if you need some. I can also write a CP/M or North Star DOS disk or two for you. You can also use the Virtual Sector Generator (see https://deramp.com/vsg.html) if you want to use soft sector media.

If you install the PROM monitor, you can create your own boot disk(s) on a “cold” machine. The advantage of writing your own boot disk is that the variables of radial and index alignment go away since your own drive will always be aligned with itself. Disk images and transfer utilities are here https://deramp.com/downloads/north_star/horizon/double_density_controller/

Mike
 
A 28C16 should be a direct replacement for a 2716.

The only difference appears to be pin 21. This is /WE on the 28C16 and VPP on the 2716.

VPP should be strapped to +5V on the 2716 socket on the N*H - which is the same as would be required for the 28C16 to read (as opposed to write).

May be worth just double-checking the relevant N*H CPU schematic to see that pin 21 is pulled up to +5V. Correction: check to ensure deramp's modification is correct for changing the 2708 option to a 2716 option...

Dave
 
I have a Northstar Horizon, and also one of the DeRamp Virtual Sector Generators. I can confirm that the DeRamp VSG works like a champ!

smp
 
The N* used good quality parts. If you don't have a variac, I have a method that isn't to hard to bring up the can capacitors. Once things are up, you can start applying power to different parts. Before doing that, make note of the tantalums and what capacitance/voltage they are. These often just blow up and there is little you can do about it. Unlike the cans, bringing them up slow does little to save them. Check that the transformer was configured for your house line voltage.
As for the cans in the power supply. Remove the floppy drive and get the cables out of the way TAKE SOME GOOD PICTURES of where the wires go and which colors they are. Loosen and disconnect wires that go through to the S100 side. Get some 100K 1/4w resistors. You should now be able to put one resistor in series with at least one of the elecrolytics can terminals, to make a current limiting for forming the capacitors. The three can electrolyics are for the unregulated rails. The large one is for the 5V rail. It usually runs at about 9 to 10 volts without a load. The two smaller ones are for the +- 12 volts. These will usually be around 18 to 20 volts.
Power the supply with these series resistors ( not connected to any loads! ). Using a DVM measure the voltage across the resistors and note it down. As time goes by the voltage should go down. This will form the capacitors. Leave it powered for up to several days. Take readings of across the resistors and note the values. When they plateau and don't go any lower, it should be safe to remove the resistors. They should get down to about a volt or so. It can take days.
before removing the resistors check the voltages on the capacitors. They should be within a few volts of the values.
N* generally does a good job except they used a lot of slip-on crimped connectors. These fail quite often. I recommend, if you are having issue with these to remove the plastic covers and solder the crimps. If the wire wiggles in the crimp, it needs to be soldered.
I restored a N* about 2 years back. I needed to solder two of the crimped wires, replace one tantulum on the motherboard's 12V line, replace both 12 volt regulators, one tantalum on one of the drives ( an axial lead one ) and one tantulum on the 5V memory board.
Dwight
 
Off the top of your head, would a 28C16 work as well? (My programmer claims to support the older 27xx series, but I don't have a UV eraser.)

The mod described in the paper ties pin 21 to +5v, so WE* on the 28C16 will remain de-asserted and the 28C16 should work fine. This assumes you can initially program the 28C16 on another device.

Mike
 
The mod described in the paper ties pin 21 to +5v, so WE* on the 28C16 will remain de-asserted and the 28C16 should work fine. This assumes you can initially program the 28C16 on another device.

Cool. Yeah, it's not the programming I'm too worried about, at least if the TL866II's device list is telling the truth about what devices it supports, it's just an EEPROM or flash device would be more convenient. Just for laughs I was looking at possibly trying to balance an SST flash chip in the PROM socket location, because I have a ton of those lying around, but without a formal adapter board putting a 32 pin chip in place of a 24 pin one looks maybe a little too awkward to be reasonable. ;)

It's probably going to take some work/time to get all set up to tear into this monster; per an earlier comment I do think one of the most important things I'm going to have to do is document its current state; among other things it has some toggle switches on the back panel wired up to various points on the motherboard and I haven't the slightest what they do yet. One of my goals eventually for this machine is to try to make my own cards for it, just for laughs, but goal number one is simply getting it breathing again.
 
The Documentation on most EEPROM's state that 10 years is the MAXIMUM Life of Data Stored in the EEPROM.
It's likely to lose the DATA after the ten year point, unlike a standard EPROM.

You might want to check it out.


Larry
 
The Documentation on most EEPROM's state that 10 years is the MAXIMUM Life of Data Stored in the EEPROM.
It's likely to lose the DATA after the ten year point, unlike a standard EPROM.

That's good to keep in mind if I settle on something I want to burn in "forever", certainly. For this situation, though, I'm thinking it's very likely that I might want to re-flash this chip a few times to experiment with different monitor programs, or in case I need to patch after discovering there's some hardware difference in how my machine is configured.

(Can always swap for a more permanent chip later, just sort of cool on having to invest in a dedicated UV light or having to leave it out in the sun for a week during the interactive stage if the electrically erasable option is available.)
 
2716s were not much more than 10 years. Also, there is no way they can ensure 10 years, either. Some times, if they don't say, minimum of 10 years, they really mean 50% failure in 10 years.
It also takes much more than a week to clear a regular EPROM in the sun, unless you are on the space station.
Dwight
 
It also takes much more than a week to clear a regular EPROM in the sun, unless you are on the space station.

The data sheet I looked at estimated three weeks, I believe?, but I didn’t want to be too melodramatic.

(Although the estimate in said sheet may have defined “erased” as “starts to lose data”, not actually clean to be reprogrammed.)
 
I put about three hours of elbow grease into the N* today; took quite a few pictures but I’m too done at the moment to curate and scale them. Some brief updates:

1: All the s100 cards look pretty clean. There’s an axial electrolytic capacitor on the cpu board that both looks and smells fishy but no catastrophic goo leak, and another polymer cap on the disk board that looks like it might have a burn mark along one side.

2: The mysterious toggle switches wired to the back panel terminate onto the patch lugs for setting serial baud rate. Took pictures but haven’t decoded what they do yet.

3: Pulled the disk drives out, they’re pretty gross, easily the worst thing wrong with the computer visually, but I’m not actually sure *what* is up with them. The aluminum (?) frame castings of the Shugart drives were covered with a white scaly corrosion/oxidation of some kind. (I’ll upload some photos later) It does wipe off with a mild vinegar solution but I’m curious what caused it. Drive spindles spin pretty freely and the belts are in one piece, but they look pretty nasty.

4: Pulled out the motherboard; there’s some nastiness going on with the solder joints; again, took pictures. It’s a tan/brown deposit in some places heavily built up around the joints. (Was really bad on the serial ports but was pretty much everywhere on the active component half of the board. Not so much on the slot joints.) It scrapes/brushes off with some elbow grease and distilled water but not easily. I wonder if it’s ancient solder flux from when the original owner put the kit together, but I’m not sure. I was afraid it might have been acid flux when I saw it but the board *looks* okay in the places where I’ve scraped it off, but if anyone has ideas what it is and how to convince it to come off without damage that’d be great.

I ran out of distilled water so cleaning of the boards is on hold.

5: Still haven’t put power on the power supply. Dumb question: Would it be safe to try putting a simple resistive load like some low voltage lightbulbs in series on the outputs to load it during a warm-up/smoke test? Have a ton of Xmas lights lying around...

6: Cleaned up the case after removing everything but the power supply with some gentle detergent, no longer smells so much like a garage.

7: Glued a spot on the wooden case that was delaminating and clamped it for a couple hours, hit the rest of it with some Pledge. It still needs love but it’s a start. Anyone know a good cleaner/polish for the front of the machine? It has some stubborn smudges and generally looks tired even after a plain wash. Found replacements in my junk drawers for the missing case top screws and two missing feet. (Replacement feet are a little shorter than the two originals still stuck on it, but better than nothing.
 
Back
Top